Review: UISP Programmer For AVR

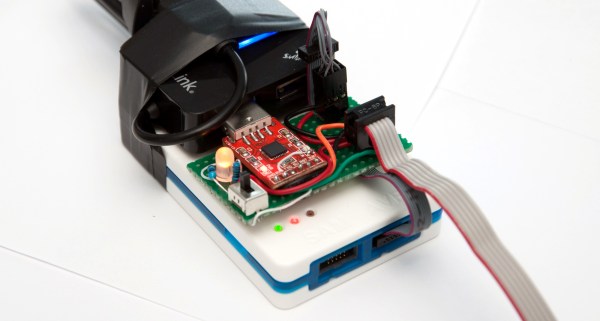
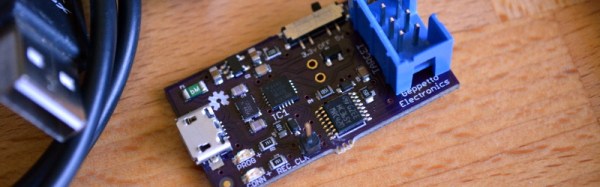
I got into AVR chips because they are easy to program, and that has become more and more true over the years with the ever-falling cost of programmers. But it’s pretty easy to make a mistake when burning the fuses on the chips and if you don’t have a proper programmer (my first programmer was a horrifyingly slow self-built DAPA cable) you’ll have a brick on your hands. This little board may be able to help in that situation. I gave the USB µISP a try this week. The half-stick-of-gum-sized board flashes firmware like a champ and includes a rescue pin for when you have clock source problems.

My full review is below. All technical information for the µISP can be found in the User’s guide. The board itself is now available to purchase in the Hackaday Store.

Continue reading “Review: UISP Programmer For AVR”

Showing An AVR Programmer Who’s Boss

[Bogdan] makes a good point. When you use a dev board you get programming, debugging, power sourcing, and usually a UART. When you go to the trouble of hooking up a programmer why don’t you get the same thing? Astutely, he points out that all you usually get with programmers is programming. So he set out to add features to the hardware he uses to program XMEGA.

The first part of the trick hinges on his use of PDI programming. This is slightly different from ISP programming. Both use a six-pin connector cable but with PDI two of these pins are unused. He took this opportunity to reroute the chip’s TX and RX pins through the cable, which now gives him an avenue to use a UART-to-USB adapter without adding any cables to his target board. Rather than add a second USB cable he rolled a USB hub into the mix. An LM1117 regulates the 5V USB rail down to 3.3V as a source for the target board.

The programmer being used is an Atmel ICE. As you might imagine he didn’t want to make permanent alterations to it. His modifications are all handled externally, with one IDC cable connecting the programmer to his added circuitry and another headed off to the target board. For now he’s jumpering RX/TX to the programming header but plans to route the signals on future PCBs.

Flashing The ESP8266 In Windows

It’s only been a few months since the ESP8266 rolled out of some factory in China, and already the community is moving from simply getting custom firmware to work on the device to making the development tools easy to use. That’s huge – the barrier to entry is lowered, getting even more people on board with this very cool Internet of Things thing.

While the majority of the community is settling on using the Lua interpreter firmware, there’s still the matter of getting this firmware uploaded to the ESP. [Peter Jennings] of Microchess fame has been working on a Windows app to upload firmware to the ESP via a serial interface. There’s not much to it, but this will allow you to upload the community-created Lua firmware, set the WiFi credentials, toggle GPIO pins, and give you the ability to write a little bit of Lua in the same window.

If you’re looking for something that isn’t designed exclusively for Windows, there’s an alternative firmware flasher over on the nodemcu Github. This flasher also connects the ESP8266 to a network and uploads firmware. It’s a stripped-down programmer without a serial terminal or the ability to toggle pins, but there are plans for making this programmer cross-platform.

AVR Programmer

Inexpensive AVR Programmer Made From Five Components

If you want to program an AVR chip as inexpensively as possible, then [Ian’s] solution might just be for you. He built an AVR programmer using only four components. This design is based on the vusbtiny AVR programmer design, with a few components left out.

[Ian’s] design leaves out two of the resistors and two diodes, leaving just four components. These include a 1.5k resistor, a small capacitor, a USB connector, a six pin header, and an ATtiny45. He admits that this may not be exactly up to USB spec, but it does work.

This is one of those projects that is really an exercise in “will it work?” more than anything else. The fact that you need to first program an AVR chip means that this wouldn’t be useful in a pinch, because you would already have to have a working programmer. Nonetheless, it’s always fun to see what can be done with as little as possible.

An MSP430 Flash Emulation Tool From An MSP430

It isn’t much trouble programming one of TI’s MSP430 chips, but outside of the official Flash Emulation Tool, TI doesn’t make programming one of these microcontrollers cheap. The most common way of programming an MSP430 is using a Launchpad Dev board, and [Vicente] has the best looking one yet.

The MSP430 series of chips can be programmed through JTAG or Spy-By-Wire, and the official, professional engineering tool from TI for these chips costs about $100. Those of us with more sense than money have another option – use one of the TI Launchpad dev boards as an MSP430 programmer.

[Vicente]’s project uses the MSP430G2 Launchpad, with just a few wires going to the proper connector found in the official programmer from TI. There are a few limitations; the programmer only works at 3.6V, so programming 1.8V devices might not be a good idea. Also, it only works with Spy-By-Wire and no JTAG support is available. Still, it’s a great looking project, and does exactly what it’s designed to.


Hackaday Links: May 11, 2014

hackaday-links-chain

North Korean drones! Yes, your local hobby shop has the same aerial reconnaissance abilities as North Korea. Props to Pyongyang for getting v-tail mixing down.

There’s nothing quite as satisfying as the look of a well laid out resistor array, and the folks at Boldport have taken this to a new level. It’s an art piece, yes, but these would make fabulous drink coasters.

Here’s something even more artistic. [cpurola] found a bunch of cerdip EPROMs and bent the pins in a weird chainmaille-esque way. The end result is an EPROM bracelet, just in time for mother’s day. It’s a better use for these chips than tearing them apart and plundering them for the few cents worth of gold in each.

[John] still uses his original Xbox for xmbc, but he’d like to use the controllers with his computer. He never uses the third and fourth controller ports, so he stuck those in his computer. It’s as simple as soldering the controller port module to a connector and plugging it into an internal USB port. Ubuntu worked great, but Windows required XBCD.

[Kerry] has modified an FT232 USB/UART thingy as an Arduino programmer before. The CP2102 USB/UART is almost as popular on eBay, a little less expensive, and equally suited for ‘duino programming. It requires desoldering a resistor and soldering a jumper on a leadless package, but with a fine solder tip, it’s not too bad.

Tag Connect Programming Headers

A Small Replacement For Large Programming Headers

No matter how small you make your embedded projects, you still need a way to program the MCU. Standard programming headers can be annoyingly large for those very small projects. [Danny] wrote in to tell us how we can save room on our PCB designs using special spring loaded connectors, rather than large headers.

There are so many small embedded development systems, such as the Trinket that still rely on standard headers. Reducing the size of the programming headers and interface headers is an issue that deserves more attention than it currently receives. Based on Tag-Connect, a proprietary connector built around pogo-style pins, your PCB does not actually require any on-board mating connector. The PCB footprint simply has test-pads that connect with the pogo-pins and holes that allow for a rock solid connection. While the Tag-Connect header is a bit expensive (it costs about $34), you only need to buy it once.

It would be great to see even smaller Tag-Connect cables. Do you have a similar solution? What about something even smaller and more compact? Write in to tell us about any ultra-compact connector solutions you have been using!