EDWARD The Vehicle Of The Future

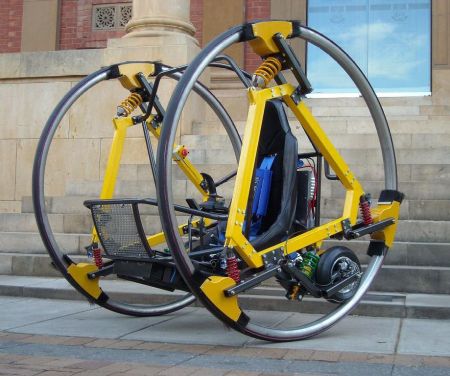
If there was a competition for coolest transportation device for the future, the diwheel would be at the top of the list with hover cars and teleportation. Over the past 3 years students at Adelaide University have been working on an Electric Diwheel With Active Rotation Damping or EDWARD.

EDWARD is an entirely electric diwheel, the operator is strapped into the bucket seat between the two large wheels with a 5 point harness and can control the machine with a gaming joystick. Full dynamic stability and slosh control allow the operator to maneuver the vehicle at up to 40km/hr, inversion control even allows you to drive upside down (if you are that way inclined). The next question is just where can we get one? Check out the video after the break for a demonstration of EDWARD in action.

Continue reading “EDWARD The Vehicle Of The Future”

Simple VGA Interface For Tiny FPGA Boards

fpga_vga_adapter

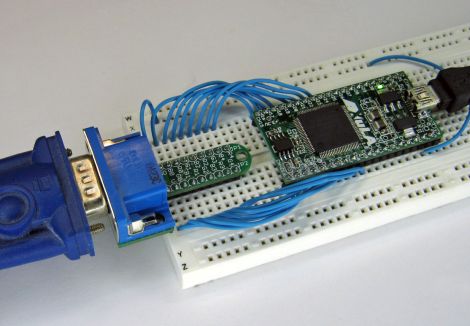
[devb] has been playing around with XESS FPGA boards for ages, and as long as he can remember, they have had built-in VGA interfaces. His newest acquisition, a XuLA FPGA board, doesn’t have any external parts or ports aside from a USB connector. He needed to get video output from the board, so he decided to build a VGA interface himself.

He prototyped a 512-color VGA interface board which worked just fine, but he thought it would be way too cumbersome to use for each and every project. To keep life simple, he designed a small PCB that integrates a VGA connector and all of the resistors he needed to get the signal from the FPGA. His boards plug directly into a breadboard, so only a handful of wires is needed to connect the FPGA to a monitor.

As you can see on his site, the adapter works quite well, allowing the FPGA to put out a crisp 800×600 image with little fuss. [devb] has also posted all of his design files on his site in Eagle format for anyone interested in replicating his work.

VGA Out On A Maple Board

The team at Leaf Labs just released a new library to demonstrate the VGA capabilities of their Maple dev board. Although it’s only a 16 by 18 pixel image, it shows a lot of development over past video implementations on the Maple.

The Maple is a great little Ardunio-compatible board with a strangely familiar IDE. We’ve covered the Maple before. Instead of the somewhat limited AVR, the Maple uses an ARM running at 72MHz, making applications requiring some horsepower or strict timing a lot easier.

We’ve seen a few projects use the increased power, like a guitar effects shield. It’s possible the Maple could be made into a game console that would blow the Uzebox out of the water, but we’re wondering what hackaday readers would use this dev board for.

Watch the video after the jump to see how far the Maple’s VGA capability has come after only a few months, or check out Leaf Lab’s Maple libraries.

Continue reading “VGA Out On A Maple Board”

Snap-together PCB Mill

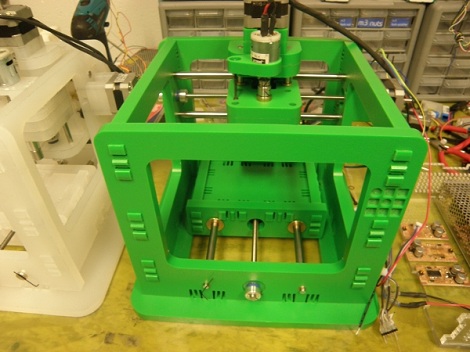
[Jonathan Ward] came up with the MTM Snap, a snap-together pcb mill as part of the Machines That Make group at MIT.

We covered [Jonathan]‘s previous work made out of half-inch plywood, but the new iteration of his PCB includes a clever snap-together mechanism instead of screws and bolts. Although the MTM Snap looks a lot like3d printers such as a reprap, the similarities end with the off-the-shelf stepper motors. Instead of using motor drivers and control electronics from a reprap, the project uses custom stepper drivers, controlled by a bare Arduino.

We’re really impressed with the results of the MTM Snap compared with what is possible on a reprap-derived milling machine like a makerbot or wolfstrap. We’re thinking that’s due to the mass of this project compared to the printed ABS parts of the ‘common’ 3d printers, but any MEs are more than happy to correct that notion.

Check out the video after the break to see the machine in action and a great view of the snap-fit mechanism.

Continue reading “Snap-together PCB Mill”

Trick Mouse Keeps The Screen Saver At Bay

mouse_wiggler

[Jerry] wrote in to share a little device he built to solve a problem he was having at work. You see, every computer in his office has a policy-enforced idle timeout, requiring the user to enter a password in order to regain access to their desktop.

This is a huge pain, since he sporadically uses an old computer for the sole purpose of monitoring some applications running in his data center. With the computer timing out every 10 minutes, he is constantly required to enter his password in order to take a 10 second glance at the screen to ensure everything is OK.

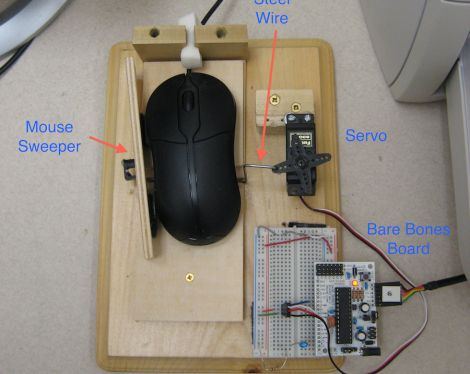
Rather than circumvent the screen saver using a local security policy or by implementing a microcontroller-based signal generator, he opted to create a mechanical solution instead. His computer’s optical mouse resides inside a wooden frame, and is periodically swept from side to side by an ATmega-controlled servo, keeping the screensaver permanently at bay.

Call it a hack, call it a kludge, call it what you will. All we know is that while we might have done it a little differently, it works just fine for [Jerry], and it generates all sorts of interesting conversation to boot.

Stick around for a quick video demonstration of his mouse wiggler box.

Continue reading “Trick Mouse Keeps The Screen Saver At Bay”

Cheap And Cheerful Arduino Breadboard Basics

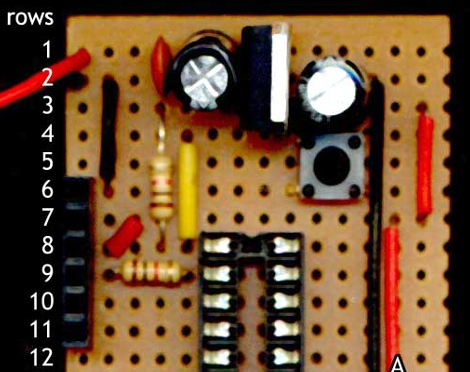
For those less experienced folks looking to move their Arduino projects to more permanent installations, this is just for you! [Martyn] Posted a three part series, VeroBoardUino, over at his blog about moving your Arduino project to a soldered breadboard.

Part one kicks off with the appropriate breadboard requirements, modifications, and a simple 7805 power supply. In the guide [Martyn]  is using strip board, so copper connections will have to be broken using a drill or just by scraping with a hobby knife. Strip board also saves a bit of wire routing in the end. Part two handles the reset button, serial connection and chip socket  (Part 2.5 has also been added to include schematics of the breadboard). Finally, part three installs the crystal and connects your Atmega chip to power and ground.

Next post he will be covering more on the software end of things, burning the bootloader and uploading programs to your new board so stay tuned for updates!

Archaeopteryx: A Large, Colorful MIDI Controller

This is [Robert Jarvis’] new MIDI controller which he has christened the Archaeopteryx. It makes its home (quite nicely might we add) in a discarded wooden cutlery case. This provides a strong and stable base for the controls while keeping the electrical connections close at hand for any rewiring or repair work.

The interface is made up of several different input devices. The guts from two Korg Nanokontrols donated the sliders and pots. These are both USB devices and they join with a USB keyboard which has been rewired to work with the colorful push buttons. All three devices connect to a hub inside which makes the device work using just one cable connection to the computer.

There’s a lot of wiring shoved into that shallow case. But if he keeps the keyboard mapping straight we think it won’t be too hard to configure the device. We like it that [Robert] included a snapshot of the back-of-the-envelope prototyping plans he made. This kind of ‘how I got there’ information is what we’re looking for when choosing projects to feature.