Adding Ambilight Clone System To Your Home Theater Just Got A Big Price Cut

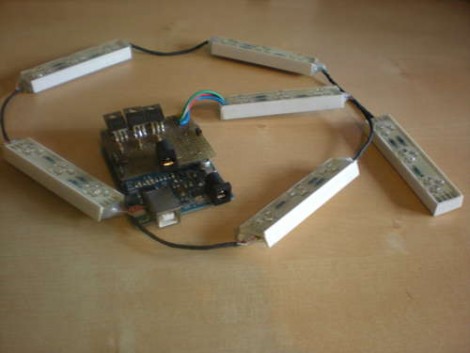
Whenever we get a tip claiming a project is cheap and easy we raise a cynical eyebrow. But [Yonsje] isn’t telling us a story, his Amiblight clone really does boil down the complexity and slash the price.

For the uninitiated, this is a clone of the Philips Amilight system that has been an option with some of their TVs over the years. It puts RGB LEDs on the back of the frame, pointed at the wall. They are tuned to the edge colors of the display, linking the color of the ambient light in the room to the colors on the screen. We’ve seen a ton of clones over the years, just search our blog for “Ambilight”.

Like the others, this iteration depends on you playing back video from a computer. [Yonsje] is using an Arduino with his own shield to connect to the HTPC. NPN transistors in the shield drive the RGB LEDs. The real cost savings is in his lighting source. A Deal Extreme RGB LED bar costs just $11.30 including shipping, and can be cut into six different segments for even spacing around your television. Check it out in the clip after the break.

Continue reading “Adding Ambilight Clone System To Your Home Theater Just Got A Big Price Cut”

Google ADK Clones Pack A Few Extra Features, Hopefully Far Cheaper Than The Original

adk_board_clone

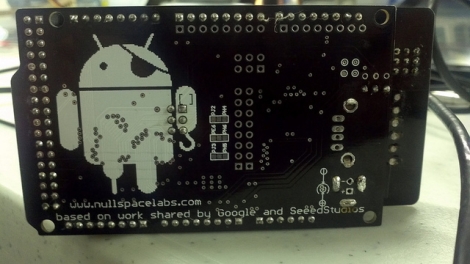
[charliex] from Null Space Labs wrote in to share a project that he and the rest of the gang have been working on over the last few weeks. The team has been remixing and building clones of the Google ADK demo board we saw earlier this year, in hopes of getting a huge batch prepped before Defcon 19.

Their version makes subtle changes to the original, such as extra header rows for Mega AVRs, higher quality RGB LEDs, and a nifty pirate-Android logo. They also added the ability for the board to send and receive IR signals allowing it to be used as a TV-B-Gone, as well as in more fruitful pursuits. The Arduino board used with the ADK has only undergone minor revisions, most of which were layout related.

[charliex] hasn’t mentioned a price for their improved ADK boards, but we’re guessing they will be substantially cheaper than the official Google version. In the meantime, check out their site for a boatload of pictures and videos of these boards undergoing various stages of construction.

Light LED’s With FIRE!

Reader [Andre] sent in a link which tells us all about this “cool” Copper Oxide Thermoelectric Generator. All you need is a bit of solid copper wire and a gas torch. Burn the wire so it gets a nice coating of oxide. From there, it is a matter of making the 2 sections of burned wire cross at a point and heat up only one of the wires. Whichever is hotter forms a cathode and whichever one is cooler is the anode.

Just one of these junctions is enough to produce a few hundred millivolts, but the author takes it a step further, well 16 steps further. He made a ring of these junctions in series, which is enough to light a bright blue LED. While the author notes that this thing is producing a considerable amount of voltage, its not producing much amperage. This could come in very handy in the future, like if you need some additional LED lighting for your camp stove.

WASP UAV Gets Some New Toys, Now Intercepts Your Phone Calls Too

wasp_drone

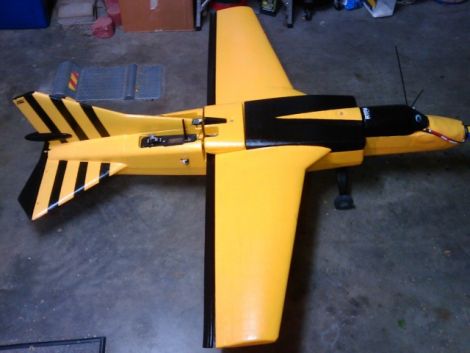
If you had the pleasure of attending last year’s DEFCON conference, you are no doubt familiar with [Mike Tassey] and [Richard Perkins]. There, the pair showed off a work in progress DIY aerial drone named WASP. Short for Wireless Aerial Surveillance Platform, WASP was impressive when we brought it to your attention last year, but the duo has spent some time completing their project, adding a few extra features in the process.

The drone still packs the same pico-ITX computer which now runs Backtrack5, and utilizes a 340 million word dictionary for cracking WiFi networks (pardon the pun) on the fly. While updated pen testing tools are well and good, the most impressive update is that the drone can now act as a standalone GSM tower. This allows the pair to trick nearby phones into routing calls through WASP before being relayed to their carrier’s network.

Once WASP is launched, the plane flies autonomously along a preset route, sniffing, hacking, cracking and gathering data until [Tassey and Perkins] summon it back to Earth. The drone is as impressive as it is scary, and we can’t wait to hear what the pair has to say about it this time around.

Continue reading to watch a video demo of WASP taking to the skies and doing its thing.

[via PopSci]

[Thanks, DainBramage1991]

Continue reading “WASP UAV Gets Some New Toys, Now Intercepts Your Phone Calls Too”

Robotic Gardener Takes Its Cue From Bomb Disposal Bots

[Dave] posted some pictures and videos of his ‘Nuntius’ robot on the Propeller forums. From the pictures it’s an impressive build, but to really appreciate [Dave]’s skill, check out the Youtube demo.

The controller is a Propeller protoboard with bits of angle aluminum fastened together. Pots are positioned at the joints of the remote’s arm so the robot’s arm can mirror the shape of the remote. We usually see Armatron bots controlled via computer, or in the rare case of human control, a mouse. [Dave]’s build just might be one of the first remote manipulator builds we’ve seen on Hack A Day.

Continue reading “Robotic Gardener Takes Its Cue From Bomb Disposal Bots”

Making The Case For In-circuit Debugging Tools

in_circuit_debugging_of_pic_microcontrollers

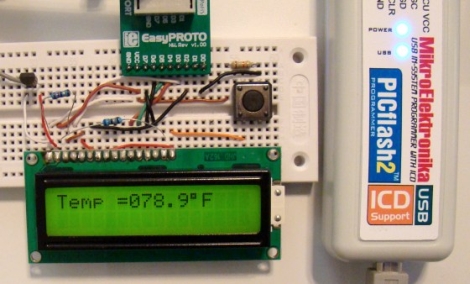
If you are in the market for a PIC microcontroller programmer, you may want to consider a model with an In-Circuit Debugger (ICD). [Rajendra] put together a great tutorial on using an ICD when debugging PIC firmware, which makes a pretty convincing argument for owning one.

In his tutorial, he happens to be using a MikroElektronika PICflash2, but he says that there are plenty of other ICDs out there if you are not keen on this particular model. The PICflash2 not only acts as an ICD, but as the name suggests it works as an ICSP as well.

[Rajendra] walks us through a short debugging session using some simple code that reads data from an LM34DZ temperature sensor, displaying the results on an LCD screen. While he isn’t actually hunting for bugs, he does show how easy it is to step through the PIC’s code one statement at a time, evaluating variables and registers along the way.

[Rajendra] does point out that using an ICD does occupy a few I/O pins while running, limiting your resources just a bit. We think that being able to debug code as it runs is pretty reasonable tradeoff if you don’t necessarily need each and every pin available for use.

Fonera-based Quadcopter Can Be Controlled From A Web Browser

fonera_html_controlled_quadcopter

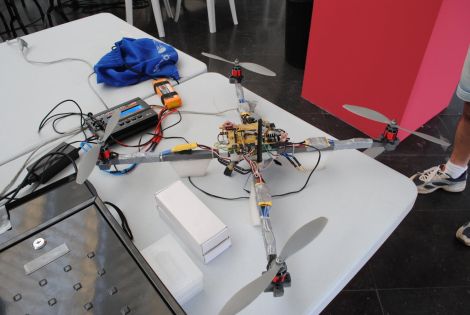
[Tiakson] just wrapped up the construction of a quadcopter which piqued our interest due to the unexpected mix of hardware he used.

A good portion of the copter is made up of the essential bits we have come to expect from a quad rotor system. Instead of using an Xbee or hobby wireless controller however, [Tiakson] opted to use an old Fonera router running OpenWRT to control the system. He wrote special software that allows him to direct the quadcopter using an HTML 5 interface, adding a few kernel tweaks along the way that enabled him to emulate I2C ports over GPIO pins.

The Fonera takes in data from Wii nunchuck and Motion+ sensors, relaying commands to the on-board PIC 16F976 microcontroller. The PIC is used to manage the electronic speed controller modules using PWM, which the Fonera could not handle on its own.

This is a great use for a old router, and the cost is obviously far cheaper than buying off the shelf wireless control modules. We would love to hear how much extra weight the Fonera adds, as well as if there is any controller lag introduced by the web-based interface.

Continue reading to see a quick demo video of the quadcopter in action.

Continue reading “Fonera-based Quadcopter Can Be Controlled From A Web Browser”