Making A Privacy Monitor From An Old LCD

privacy-screen

[dimovi] had a spare LCD monitor sitting around and thought it would be great to convert it into a “privacy” monitor.

The process is simple enough for anyone comfortable with disassembling electronics. He took apart the monitor’s plastic frame, cutting out the polarized film with a utility knife. Once the film was removed, he spent some time removing the film adhesive from the glass panel using a combination of Oops cleaner and paint thinner.

He reassembled the monitor, which now shines a bright white regardless of what is actually being displayed on the screen. He removed the lenses from a pair of theater 3D glasses, replacing the plastic with the film he removed from the monitor.

Now, [dimovi] is the only one who can see what’s he is doing on his computer, which is just the way he likes it.

While there’s not a lot of magic going on behind the process, we think it’s a neat way to reuse an old monitor.

UberFridge Helps Keep Beer Production Going Through The Dog Days Of Summer

uberfridge

[Elco Jacobs] used to let his beer ferment in the kitchen, but when things got too hot over the summer, he had to suspend his ale making for a few months. Not wanting to have to put production on hiatus again, he modified an old refrigerator into an awesome fermentation unit he calls the UberFridge.

The refrigerator features two temperature sensors, one that sits in the fermenting beer, and one that measures the temperature of the fridge. This dual probe setup offers him the ability to closely monitor the fermentation process, which he does via a sharp-looking web interface.

An Arduino serves as the PID controller, talking to a wireless router via a serial connection. The Arduino logs and relays data to the router where it can be viewed via a web browser. Not only can he keep tabs on what’s going on inside the fridge, he can reprogram the Arduino via the web interface as well.

Keep reading to see [Elco] explain the ins and outs of his UberFridge – we’re pretty sure you’ll want to build your own after you do.

[via BuildLounge]

Continue reading “UberFridge Helps Keep Beer Production Going Through The Dog Days Of Summer”

Toaster Oven Reflow Control Without Modifying The Oven

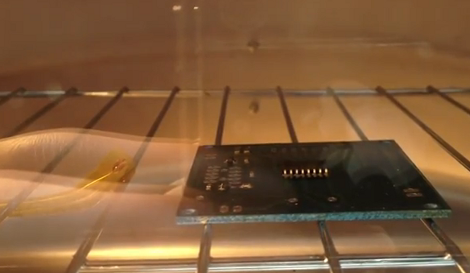
[Eberhard] wanted his own reflow oven but didn’t really want to mess around with the internals that control the heating element. He put his microcontroller programming experience to work and came up with an add-on module that controls the oven by switching the mains power.

The image above shows a board in the midst of the reflow process. If you’re not familiar, solder paste usually comes with a recommended heat curve for properly melting the slurry. [Eberhard] managed to fit three of these temperature profiles into his firmware.

The ATtiny45 which makes up the controller samples oven temperature via the thermistor seen next to the board. A PID algorithm is used to calculate when to switch mains power on and off via a relay. One button and one LED make up the controller’s user interface for scrolling through the three preprogrammed temperature profiles.

It looks like it works great, see for yourself in the clip after the break.

Continue reading “Toaster Oven Reflow Control Without Modifying The Oven”

Internet Controlled Robotic Arm

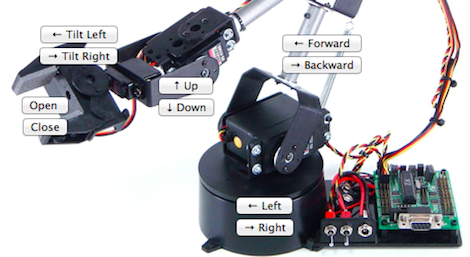
The guys over at Rusty Nail Workshop have put up an Internet controlled robotic arm for your amusement. While you’re waiting for the turkey to be done (or, you know, working), try your hand at moving some LEGO pieces around with a remote-controlled robotic arm.

The build log goes through the parts needed for the build. The arm itself is a Lynxmotion AL-5D, a heavy-duty device that’s far more capable and looks a lot better than our old Armatron.

The arm is controlled by an Arduino Uno. The Arduino is connected to the arm’s servo controller. Movement commands are received by an Ethernet shield and translated into servo commands. The entire build runs independently of a computer just like this project’s inspiration, the Orbduino.

Of course you can imagine the mayhem that would ensue if multiple people tried to take control of the robot simultaneously. A bit of code on the project’s website makes sure only one person has control of the robot at any given time. Check out what somebody else is building out of LEGO blocks with a Waldo. If you’re lucky, you’ll be able to knock that work down.

Hackaday Links: November 24, 2011

Finally an Arduino shield that does nothing

The folks at Evil Mad Scientist labs have finally created the Googly Eye Shield for Arduinos. With it’s pass-through .100 headers, it adds googly eyes to your Arduino projects. Of course, instead of in addition to the googly eyes you could add a breadboard, making it somewhat useful. A million fake internet points goes to the first person to implement Xeyes on this thing.

Phat beats from kids toys

[Ville] couldn’t afford an Akai MPC for laying down some beats. Wanting a real tactile interface, he hacked this kid’s toy. It’s just an RCA cable attached to the tiny chip inside the toy. The new line out goes to his mixers where he does some pretty impressive stuff.

Mona Lisa is Vigo the Carpathian

What did we just say about real-life Xeyes? [Geert] just made a print of the Mona Lisa follow you around the room with her eyes (Dutch, translation). The build is a pair of servos and a DIY motion capture app running on a laptop. Now we need to find a print of Vigo…

Quantifying heat sink efficiencies

[Mike] is an experimenter at heart. He was wondering about the efficiency of small, clip-on heat sinks versus the ones we use to defrost frozen food. The results are exactly as you would expect, but he did find something interesting – his experimental technique didn’t find much of a difference between thermal paste/grease/pads and no thermally conductive material.

Mini-fig sized R/C LEGO car

The guys at Brickmodder.net took a car from a LEGO set and made it remote control. The drive train and steering both use servos controlled by the smallest 3-channel receiver they could find.

Name These Parts: Verifone Payment Module Tear Down

[Jerzmacow] got his hands on this Verifone Vx570 handheld payment terminal at a flea market. It’s got a thermal printer, a magnetic card reader, and then there’s the big LCD screen and buttons. In other words, lots of parts for his hacking amusement. But first, he decided to take a look at the parts that went into the design. He carefully disassembled the device, documenting what he found along the way. He mentions that there’s a switch pressing against the underside of the LCD which disables the hardware when disassembled. So it sounds like he won’t be able to get it to work again (there’s a Lithium battery inside which we’d guess powers some type of hardware kill switch circuit).

He posted an HD video of the tear down which we’ve embedded after the break. We find some of the design to be quite peculiar. Normally we have [Dave Jones] to walk us through design choices in his EEVblog hardware reviews. Since [Jerzmacow] wasn’t able to provide that level of insight, we’d love to hear what you think each piece of hardware is for. Leave your comments, along with time-stamps from the video. Specifically, what’s up with that strange board shown at 1:51? Continue reading “Name These Parts: Verifone Payment Module Tear Down”

Fixing That Broken Laptop Power Jack

It seems that there’s a whole range of Toshiba Satellite laptop computers that suffer from a power jack design that is prone to breaking. We see some good and some bad in this. The jack is not mounted to the circuit board, so if it gets jammed into the body like the one above it doesn’t hose the electronics. But what has happened here is the plastic brackets inside the case responsible for keeping the jack in place have failed. You won’t be able to plug in the power adapter unless you figure out a way to fix it.

We’d wager the hardest part of this repair is getting the case open. Once inside, just cut away all of the mangled support tabs to make room for the replacement jack. The one used here has a threaded cuff that makes it a snap to mount the new part to the case. Clip off the old jack and solder the wires (mind the polarity!) and you’re in business.

Anyone know why we don’t see more of the magnetic connectors (MagSafe) that the Apple laptops have? Is it a patent issue?

[Thanks Dan]