Solder Trick To Make Your Own Surface Mount Breakout Boards

surface-mount-breakout-trick

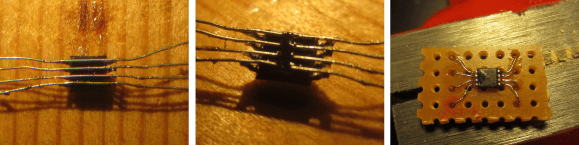
We think you’re really going to enjoy this trick for making surface mount breakout boards. It’s common to use magnet wire to connect individual pins of a surface mount part to breadboard friendly protoboard with pin headers. What’s new here (at least to us) is that [Raul] solders one wire to both pins directly across from one another.

The image at the left shows an eight pin part with four wires soldered in place. To get to this point he first taped the wires down to a work surface being careful to space them to match the pitch on the chip’s leads. He then tapes the chip in place and solders all of the legs to the wires. This seems to kill two birds with one stone as aligning one wire to one leg is tough. From there he flips the chip over and cuts the wire spanning under it. This leaves an easy job of soldering the trailing side of the wire to a hunk of protoboard.

It’s perfect for chips with a small number of pins. Of course you may still want an etched breakout board for something with a ton of leads.

Signmaking In Glass And Gold

Signmaking today isn’t what it once was. Where today a few vinyl letters stuck to a piece of plate glass is good enough for any storefront, there was a time when the signs in front of businesses were works of art involving many skills and dozens of tradesmen to create. [David Smith] is one of the last remaining old-school signmakers, and his creations are just as beautiful as the finely crafted signs of a century ago.

The techniques [David] uses to create his signs are as varied as the finished products are elegant. He cuts patterned grooves into glass with wheels made of diamond or ceramic and bends shaped glass over forms in a very large kiln.

Aside from cutting, shaping, and grinding glass, [David] also paints his signs – on the back side in reverse, building up his design layer by layer. The very first layer in some of his designs are gold leaf, a difficult material but [David] invented his own leaf applicator that makes the job much easier.

Truly amazing works of art, and certainly much more elegant than whatever plastic nonsense goes as proper signmaking these days.

Continue reading “Signmaking In Glass And Gold”

Build A Waterproof Music Controller On The Cheap

shower-controller-for-music-playback

[Aaron] wrote in to show off the waterproof music controller (translated) he just finished building. He uses it in the shower — which makes us wonder how long he’s spending in there. We could also see it being useful by the pool, on the beach, or anywhere else that you need a cheap and easy control system.

His computer plays tunes while he’s getting ready for the day. This means he was able to use an inexpensive wireless keyboard for control. The donor keyboard has dedicated music control keys which he carefully traced to the PCB before removing the flexible sheets that detect key presses. Next he found a water tight food container and sized his protoboard to fit. You can see his button layout above. Holes were cut in the lid of the container, with a plastic membrane glued on the underside. This will keep the water out while still allowing him to actuate the momentary push switches.

Most mobile devices will work with wireless keyboards. If your car is nearby just hook your phone to the stereo and control it with this rather than building a dedicated beach stereo system.

How To Build A Tron Bar That Daft Punk Would Hang Out At

tron-bar-daft-punk

Sure, the bar in this image looks pretty neat. But the video showing off its synchronization with the music brings it to the next level. The flashing lights and EL wire put on a quite a show that may make the bartenders feel like they’ve already had a few too many.

The most amusing part of the project is that it all started from that half bookcase mounted on the wall. [Alexander Givens] and his roommate decided to augment its usefulness as a liquor cabinet by building a bar around it. But why stop there? LED Strips and 120 feet of elecroluminescent wire give the bar its inner glow. The illuminated lines are obvious, but the LED strip locations may not be. Several of them light the shelves hosting liquor and glass wear. The bartop itself is made of glass, filled with 75 pounds of marbles, and lit from underneath by the rest of the strips.

An Arduino Mega with an EL shield drives the system. The guys built a rudimentary control interface that looks partially spill tolerant. It’s located just under the inside lip of the bar.

Their costumes came out pretty well too. But with a built-in centerpiece like this they may want to upgrade to a more accurate replica.

Continue reading “How To Build A Tron Bar That Daft Punk Would Hang Out At”

TI’s CC3000 WiFi Chip Gets A Library

About six months ago, Texas Instruments released a simple, cheap, single-chip WiFi module. At $10 a piece in quantities of 1000, the CC3000 is a much better solution to the problem of an ‘Internet of Things’ than a $50 Arduino Ethernet modules, or even the $30 Electric Imp. All indications, especially the frequent out of stock status for the dev board on TI’s web site, show the CC3000 will be a popular chip, but until now we haven’t seen a CC3000 library for the Arduino or other microcontrollers.

[Chris] just solved that problem for us with a CC3000 WiFi library for the Arduino. He ported TI’s MSP430 CC3000 library to the Arduino, allowing even the bare-bones Arduino Uno to connect to a WiFi network with just a handful of parts. The code itself takes about 12k of Flash and 350 bytes of RAM, giving anyone using the CC3000 enough room left over to do some really interesting stuff. There’s even a slimmed down library that uses somewhere between 2k and 6k of Flash, making an ATtiny-powered web server a reality.

There are a few caveats in using the CC3000 with an Arduino; it’s a 3.3 Volt part, so you’ll need a level shifter or some resistors. Also, the chip draws about 250 mA when it’s being used, so you’ll need a beefy battery if you want your project to last an entire day of use.

Now that the library is out of the way, be on the lookout for a CC3000 breakout board. Here’s one, but expect some more on the market soon.

Lots Of Seven Segment Displays With A Single ATtiny

7seg

These days they’ve been replaced with character LCD displays or even brightly colored graphical displays, but if you’re trying to display data on one of your projects, there’s nothing like the classic red glow of a red seven segment display. [five volts] got his hands on a few ancient segmented displays, but controlling even one took up more microcontroller pins than he was ready to spare. The solution to this problem was to use a shift register and control multiple segment displays with an 8 pin microcontroller.

[volts] is using an ATtiny13 to control six seven segment displays. Each display is mounted on a hand-etched board, with a shift register and a handful of resistors soldered to the back. By having the microcontroller shift bits down the line, [volts] created an extremely easy to interface 6-digit segment display, and the entire device can be expanded even more.

The board files and schematics are available on [volt]’s project page. A great project if you’re just starting out to etch your own boards.

16 Core Computer Made Of ATMegas

Your desktop has two, four, or even eight cores, but when’s the last time you’ve seen a multicore homebrew computer? [Jack] did just that, constructing the DUO Mega, a 16 core computer out of a handful of ATMega microcontrollers.

From [Jack]’s description, there are 15 ‘worker’ cores, each with their own 16MHz crystal and connection to an 8-bit data bus. When the machine is turned on, the  single ‘manager’ core – also an ATMega328 – polls all the workers and loads a program written in a custom bytecode onto each core. The cores themselves have access to a shared pool of RAM (32k), a bit of Flash, a VGA out port, and an Ethernet controller attached to the the master core.

Since [Jack]’s DUO Mega computer has multiple cores, it excels at multitasking. In the video below, you can see the computer moving between a calculator app, a weird Tetris-like game, and a notepad app. The 16 cores in the DUO Mega also makes difficult calculations a lot faster; he can generate Mandelbrot patterns faster than any 8-bit microcontroller can alone, and also generates prime numbers at a good click.

Continue reading “16 Core Computer Made Of ATMegas”