360° Photography Made Easy

rotate

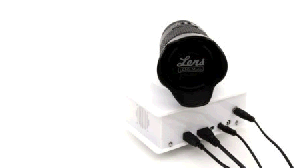
The graphic above wasn’t painstakingly stitched together by rotating a camera lens on a lazy suzan a tiny bit, taking a picture, and repeating the process fifty times. This is high tech stuff, courtesy of Zcapture, a tool for automated 360 degree photography of small objects.

For the last 15 years, [Jared] has been spending a lot of time on eCommerce and found existing solutions to displaying products online to be very lacking. After playing around with the Basic Stamp eight years ago and most recently the Arduino, [jared] decided he would build something to solve his problem – an automated box that takes pictures of a rotating product.

Inside the Zcapture is an Arduino connected to a motor and the software to control Canon and Nikon DSLRs. Put the Zcapture in a soft box, light it up, set up your camera, and you have a computer-controlled lazy suzan robot that will take pictures of any object, then stitch them together into an animated GIF or a fancy eCommerce rotating image viewer

Free Hackaday Stuff At Next Week’s Open Hardware Summit

supply-frame-at-ohs-2013

If you’re headed off to the Open Hardware Summit next week we’ve got some free swag for you. Readers paying any attention know that Hackaday was acquired by Supply Frame over the summer. There had been some nervousness in the comments about what this all means. But I think you’ll agree it’s a good sign that Supply Frame is one of the major sponsors of the event at the ‘FANATIC’ level.

Several of the Supply Frame guys will be attending (which makes me jealous since I want one of those ePaper display badges so badly!). Details haven’t quite firmed up yet, but we believe there will be a Supply Frame booth were you can stop by, chat, and see if they’ve got any Hackaday T-shirts left to hand out.  I don’t think they’ll run out of stickers so you won’t go away empty handed.

Also ask them for a beta code for the hush-hush new online tool which they’ve been working on. I got a preview when I visited their headquarters in Pasadena last week. It’s something that EE and hobby electronics enthusiasts will appreciate as it simplifies the planning and part choosing process of a design. Actually, now that I think of it, it solves a problem I’ve heard [Dave Jones] rant about before on the Amp hour. Obviously I’m under a bit of an info embargo until they get the service fully online but I’m sure we’ll cover it once they do. Incidentally, one of the devs on this project — [Ben Delarre] — founded CircuitBee.

Our own [Eric Evenchick] will be on hand as well. He’s still networking for future employment so you might not find him just sitting at the SF booth. He will have Hackaday stickers to hand out as well since I felt bad about not sending swag along with him to Def Con. Look for his recollection of the event once it is all wrapped up.

Worry not if you can’t attend OHS. [Brian Benchoff] is planning a trip to World Maker Faire later in September and he’ll be packing a stash of freebies as well!

Cooling Fan Speed Controllers Do It By Generating Heat

cooling-fan-speed-controllers

We’ve never torn one apart ourselves, but it boggles the mind just a little bit to learn that these cooling fan controllers generate heat to do their job. We’d bet we’ll get shouted down in the comments, but doesn’t this seem counter-productive?

At any rate, we enjoyed reading two posts on this topic. [Göran’s] first adventure with the hardware started when he was trying to design his own speed controller. He saw a reference design in the LM7805 linear regulator datasheet which allows the adjustment of the output by changing the ground reference. When fed with 12V this ends up putting off some heat but it is a simple and reliable solution. He was a bit surprised to crack open a Zalman module and find the exact same circuit inside.

The controller in the background is an eBay purchase. He cracked that one open as well (that’s the link at the top) and found a circuit with a linear regulator in it, but this time it was a TL431 adjustable regulator. So here are our questions: Which one of these two is better and why. And can you do it relatively inexpensively without generating as much heat?

[Ken Shirriff] Completely Reverse Engineers The 1974 Sinclair Scientific Calculator

Wow. Seriously… Wow! The work [Ken Shirriff] put into reverse engineering the Sinclair Scientific is just amazing. He covers so much; the market forces that led [Clive Sinclair] to design the device with an under-powered chip, how the code actually fits in a minuscule amount of space, and an in-depth look at the silicon itself. Stop what you’re doing and read it right now!

This calculator shoe-horned itself into the market when the HP-35 was king at a sticker price of $395 (around $1800 in today’s money). The goal was to undercut them, a target that was reached with a $120 launch price. They managed this by using a Texas Instruments chip that had only three storage registers, paired with a ROM totaling 320 words. The calculator worked, but it was slow and inaccurate. Want to see how inaccurate? Included in the write-up is a browser-based simulator built from the reverse engineering work. Give it a try and let us know what you think.

Now [Ken] didn’t do all this work on his own. Scroll down to the bottom of his post to see the long list of contributors that helped bring this fantastic piece together. Thanks everyone!

[Thanks Ed]


PlayStation 3 Analog Audio Out Hack

ps3-analog-audio-out

Here’s the scenario: You’ve got the rage to play som CoD (we’re more GTA fans but whatever) but the monitor you’re going to play on has no speakers. You can get a crystal clear image using HDMI, but getting sound is a different matter. What’s the fix? Crack open your PS3 and solder on some audio connectors.

[Paul] knew there is a special cable that breaks out analog audio. Like original Xbox hacking of ages past, there is now plenty of information online about the internals of these machines. He grabbed a copy of the A/V pinout and found the analog audio pins. After soldering on this pair of RCA cables he cut savaged a hole in the case and put the console back together. The machine he’s working with is a salvaged unit with no Blu-ray drive — he links to his past posts on the repair process. You may be thinking what good is it without an optical drive? Remember, this is the beginning of the Internet age… everything is downloadable.


Disabling Under/over Voltage Protection On ATX Power Supplies

voltage

[C] just recently put together a RepRap. Not wanting to spend the money on a dedicated power supply, he looked around for a cheaper solution and found one in an off-the-shelf ATX computer power supply. These ATX supplies are actually a little finicky when not used in a computer, as [C] found, with voltage drops on the +12 line even when a load is connected to the supply. Undeterred, [C] eventually solved this problem by cutting some traces and grounding a few pins on the protection circuit.

The ATX supply [C] used could supply 25 amps on the 12 volt rail, more than enough for a simple RepRap. There was only one problem: the supply would randomly shut itself off, ruining the print. After a little googling, [C] found some people powering 12 volt amplifiers that were running into the same problem. Their solution was to ground a few pins on the protection circuit. Their supply wasn’t quite like [C]’s so he had to do a little experimentations.

It took a few iterations to get right, but [C] managed to figure out exactly which pins on the “power supply supervisor” IC must be grounded to disable the undervoltage protection. With these pins grounded, the protection circuit of the supply is completely disabled, giving him and uninterrupted 25 amps at 12 volts. If you’re looking for a cheap source of power, it would be hard to go wrong with [C]’s tutorial and his power supply of choice.

Bluetooth Low Energy Weather Lamp

bluetooth_low_energy_ble_weather_lamp

This is a well-executed proof of concept which [Aaron Jeromin] threw together in a couple of hours. This lamp hosts a Bluetooth Low Energy weather display. The project was a way for him to get used to using the BLE module. But to make the most out of that hardware this should really be refined into an actual low energy circuit. We do think the timing is perfect to feature this project since we just looked at a BLE primer yesterday.

He’s using a BLE Mini board from RedBearLab. It uses a Texas Instruments CC2540 SoC. We’d love to see a follow-up that does away with the Arduino in lieu of code running on the TI chip. But we would have done the same thing (use the uC we were most familiar with) when testing the BLE board out for the first time. It gets weather data from an iPhone. The forecast is projected as one of three icons using an LED bulb and a stencil which is positioned by a hobby servo.

Other inanimate objects that can tell you if it’s storming include this color-coded umbrella stand.

Continue reading “Bluetooth Low Energy Weather Lamp”