Umbrella Turned Delta Kite

How many broken umbrellas have you thrown out in your life? [BigApe] has come up with a novel way to reuse them, by turning them into kites.

The beauty of the build is in the MacGyver-style material list. Apart from a few store bought 8mm aluminum and plastic tubes, the majority of the build is out of other scraps that you can easily find around the house. Spokes from a broken bicycle wheel, plastic from a CD case, elastic bands, yarn, some washers, an empty hair gel tube, the list goes on… We really have to give him credit on the creative material choices!

Now before you get too excited, this project does involve quite a bit of sewing, so a sewing machine would be quite handy. Other than that, only basic tools such as pliers, scissors, punches, matches, drill bits, and a saw, are required.

The finished product ends up being a bit heavier than most similar sized consumer-grade delta kites, but [BigApe] achieved some kite-like flight out of it in low wind speeds. He promises to post a test video when it gets a bit windier to prove his design.

On the topic of kites, earlier this year we covered a remote-controlled, autonomous, power generating kite!

Passive Bluetooth Keyless Entry System

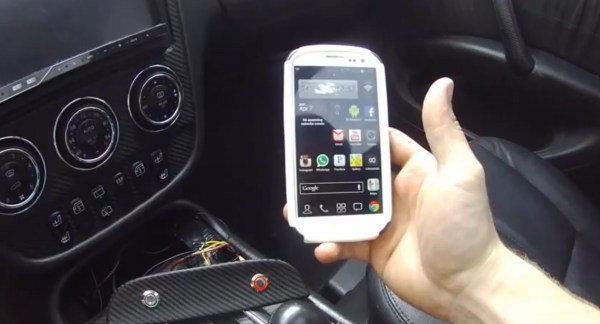
Modern smart keys allow you to keep the key fob in your pocket or purse while you simply grab the handle and tug the door open. [Phil] decided he would rather ditch the fob altogether and instead implemented a passive Bluetooth keyless entry system with his Android phone. It’s probably unlikely for car manufacturers to embrace phone-based keys anytime soon, and [Phil] acknowledges that his prototype poses a landslide of challenges. What he’s built, however, looks rather enticing. If the car and phone are paired via Bluetooth, the doors unlock. Walk out of range and the car automatically locks when the connection drops.

His build uses an Arduino Mega with a BlueSMiRF Silver Bluetooth board that actively searches for his phone and initiates a connection if in range.  Doors are unlocked directly through a 2-channel relay module, and an LED indicator inside the vehicle tells the status of the system. A pulsing light indicates it’s searching for the phone, while a solid ring means that a connection is established.

We hope [Phil] will implement additional features so we can make our pockets a bit lighter. Watch a video demonstration of his prototype after the break, then check out the flood of car-related hacks we’ve featured around here recently: the OpenXC interface that adds a smart brake light, or the Motobrain, which gives you Bluetooth control over auxiliary electrical systems.

Continue reading “Passive Bluetooth Keyless Entry System”

Hackaday Links: September 29, 2013

hackaday-links-chain

We would be remiss if we didn’t mention that all of SparkFun’s open source hardware is now on Upverter.

Not wanting to tie up an iPad as a mini-gaming cabinet [Hartmut] hacked an Arcadi cabinet to use EUzebox instead.

Time travel happens in the bedroom as well. But only if you have your very own Tardis entrance.  [AlmostUseful] pulled this off with just a bit of word trim and a very nice paint job. [via Reddit]

[Pierre] tricks an iPhone fingerprint scanner by making a replica out of hot glue.

Some of the guys from our parent company were over in Shanghai on business. [Aleksandar Bradic] made time to visit the Shanghai hackerspace while in town and wrote about the experience over on their engineering blog.

[Gregory Charvat] is a busy guy. In fact we’ve got a juicy hack of his saved up that we still need to wrap our minds around before featuring. In the mean time check out the Intern-built coffee can radar that he took over and tested on a  multi-million dollar Spherical Near Field Range.

And finally, everyone loves coffee hacks, right? Here’s what [Manos] calls a Greek style instant coffee machine.

Inside The Clapper

clapper

Hackaday readers above a certain age will probably remember the fabulously faddish products developed by Joseph Enterprises. These odd gadgets included the Ove’ Glove, VCR Co-Pilot, the Creosote Sweeping Log, and Chia Pet (Cha-Cha-Cha-Chia) as mainstays of late night commercials, but none were as popular as The Clapper, everyone’s favorite sound-activated switch from the 1980s. [Richard] put up a great virtual teardown of The Clapper, that provides a lot of insight into how this magic relay box actually works, along with some historical context for the world The Clapper was introduced to.

Sound activated switches are nothing new, but the way The Clapper did it was just slightly brilliant. Instead of listening to every sound, the mic inside the magic box sends everything through a series of filters to come up with a very narrow bandpass filter centered around 2500 Hz. This trigger is analyzed by a SGS Thompson ST6210 microcontroller ( 4MHz, ~1kB ROM, 64 bytes of RAM, and 12 I/O pins ) to listen for two repeating triggers  within 200 milliseconds. The entire system – including the source code for the MCU – can be seen in the official patent, US5493618.

The Clapper sold many millions of units at a time when a lot of homes were assuredly in a pre-microelectronics world. Yes, in 1986, a lot of TVs had microcontrollers and maybe a washer/dryer combo may have had a few thousand transistors between them. Other than that, The Clapper was many household’s introduction to the ubiquitous computing power we see today, and all with less capability than an Arduino.

50″ Multitouch Table Is Expensive, Indestructable

50inchMultiTouch

Wander through a well-funded museum these days and you’re likely to find interactive exhibits scattered around, such as this sleek 50″ projection-based multitouch table. The company responsible for this beauty, Ideum, has discontinued the MT-50 model in favor of an LCD version, and has released the plans for the old model as part of the Open Exhibits initiative. This is a good thing for… well, everyone!

The frame consists of aluminum struts that crisscross through an all-steel body, which sits on casters for mobility. The computer specs seem comparable to a modern gaming rig, and rely on IEEE1394 inputs for the cameras. The costs start to pile up with the multiple row of high-intensity infrared LED strips, which can run $200 per roll. The glass is a custom made, 10mm thick sheet with projection film on one side and is micro-etched to reduce reflections and increase the viewing angle to nearly 180 degrees. The projector is an InFocus IN-1503, which has an impressively short projection throw ratio, and a final resolution of 1280×720.

The estimated price tag mentioned in the comments is pretty steep: $12k-16k. Let us know with your own comment what alternative parts might cut the cost, and watch the video overview of the table below, plus a video demonstration of its durability. For another DIY museum build, check out Bill Porter’s “Reaction Time Challenge.

Continue reading “50″ Multitouch Table Is Expensive, Indestructable”

Project Thumper Walkthrough

ScreenShot029

The Geek Group is at it again! Many years ago they built Project Thumper, a 1,600V @80,000A electrical impulse … well … “thumper”.

For those of you that don’t know, The Geek Group is the world’s largest not-for-profit Hackerspace. Lately they have been working on developing better videos for their YouTube channel, and have just released a stunning CGI animation of the build, operation, and explanation of Project Thumper.

So what is Project Thumper? In the simplest terms, it’s a giant capacitor, or more specifically, an entire server rack filled with capacitors. The Hackerspace uses it for experiments and demonstrations — but from the looks of their videos, they mostly just use it to blow things up, as shown in their 2008 Project Promo video. I think we would too. They even used it to blow up an iPhone! (Skip to 3:00 for the explosion). We think someone with a high-speed camera really needs to film Thumper in action!

The awesome CGI animation explanation of it is after the break.

Continue reading “Project Thumper Walkthrough”

Upgrading Cordless Drill Batteries To Lithium

Cordless power tool battery replacements are expensive: you can easily spend $100 for a NiCd pack. [henal] decided to skip nickle-based cells and cut out the middleman by converting his old cordless battery packs to inexpensive hobby lithium cells. These batteries appear to be Turnigy 3S 1300mAh’s from Hobbyking, which for around $10 is a great bargain. As we’ve explained before, lithium batteries offer several advantages over NiMH and NiCd cells, but such a high energy density has drawbacks that should be feared and respected, despite some dismissive commenters. Please educate yourself if you’ve never worked with lithium cells.

[henal] gutted his dead battery packs and then proceeded to prepare the lithium replacements by soldering them to the cordless pack’s power connectors. To keep charging simple, he also branched off a deans connector from power and ground. After cutting some holes in the pack for access to the balancing connector and deans connector, [helan] went the extra mile by soldering on a DIN connector to the balancing wires, which he then securely glued to the side of the case.

We’ve featured lithium power tool replacements before, and these Turnigy packs pose the same problem: they don’t appear to have any low voltage cut-off protection. Check out some of the comments for a good solution.