Home Made CNC Reuses Printer Parts

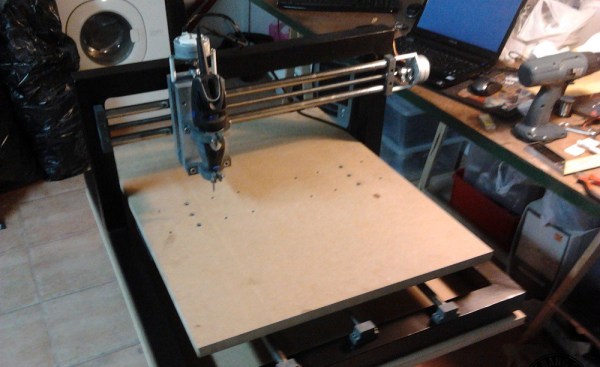
Do it yourself CNC machines can be never ending projects. Once you get one machine done, you want another. [Mario] found this out when he started work on his second CNC machine, TheMaker2. As its name implies, TheMaker2 is the successor to TheMaker1. It seems that [Mario] was trying to walk the fine line of precision at minimal cost. He wanted a rigid frame, so he chose to go with a moving table, rather than the moving gantry of TheMaker1. The frame is made up of galvanized steel stock, which makes it much stronger than many DIY CNCs out there. [Mario] had a friend weld the steel up for him, we hope he took the proper precautions when welding galvanized material.

Standard threaded rod was used as lead screws, with some very well made anti backlash nuts. Acme thread would have been a better choice here, however [Mario] doesn’t say if acme stock was available to him. Most of the mounts and small parts are made from easily worked PVC sheet stock. Precision rails were scavenged from old Ricoh copiers. Epson printers provided the tubing which became motor couplers.

One negative in this build are the stepper motors. [Mario] used NMB PM55L-048 motors he had pulled from HP printers. These motors have both a wide step angle (7.5 degrees) and a rather anemic torque. Thankfully [Mario] mentions upgrading NEMA 23 motors in the comments of TheMaker2’s instructables page.

Have A Router? Build A Skeeball Machine

skee

There are a lot of hackerspaces and maker labs all around the world that have amazing capabilities for manufacturing. Mills, lathes, drill presses, laser cutters, and CNC routers are no stranger to the any maker’s arsenal of tools. Do you know what isn’t? A DIY Skeeball machine.

This, ‘should be a project for every hackerspace’ project is the brainchild of [fungus amungus] over on Instructables. Despite what you might think about the complexities of building a Skeeball machine, [fungus’] build is actually rather simple, and also easily transportable.

The main material used in the build is seven sheets of 3/4″ plywood. These sheets were cut out on a ShopBot CNC router, and held together with screws in a tab-and-slot construction scheme. The playfield is covered with cork for what we assume is a proper Skeeball experience, and all the electronics controlled by an Arduino and Laptop.

The electronics for this build are very simple – just a few IR distance sensors mounted under the holes. The laptop is running a Processing sketch to display the score on a TV above the cage, allowing for some improvements in the gameplay and scoring system of the original Skeeball machines.

It’s a really fantastic project, and something that we’re sure will be the center of attention wherever [fungus] brings it.

Continue reading “Have A Router? Build A Skeeball Machine”

Why Kickstarter Projects Are Always Delayed

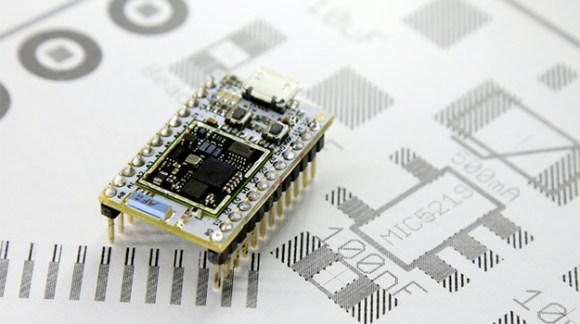
Most Hackaday readers may remember the Spark Core, an Arduino-compatible, Wi-Fi enabled, cloud-powered development platform. Its Kickstarter campaign funding goal was 10k, but it ended up getting more than half a million. The founder and CEO of Spark [Zach Supalla] recently published an article explaining why Kickstarter projects are always delayed as the Spark core project currently is 7 weeks behind schedule.

[Zach] starts off by mentioning that most founders are optimistic, making them want to embark in this kind of adventure in the first place. In most presentation videos the prototypes shown are usually rougher than they appear, allowing the presenters to skip over the unfinished bits. Moreover, the transition from prototype to “manufacturable product ” also adds unexpected delays. For example, if a product has a plastic casing it is very easy to 3D print the prototype but much harder to setup a plastic injection system. Last, sourcing the components may get tricky as in the case of Spark core the quantities were quite important. Oddly enough, it was very hard for them to get the sparkcore CC3000 Wifi module.

Electrooculograph (EOG) From A Video Stream

[Michael] from Lucidcode is at it again, this time with an Android app called Halovision.

In case you don’t remember, this is the guy who has been working on the Lucid Scribe Project, with the end goal of communicating from inside your dreams! Here’s the basic gist of it. If we can use a sensor to detect REM (rapid eye movement) or body movement during sleep, we can tell if we’re dreaming — then it’s just a matter of using an audible cue to inform the sleeper of the dream, so they can take control and become lucid.

The first way they did this was by using commercial EEG headsets to detect REM. We covered a hack on modifying one so it would be more comfortable to wear at night, but what is really exciting is [Michael’s] new app, Halovision — No EEG required

It’s an Android app that uses the camera to detect movement during sleep, and it is only the first plugin planned for Lucid Scribe. The algorithm is still in its experimental stages, but it is at least somewhat functional at this time. They note it’ll only work for day-time naps or with a bright night light, but this could be easily solved with an IR webcam and a few IR LEDs.

It will be interesting to see where this all goes, has anyone else been following or participating in Lucid Scribe?

A DIY Solution For Controlling Robots And Quadcopters

RC

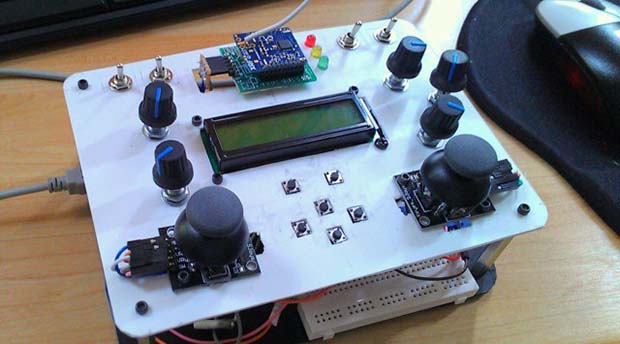
RC transmitters used for controlling robots, quadcopters, airplanes, and cars really aren’t that complex. There are a few switches, pots, a screen and a radio transmitter. The maker toolbox already has all these components, so it only makes sense someone would try to build their own RC transmitter.

[Oscar]’s project started by gathering a bunch of toggle switches, 2-axis joysticks, pots, tact switches, an Arduino, LCD, and a Ciseco XRF wireless module. These were attached to a front panel made of polystyrene and work on the communications protocol began.

It should be noted that microcontroller-powered RC transmitters with XBees is nothing new. There was a Kickstarter for one last year, but the final product turned out to be bit janky and full of fail wiring, We’re really glad to see [Oscar]’s attempt at a DIY RC transmitter, and hopefully we’ll see this project taken up and improved by others.

Continue reading “A DIY Solution For Controlling Robots And Quadcopters”

New Ads – Please Whitelist Hackaday On Adblock

adblock-plus-whitelist

If you’ve been watching very closely you may have noticed that our ads have changed. If you didn’t know we run ads, I’m asking you to consider whitelisting Hackaday.com in your advertisement blocking browser plugin.

The plan to transition to advertisements which are more targeted for our interests was mentioned back in July, when Hackaday was purchased by SupplyFrame,  I say ‘our’ interests because the companies who have signed up so far are ones with which I have personally done business when hacking my own projects. These include the manufacturers: Atmel, Microchip, NXP, and Texas Instruments as well as distributors: Arrow Electronics, Element 14, Mouser, and RS Components. The ads are in the exact same places as they have always been, at the same size, with the core belief that on-page advertising should be entirely unobtrusive. If you find the ads to be otherwise, please do let us know about it (screenshots are helpful!).

Hackaday highlights a steady stream of project features every single day. These are the best engineering-oriented hacks the web has to offer. There is some cost involved in do this, which we cover by including advertisements on our pages. Please don’t block the ads. If you haven’t been blocking, thank you! If you do use an Ad blocker, I certainly understand that you want to get away from ads that automatically play audio, flash annoying colors, or include inappropriate content. Our ads don’t do this. Please throw us a bone by adding our domain to your “whitelist”. This is very simple, and after the break I’ve included the instructions for doing so with Adblock Plus.

Continue reading “New Ads – Please Whitelist Hackaday On Adblock”

Tre: When Arduino Meets Beagle Bone

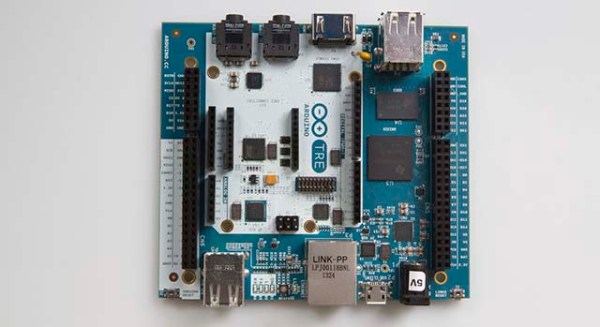
Although yesterday saw the announcement of an x86-based Arduino powered by an Intel chip. This may have not been the big story to come from [Massimo] at Maker Faire Rome. Announced along with the x86 Arduino Galileo was the Arduino TRE, a collaboration between Arduino and the BeagleBoard foundation.

The TRE is really two Arduinos in one: in the center is basically an Arduino Leonardo with the standard Arduino headers and an ATmega32u4. Elsewhere on the board is a TI Sitara ARM Cortex A-8 processor running at 1GHz with 512 MB of RAM, 10/100 Ethernet, HDMI out, USB host and device ports, and a bunch of connectors intended for an LCD and a ZigBee.

There is, of course, the obvious comparison between the TRE and Raspberry Pi. Hardware-wise, the TRE is very close to the BeagleBone Black, a bit more powerful than the Raspberry Pi, and able to do some very cool stuff (i.e. OpenCV) the Pi just can’t handle.

There is – I think – no official price for the Arduino TRE quite yet. It will be available in spring, 2014, though. You can check out all the press release photos in the gallery below.

Continue reading “Tre: When Arduino Meets Beagle Bone”