Using DMA To Drive WS2812 LED Pixels

It’s pretty well known by now that the LED pixel hardware which is starting to be commonplace, both WS2811 and WS2812, needs pretty strict timing in order to address them. There are libraries out there which mean almost no work on your part, but that’s no fun. [Elia] started looking into what it takes to drive the hardware, trying out a few 8-bit micros before moving to 32-bit with the help of an STM32VL Discovery Board. The move to a beefier processor brings a lot of speed, but why bit bang everything? He came up with a way to use the PWM and DMA features of the chip to drive the LEDs.

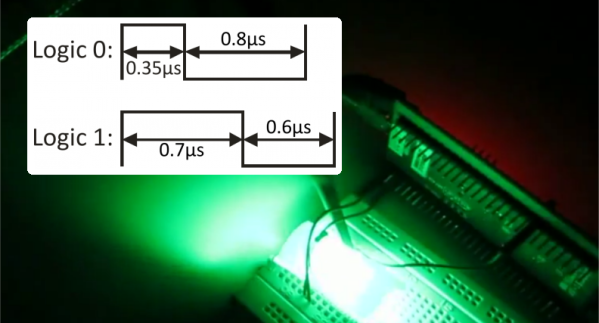
DMA is the Direct Memory Access unit that allows you to change the values being sent to the pixel without interrupting the processor. This is done by pre-loading the data at a memory location. This buffer is automatically read by the DMA unit — its values are used to set the PWM timer compare trigger in order to send out logic values show in the diagram above.

If you do want to delve further into this topic here’s a collection of techniques for driving the WS2811.

Continue reading “Using DMA To Drive WS2812 LED Pixels”

Tricky Repair Of Power Driver For CNC Machine

tricky-power-driver-repair

Designing and building something from scratch is one thing. But repairing fried electronics is a much different type of dark art. This video from [Mike’s Electric Stuff] is from more than a year ago, but we didn’t think you’d mind since what he accomplishes in it is so impressive. He’s got a burnt out pick and place hybrid power module which isn’t going to fix itself.

The power module construction includes a part that has chip-on-board-style MOSFETs and the circuitry that goes with them enclosed in a black plastic housing. It’s kind of like a submodule was encapsulated using the same plastic as integrated circuits. After cracking it open it appears the bonding wire has burnt away. [Mike] connects a jumper wire to one of the board traces in order to use an external MOSFET. This is much easier said than done since the module substrate is ceramic designed to dissipate heat. We’re amused by his technique of melting the jumper into the plastic housing to protect it from the heat sink that goes over the package. In the end he gets his CNC running again. This may not be the best long-term fix but he just needed to continue running until a proper replacement part arrives.

Oh, one more thing: the Metcal vacuum desolderer he uses in the video… do want!

Continue reading “Tricky Repair Of Power Driver For CNC Machine”

A Low-Cost Modular High Altitude Balloon Tracker With Mesh Networked Sensors

[Ethan] just tipped us about a project he and a few colleagues worked on last year for their senior design project. It’s a low-cost open hardware/software high altitude balloon tracker with sensors that form a mesh network with a master node. The latter (shown above) includes an ATmega644, an onboard GPS module (NEO-6M), a micro SD card slot, a 300mW APRS (144.39MHz) transmitter and finally headers to plug an XBee radio. This platform is therefore in charge of getting wireless data from the slave platforms, storing it in the uSD card while transmitting the balloon position via APRS along with other data. It’s interesting to note that to keep the design low-cost, they chose a relatively cheap analog radio module ($~40) and hacked together AFSK modulation of their output signal with hardware PWM outputs and a sine-wave lookup table.

The slave nodes are composed of ‘slave motherboards’ on which can be plugged several daughter-boards: geiger counters, atmospheric sensors, camera control/accelerometer boards. If you want to build your own system, be sure to check out this page which includes all the necessary instructions and resources.

Making The Worst Linux PC Useful

AVR

After seeing [Dimitry] build the most minimal Linux computer ever, [Kyle] decided he needed one for himself. In true hacker fashion, he decided to take this build for the worst Linux PC one step further: he would add I2C to his version, making it somewhat useful, considering the number of I2C peripherals out there.

This build is based on [Dmitry]’s ARM Linux computer emulated on an 8-bit AVR. It’s a full-blown Linux computer with 16 MB of RAM courtesy of a 30-pin SIMM, a lot of storage provided by an SD card, all running on an emulated ARM processor inside a lowly ATMega1284p. [Kyle] built this clone over the course of a few months, but from the outset decided he wanted to implement an I2C protocol on this terribly under specced computer.

After booting his computer, [Kyle] eventually got an I2C module loaded by the kernel. With an I2C module and a few spare GPIO pins, he set out to create something to attach to this terribly slow computer – an ancient LED dot matrix display. With a real-time clock, this display became a clock  with the help of a homebrew program written in C. Considering the speed of the emulated processor, the program takes nearly three seconds to read the RTC and display the current time to the display. We’re thinking it was a wise choice to only implement hours and minutes in this clock.

If having a useful computer running at about 10 kilohertz isn’t enough, [Kyle] also compiled the classic text-based adventure Zork. It actually runs, proving you don’t need Megahertz of power to do something useful and fun.

A Pair Of Toaster Reflow Oven Builds

For some reason or another, the Hackaday tip line sometimes sees a short burst of submissions for the same project. The latest one of these was for toaster oven reflow stations. They’re both great builds and different approaches to making a useful tool out of home appliances.

First up is [Richard]’s build. he ended up with a fairly high-end build using a Rocket Scream Reflow Oven Controller Arduino shield. This shield accepts a normal K-type thermocouple and controls an external solid state relay with the Arduino’s PID library. [Richard]’s build has a few neat additions – a properly dremeled enclosure, computer fan, and a welding blanket for insulation. Now that we think about it, it’s odd we’ve rarely seen any sort of insulation in these reflow oven builds.

Next up is [Ray]’s version of a Black & Decker reflow oven. While not as fancy as [Richard]’s build, this one does have a few features that make it very interesting. Instead of messing around with thermocouples, [Ray] simply took a digital kitchen thermometer – a neat tool that already a thermistor in a compact metal probe – and read the analog value with an Arduino. To control the power, [Ray] is using a cheap 433 MHz radio transmitter to control a few remotely operated power sockets. It’s a very clever and inexpensive replacement for a SSR, especially since [Ray] had these power sockets just lying around.

So there you go. The same tool, built two different ways. A great demonstration of how you can not only build anything, but you can build anything any way you want.

A Six Part CNC Machine

CNC

CNC machines are impressive pieces of kit. We’re all for seeing the big, burly, impressive machines, but there’s something to be said about seeing how small they can get. [Jay] has what is probably the most minimal CNC plotter we’ve ever seen, built from only six 3D printed parts.

[Jay]’s plotter is based on the Piccolo, an exceedingly small-scale CNC platform that can be built for $70 with laser-cut parts. This version, though, uses only six parts that can be downloaded from Thingiverse. Powered by an Arduino and two micro servos, this CNC plotter would be a great introduction to CNC for any robotics club or hackerspace tutorial series.

[Jay] has been doing some awesome work with CNC plotters; we saw his large format Plotterbot earlier this month, and his giant plotted HaD logo with HaD infill poster was a great submission to our Trinket contest.

Video of [Jay]’s plotter in action available after the break.

Continue reading “A Six Part CNC Machine”

Fail Of The Week: Commute-Shortening Electric Scooter

fotw-electric-scooter

Please don’t judge [Alan] on his choice of vests. This project is from 1999 when it was common to see people rockin’ these threads. Anyone who has ever spent time on the University of Minnesota campus in Minneapolis, Minnesota will know that parking is at a premium. [Alan] had a 12-15 minute walk from his parking garage to his office and was considering a cheaper parking location that would balloon that to 20-25 minutes. But engineers don’t see problems, they see project ideas. He started work on a tiny electric scooter that could slim down his commute. Obviously he did find some success, but it was interspersed with failures that make his scooter the Fail of the Week.

Continue reading “Fail Of The Week: Commute-Shortening Electric Scooter”