An Animated Elf

animatedElf

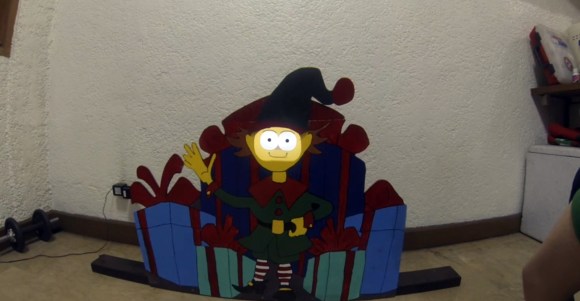
Halloween receives the bulk of the attention for installation-type hacks, but [Stephen’s] animated elf hack-in-progress provides the perfect example of bringing the Christmas spirit to life.

[Stephen] constructed both the background and the elf’s body from a scrap piece of plywood, drawing and painting everything by hand, and then secured the plywood with a simple 2×4 that serves as a stand. The bulk of the hack is rather simple, and reflects the longstanding technique of traditional cel animation: the non-moving portions are kept stationary and only the moving parts need to change. In this case, [Stephen’s] shortcut is to insert a tablet as the elf’s face.

The tablet is a BlackBerry PlayBook, which moves the eyes around and spouts off a few Santa-related quips while animating the mouth. [Stephen] encountered a problem with the PlayBook’s 5-minute screen timeout function, and had to design a custom application to prevent the tablet from entering sleep mode while it played through the animations. His future plans are to drill a hole through the plywood and expose the tablet’s light sensor to detect when someone walks by, then have the elf spring to life in response. You can see his progress so far in the video below.

Continue reading “An Animated Elf”

Spherebot: Decorating Xmas Baubles

spherebot_1-446x500

The Spherebot is an open source machine capable of printing designs onto spherical objects, such as Xmas baubles!

The design is based on the ever-popular Egg-Bot, which we have seen derived into many other useful printers such as the Mug Plotter, and the Ping Pong Printer.

The Spherebot features two stepper motors, one servo motor for marker actuation, some cheap mounting hardware, and a whole bunch of 3D printed parts—all of which are available on Thingiverse. In this design they used a 3D printer controller board called the 3Drag by Open-Electronics, which is based on the ATmega2560 (the same microcontroller as the Arduino MEGA). The Spherebot doesn’t require all three axes or an extruder, so they only installed 2 out of the 4 stepper drivers on the board to save cost.

Once you have it all built, it’s a simple matter of uploading your design into the free Spherebot-Host-GUI provided on GitHub. Stick around after the break to see just what it is capable of!

Continue reading “Spherebot: Decorating Xmas Baubles”

CartoLucci: A Candle-Powered Christmas Card

cartoLucci

If you’re looking for a last-minute Christmas present, you probably won’t have enough time to reproduce [Helmar’s] candle-powered Christmas card. He’s been working on it for a few years now, since his first prototype in 2010. Though he pieced together the original card with parts lying around his workshop, the most recent iteration looks like it belongs on the shelf in a store.

We last saw [Helmar’s] work two years ago, when he shared his Full Color Laser TV. This project is a bit more compact: the circuitry was printed with conductive ink on the cardstock, and all the required components are held together by conductive adhesive. To power the electronics, he decided against a battery and instead chose to embed a solar cell on the inside of the card. Placing a lit candle inside the open card provides enough juice for the exterior of the card to shine.

You can see a video of both the current and prototype versions of [Helmar’s] cards after the break.

Continue reading “CartoLucci: A Candle-Powered Christmas Card”

LED Matrix Mask Will Scare Up Holiday Cheer

[Davide] sent us this fun LED matrix mask he built using an ATMega8 and 74LS595N shift registers. Each of the eyes is an 8×8 LED matrix, and the mouth is made from two 8x8s. [Davide] used a ULN2803A Darlington transistor array to drive the matrices.

When the user steps behind the mask, an IR sensor detects that a face is within range and activates the facial features. The code randomly runs the eye and mouth patterns. If the user starts speaking, a microphone element detects his voice and a separate speaking mouth pattern is executed.

The mask body and stand are découpaged with pages from Dylan Dog comics. [Davide] says he built the mask years ago, but decided to submit it to the 2013 Inverart Art Fair in Milan. As you can probably imagine, the mask has been a big hit with the kids so far. Stick around to see [Davide]’s Santa-fied demonstration after the jump. [Davide] didn’t give us any details on that sweet hat, unfortunately.

If you require a better degree of protection or more LEDs, check out this LED helmet.

Continue reading “LED Matrix Mask Will Scare Up Holiday Cheer”

Direct, Wall-Mounted Storage With Lasers And Polymorph

parts-storage-brackets

We’re sure everyone could use some more storage and organization in their workshop. [Nixie] is no exception, though he also hates sacrificing tabletop space for boxes. His solution was to attach them to the wall directly by hacking together some brackets. This hack allowed him to hang everything without using internal screws which were a pain to get at if he need to removed the boxes from the wall to take with him.

[Nixie] started by laser-cutting a negative pattern for a mounting bracket that would fit the dovetail rails already on the sides of the boxes. He then pressed a piece of polymorph into this mold, slid the bracket along the side of the box…and realized it wouldn’t work. The piece wiggled around too much because it did not sit firmly in the rail. Back at the drawing board, [Nixie] split the project into two steps. He cast the screw-hole portion of the bracket in its own separate mold, then cast the railing part of the bracket directly in the dovetail section of the box, providing him a much higher degree of accuracy. After joining the two pieces, [Nixie] had a sturdy support bracket that he duplicated and attached around the rest of the bins.

Fubarino Contest: A Sculpted Room With LEDs

[Sisam] and [Mclien] are a father and son team that built this sculptural room with an organic looking built-in seating area and sculpted lamp shades. When you have a room that looks this cool, the only option you have is to fill it with RGB LEDs, and it just so happens their light controller has a great Hackaday Easter egg.

The room lighting is provided by a Shifty VU shield, OctoBar LED controller, and a few of these RGB LED modules. All pretty standard for an RGB LED project, but where this contest submission really shines is the controller for all the room lights. It has three sliders for the red, green, and blue channels, beefy toggle switches for each light location, an LCD for showing the program mode, a rotary switch, and push buttons for cycling through stored setups.

The Easter egg for this project comes into play whenever the color value of the lights is set to Hackaday green, #00c100. When that happens, the Hackaday URL is displayed on the controller’s display.

Awesome work, and a really cool-looking room. We wouldn’t mind a tutorial on how you sculpted it, [Sisam].


This is an entry in the Fubarino Contest for a chance at one of the 20 Fubarino SD boards which Microchip has put up as prizes!

Retrotechtacular: Submarine Cable Splicing Is Serious Business

Really. As this wonderfully narrated talkie picture from 1939 will attest, keeping even one drop of water from penetrating undersea cables is of the utmost importance.

How do they do it? Many, many layers of protection, including several of jute wrapping. The video centers on splicing a new cable to an existing one in the San Francisco Bay to bring the wonder of telephony to a man-made island created for the Golden Gate International Expo.

The narrator makes these men out to be heroes, and when you see how much lead they came into contact with, you’ll understand what he means. Each of the 1,056 individually insulated wires must be spliced by hand. After that comes a boiling out process in which petrolatum is poured over the splice to remove all moisture. Then, a lead sleeve is pulled over the connections. Molten lead is poured over the sleeve and smoothed out by hand.

At this point, the splice is tested. The sleeve is punctured and nitrogen gas is pumped in at 20psi.  Then comes the most important step: the entire sleeve is painted with soap suds.  Any gas that escapes will make telltale bubbles.

Once they are satisfied with the integrity of the sheath, they wrap the whole thing in what appears to be lead cables and pound them into submission. Surely that would be enough, don’t you think?  Nope.  They weld the cables all around and then apply two coats of tar-treated jute wrapping, which retards saltwater corrosion considerably.

Continue reading “Retrotechtacular: Submarine Cable Splicing Is Serious Business”