DIY Space Experiments Within A Ping Pong Ball ‘satellite’

Pongsat space satellite

Ahhh space. The final frontier. While many people dream of one day becoming an astronaut (and possibly battling aliens or cylons), it’s a select few who actually make it their reality. Fortunately for us, there’s a middle ground that allows the masses to still have some fun in the sky. Enter the “Pongsat” program – space experiments within a ping pong ball.

Created by JP Aerospace, this free program allows anyone to create their own mini experiment and send it off to the edge of space. The imagination is the limit. Curious if a marshmallow will expand? Interested what the temperature would be? Wonder if you can charge a solar battery? Stuff it inside a ping pong ball and find out!

Check out the PDF Users Guide to get started, then their Blog and Facebook page for more up to date information.  Now go out there and get your experiment to Mars! (Or at least 100,00 feet)

Watch a video of in flight footage after the break.

[via adafruit]
Continue reading “DIY Space Experiments Within A Ping Pong Ball ‘satellite’”

Wiimote Controlled RPi Robot

Wiimote RPi Robot

[Brian] has brought together a powerful collection of hardware to build a robot. The end goal is to have a robot that’s controlled by a Wiimote.

The Wiimote communicates over Bluetooth with a Raspberry Pi, which is running a Python script. This script uses the CWiid Python module to communicate with the controller, and [Brian] has detailed instructions on getting the Wiimote working with a RPi. The RPi controls an ATmega based development board over SPI, which drives an h-bridge to control the two DC motors that move the robot.

[Brian]’s code for this could be helpful for anyone looking to control their RPi with a Wiimote. Since Wiimotes and Bluetooth dongles are fairly cheap nowadays, this is a great way to drop in wireless control to any RPi project, or even to control your media center from the couch.

After the break, check out a video of the build in action

Continue reading “Wiimote Controlled RPi Robot”

This Maglite Is A BB Gun

Maglite BB Gun

This innocent looking Maglite houses a piston and barrel, making it into a functional pneumatic BB gun. A Maglite was chosen due to its high durability, and easy access to the internals. A schrader valve sticks out of the battery cap, which allows the gun to be charged using a standard fitting. A brass tube is used as the barrel, and a piston controls firing.

Firing the gun is simple. First, the whole thing is charged up to the desired pressure. Then the ammunition is inserted into the barrel. At this point, the rubber piston is held against the end of the barrel by the pressure in the gun. By pushing the pin of the valve in, the piston is able to move back slightly. This acts as the trigger, and causes air to rush into the barrel, firing the BB.

The results are fairly impressive. Using a chronograph, the speed of the BB was measured at 850 feet per second. Using the Gas Gun Design Tool simulator, it was estimated that the gun could fire at over 1000 feet per second, and maybe even break the sound barrier.

A Real Thermal Imaging Camera For $300

If you want to check your house for hot air leaks, take pictures of the heat coming off a rack of equipment, or just chase the most dangerous animal, [Arnie], through the jungles of central america, a thermal imaging camera is your friend. These devices normally cost a few thousand dollars, but the team behind the Mu Thermal Camera managed to get the price down to about $300.

The basic idea behind the Mu Thermal Camera is overlaying the output of an infrared thermopile – basically, an infrared camera – on top of the video feed of a smart phone’s camera. This is an approach we’ve seen before and something that has even been turned into a successful Kickstarter. These previous incarnations suffered from terrible resolution, though; just 16×4 pixels for the infrared camera. The Mu thermal camera, on the other hand, has 160×120 pixels of resolution. That’s the same resolution as this $2500 Fluke IR camera. After the indiegogo campaign is over, the Mu camera will eventually sell for $325.

We have no idea how the folks behind the Mu camera were able to create a thermal imaging with such exceptional resolution at this price point. The good news is the team will be open sourcing the Mu camera after their indiegogo run is over. W’e’d love to see those docs now, if only to figure out how a thousand dollars of infrared sensor is crammed into a $300 device.

Beautiful Replica Team Fortress 2 Weapons

gun

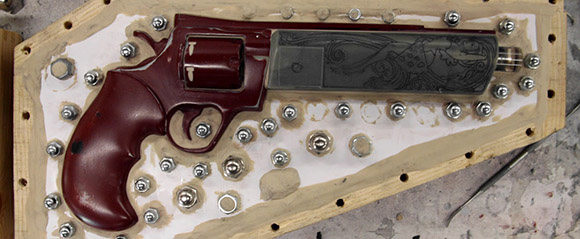
We’ve seen our share of replica props, but [Nathan]’s replica of the spy’s sidearm from Team Fortress 2 is the bee’s knees.

The build began as an off-the-shelf Airsoft gun. After removing the barrel and cylinder, [Nathan] used Apoxie Sculpt and a whole lot of sanding to turn a stock piece of metal and plastic into something that came straight from the Mann Co. store. The in-game version of the Ambassador also includes an engraving of the object of the spy’s affection, replicated by [Nathan] with some very careful Dremel work. Once the prop was done, [Nathan] built a mold box out of plywood and filled it with silicone rubber. This allowed him to make several castings of his prop weapon

This isn’t [Nathan]’s only TF2 replica prop; he also made a replica of the stock sniper gun and scout’s scattergun and a megaphone from Borderlands. In an effort to out do himself, [Nathan] is gearing to build a gun that fires two hundred-dollar, custom-tooled cartridges at ten thousand rounds per minute. He has yet to craft any hats.

Dynamic Bicycle Headlight Uses The Open Road As A Display

This thing is so cool it almost looks fake. But [Matt Richardson] isn’t a hoaxster. He actually built what might be called a heads-down display for your bicycle. He refers to it as a headlight because it borrows a similar function. It mounts on the handlebars and shoots light off the front of the bike. But it’s more than just a battery and a bulb, this uses a pico-projector to give that light some meaning. In the video after the break he shows it off on the streets of NYC.

So far he’s only displaying information that has to do with the speed of travel, but the proof is there just waiting for a brilliant new use. Feeding the projector is a Raspberry Pi board. For this prototype [Matt] mounted it, along with the portable cellphone charger which plays the role of the power source, on a hunk of hardboard strapped inside the bike frame.

If you’re thinking of doing this one yourself beware of the BOM price tag. That projector he’s using runs upwards of $400. We wonder if you could hack together a rudimentary replacement with an old cellphone screen and this diy film projector?

Continue reading “Dynamic Bicycle Headlight Uses The Open Road As A Display”

POV Pong Game Uses All Kinds Of Smart Design

pov-pong-game-uses-smart-design

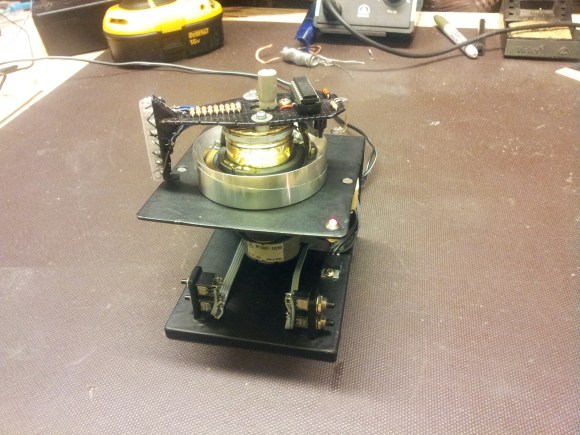
This little device lets you play some head-to-head pong using a spinning LED display. We’re really in love with the design. You get a pretty good idea of the Persistence of Vision aspect of the build by looking at this picture. But hearing [Dennis] explain the entire design in the video after the break has us really loving its features.

He’s using the head from a VCR as the spinning motor. The display itself uses a vertical row of LEDs with a bit of wax paper as a diffuser. These are current limited by a 1k resistor for each of the eight pixels. They’re driven by a PIC 16F690 but you may have already noticed that there’s no battery on the spinning part of the board. It gets voltage and ground from a pair of brushes which he fabricated himself. To avoid having to do the same thing to map the control buttons in the base to the spinning board he came up with something special. There’s a downward facing phototransisor which registers LED signals from the base to move the paddles up or down.

If you love this project check out the POV Death Star.

Continue reading “POV Pong Game Uses All Kinds Of Smart Design”