Auto Bike Light: On When Moving Off When Not

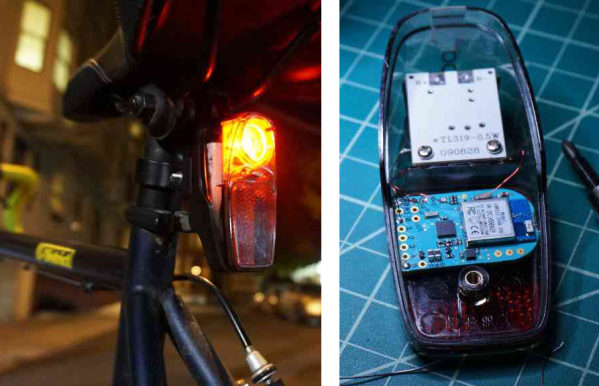
If you’re plagued by perpetually dead bike light batteries you’ll like this one. It’ll also fix the problem of remembering to turn the lights on in the first place. This hack uses an accelerometer to switch the light when the bike is in motion.

In this case the bike light was chosen for its ability to fit the control board inside the case. But with this proof-of-concept you can easily spin a tiny board with uC and accelerometer to replicate the functionality (the Bluetooth module shown above is going unused in this application). Many accelerometer chips have low-power mode that can be used to was a uC so we could easily see this having very little impact on the normally battery life of your light. The one caveat being the need to regulate the voltage as many of these lights take a 12V cell.

The other alternative is to make sure your battery is always charging during the day. This solar setup is one way, but then you won’t want to leave the thing unattended.


Even More Power Wheels Racers

With the Power Wheels Racing series wrapping up for the year, the teams are winding down and writing up their build and rebuild logs for their cars. In previous years, the kids from MIT, a.k.a. MITERS, have brought small electric cars to the races, but nothing like this. It’s a true Power Wheels, or at least the plastic shell, an alternator, a huge battery pack, and a completely custom drivetrain.

[Dane], [Ben], [Rob], [Mike], and [Ciaran] started their build with an alternator that was salvaged from [Charles]’ Chibi-Mikuvan, added a motor from a CDROM drive for a sensor, and basked in the glory of what this cart would become. The frame was crafted from 1″ square tube, a custom disc brake machined, and a 10S2P battery pack built.

The alternator the team used for a motor had a rather small shaft, and there were no readily available gearboxes. The team opted to build their own with helical gears milled on the MITERS Bridgeport mill. That in itself is worth of a Hackaday post. Just check out this video.

With the build held together with duct tape a baling wire, the team headed out to the races in Detroit. Testing the racer before getting to Detroit would have been a good idea. During the endurance race, a set of 10″ rear tires were torn apart in just four laps, impressively bad, until you realize the smaller pink tires that were also from Harbor Freight fared even worse.

After a few races, the MITERS team figured out the weaknesses of their car and managed to get everything working perfectly for the race at Maker Faire NY.

Continue reading “Even More Power Wheels Racers”

Simple Photo Flash Trigger For Water Balloon Photography

Water Balloon Photography

There have been countless projects to make custom photo flash trigger circuits. Usually the circuits react to sound, triggering the camera flash at the moment a certain sound is triggered. That type of trigger can be used to detect the popping of a balloon or shattering of glass. Other triggers detect motion, like a projectile crossing a laser beam for example. [Udo’s] friend had a fun idea to take photos of water balloons popping. Unfortunately neither of those trigger methods would be well suited for this situation. That’s when [Udo] had to get creative.

[Udo] built a unique trigger circuit that uses the water inside the balloon as the trigger. The core component of the circuit is an Arduino. One of the Arduino’s analog pins is configured to enable the internal pull-up resistor. If nothing else is connected to the pin, the Arduino will read 5 volts there. The pin is connected to a needle on the end of a stick. There is a second needle on the same stick, just a short distance away from the first. When these needles pierce the balloon’s skin, the water inside allows for a brief moment of conductivity between the two pins. The voltage on the analog pin then drops slightly, and the Arduino can detect that the balloon has popped.

[Udo] already had a flash controller circuit. He was able to trigger it with the Arduino by simply trying the flash controller’s trigger pin to one of the Arduino’s pins. If the Arduino pulls the pin to ground, it closes the switch on the flash controller and the flash is triggered. Both circuits must share a common ground in order for this to work.

All of the code for [Udo’s] project is freely available. With such spectacular photographs, it’s only a matter of time before we see more of these floating around.

Fail Of The Week: Sonar Submersibility Sealing

For the last decade or so, [Jason] has wanted to build an underwater robot. Can you blame him? More recently, he’s been researching sonar sensing and experimenting with the relatively inexpensive HC-SR04 module. Since he had good luck getting it to work with a PC sound card and a Stellaris Launchpad, he figured it was time to try using it underwater.

Hydrophone research led him to the idea of submerging the sensor in mineral water oil to both seal it and couple it with the water. Unfortunately, the HC-SR04 only sends one pulse and waits for echo. Through the air, it reliably and repeatedly returned a small value. Once inside a pill bottle filled with mineral oil, though, it does something pretty strange: it fluctuates between sending back a very small value and an enormous value. This behavior has him stumped, so he’s going to go back to the Launchpad unless you can help him figure out what’s going on. Should he use a different method to seal it?


2013-09-05-Hackaday-Fail-tips-tileFail of the Week is a Hackaday column which runs every Thursday. Help keep the fun rolling by writing about your past failures and sending us a link to the story — or sending in links to fail write ups you find in your Internet travels.

Get Ready For Hackaday Munich By Attending Make Munich

Need something to get you revved up for the Hackaday get-together in Munich next month? Don’t miss out on this year’s Make Munich.

The two-day festival will be held in Munich on November 1st and 2nd. Last year there were about 2500 in attendance and this year is shaping up to be even bigger! Wander through the exhibits to see what others have been building during their spare time. You’ll see everything from 3D printing, to custom electronics, crafts, art pieces, talks, and more. What a wonderful way to draw inspiration for the projects you want to pull off this winter!

What’s that you say? You have something to show off at Make Munich? You could always just carry it around with you but maybe it’s better to apply for a booth or to give a talk.

Seeing all that Make Munich has to offer should get you excited about doing some hands on hacking and you’ll have the chance just a couple of weeks later. The Hackaday crew is hard at work planning our own afternoon hackathon and evening party. Block out your calendar on Thursday, November 13th. We’re not quite ready to give away free tickets but watch the front page for an announcement soon!

We’re lucky to have a lot of people in the Munich area helping get the word out. A special thanks to [Nils Hitze] who is organizing Make Munich and has already connected us with a lot of interesting parts of the hacker community in the area.

THP Hacker Bio: Neil Jansen

If we were running a contest to give away a trip to space for building the most innovative open hardware project a few years ago, the winner would inevitably be a 3D printer. Times have changed, 3D printing is reaching the limits of what can be done with simple plastic extrusion, and there are new hardware challenges to be conquered. One of the challenges facing hardware designers is the ability to create and assemble electronic circuits quickly. For that, there are a few pick and place machines being developed, the lowest cost being the FirePick Delta. It sells itself as a $300 pick and place machine borrowing heavily from the RepRap project, enabling tinkerers and engineers to assemble PCBs quickly.

[Neil Jansen] is the project lead for the FirePick Delta, and along with team members ranging from software developers in the bay area, to electronics technicians and high school students, they’ve created what will become the lowest cost and most capable pick and place machine available. Already the machine has tape feeders, tray feeders, a vision system, and modules to dispense solder paste. It’s an astonishing accomplishment, and were it not for some damage in shipping, we would have a video of [Neil] demoing the FirePick at Maker Faire NY.

In lieu of that, we do have a bio on [Neil] and what challenges he’s faced in building the FirePick. You can read that below, or check out their second demo video for The Hackaday Prize:

https://www.youtube.com/watch?v=46pLeLBYVTs

Continue reading “THP Hacker Bio: Neil Jansen”

Unjettisoned Inkjet Turned Tumbler

printer parts tumblerDon’t throw out that old printer! Not that you would, but even if you’ve already scavenged it for parts, you can use the shell and the rollers to make a rock/coin/what-have-you tumbler. If your printer is part scanner, it might end up looking as cool as [th3_jungle_inv3ntor]’s. You’ll have to laser-cut your own arachnid to supervise from above, though.

Somewhere between having an irreparable printer, being inspired by another tumbler, and the desire to make a mancala set for his sister-in-law, [th3_jungle_inv3ntor] was sufficiently motivated to get out his hacksaw and gut the printer. He used the main paper roller and its motor to do the tumblin’, and a smaller roller to help accommodate different jar sizes.

Aside from adding those sweet blue LEDs, he wired in a toggle switch, a speed control pot, and an LM317 to govern the tumbling rate. Unfortunately, the rocks in [th3_jungle_inv3ntor]’s town are too soft and crumbly, so he can’t make that mancala set after all. But hey, (almost) free stuff tumbler.

No dead printers lying around? If you have a drill and a vise, you could always make a tumbler that way, and nothing is compromised but the peaches jar.