Easy Multi-Touch Table

Screen Shot 2013-12-31 at 1.53.13 PM

[2bigbros] put up an Instructable on his multi-touch table build. It’s a nice setup, using the typical frustrated total internal reflection method for touch sensing. Tinkerman’s Method was used for the screen itself, which involves rolling silicon onto vellum with a paint roller to improve the bond. [2bigbros] then built a nice aluminum and wooden frame for the whole thing. He’s light on some details, but most people with a basic understanding and Google will be able to figure it out.

This is a very accessible project for most builders. If you’re interested in getting into it, there are plenty of projects to reference. We previously covered the basics, as well as a more involved build. We’ve even seen an interactive tower defense game using multi-touch. If you decide to build one of your own, don’t forget the excellent resource at TUIO for finding frameworks and example implementations.

Continue reading “Easy Multi-Touch Table”

Reverse Engineering HitClips

hitclipz

After a quick review of the Hackaday viewer demographics, we need to say the late 90s were weird. Even portable audio players were downright bizarre: MP3 players existed, but you loaded up your songs (all eight of them) over your PC’s parallel port.  While helping a cousin move some furniture, [Ch00f] found a huge collection of one of the oddest music formats ever: HitClips, a tiny plastic encapsulated bit of circuitry that stores 60 seconds of terrible-sounding mono audio. Yes, this was a thing, but so was the pet rock. With no HitClips player, [Ch00f] decided he would take a swing at reverse engineering these tiny, tinny songs.

After taking apart the plastic enclosure, [Ch00f] found a very simple circuit: a few resistors, a cap, and an epoxy blob that enclosed an die with the musical data. On the back of the clip, there are eight pads for connecting to the player. With nothing to go on, [Ch00f] started poking around and found connecting one of these pins to ground caused circuit to draw 300uA of current for about 60 seconds – the same length of time as the recorded sample.

[Ch00f] originally thought the HitClip would provide audio data over an SPI or other digital protocol. What he found was much more interesting: two of the pins on the HitClip correspond to the push and pull FETs of a class D amplifier. The audio on the HitClip is digital audio, but it’s encoded so it can directly drive an analog circuit. Pretty clever engineering for a happy meal toy, if you ask us.

After dumping this data with a logic analyzer, [Ch00f] turned all the values in to .WAV file. It was, amazingly, music. A little refinement to the process to nail down the timing resulted in a 60-second clip seen (heard?) after the break.

Since [Ch00f] doesn’t want to spend $40 on eBay for a vintage HitClips player, he’s right about at the limit of what he can reverse engineer out of these cheap, crappy music chips. He has put up all his documentation, though, so if you’re up for improving on [Ch00f]’s methods, have a go.

Continue reading “Reverse Engineering HitClips”

Building An Engine Control Unit With The STM32F4

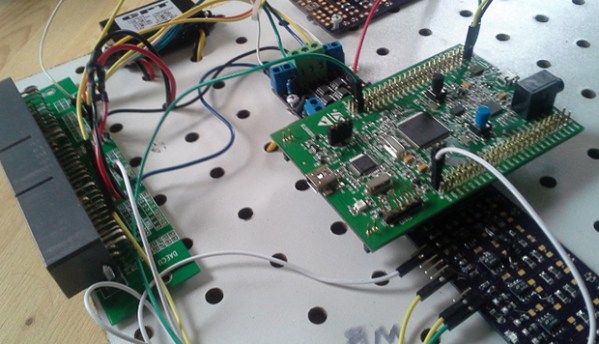
If you’re looking to soup up your whip, the first place you’ll probably look is the engine control unit. This computer shoved in the engine compartment controls just about every aspect of your car’s performance, from the air/fuel ratio, the ignition timing, and the valve controls. Upgrading the ECU usually means flashing new firmware on the device, but [Andrey] is taking it one step further: he’s building his own ECU using the STM32F4 Discovery dev board.

[Andrey]’s ride is a 1996 Ford Aspire, but while he was developing his open source ECU, he wanted to be able to drive his car. No problem, as going down to the junkyard, picking up a spare, and reverse engineering that was a cheap and easy way to do some development. After powering this spare ECU with an ATX supply, [Andrey] was able to figure out a circuit to get sensor input to his microcontroller and having his dev board control the fuel injector.

With a few additional bits of hardware [Andrey] has his open ECU controlling the fuel injection, ignition, fuel pump, and idle air valve solenoid. Not a bad replacement for something that took Ford engineers thousands of man hours to create.

[Andrey]’s ECU actually works, too. In the video below, you can see him driving around a snow-covered waste with his DIY ECU controlling all aspects of the engine. If the engine sounds a little rough, it’s because a wire came loose and he was only using two cylinders. A bit of hot glue will fix that, though.

Continue reading “Building An Engine Control Unit With The STM32F4”

Gotta Catch ‘Em All, With An Arduino

PKMN

For every pokemon you encounter on your adventure to become the world’s greatest trainer, you have about a 1 in 8000 chance of that pokemon being ‘shiny’, or a different color than normal. Put an uncommon event in any video game, and of course a few people will take that feature to the limits of practicality: [dekuNukem] created the Poke-O-Matic, a microcontroller-powered device that breeds and captures shiny pokemon.

We’ve seen [dekuNukem]’s setup for automatically catching shiny pokemon before, but the previous version was extremely limited. It only worked with a fishing rod, so unless you want a ton of shiny Magikarp the earlier setup wasn’t extremely useful.

This version uses two microcontrollers – an Arduino Micro and a Teensy 3.0 – to greatly expand upon the previous build. Now, instead of just fishing, [dekuNukem]’s project can automatically hatch eggs, search patches of grass for shiny pokemon, and also automatically naming these new shiny pokemon and depositing them in the in-game pokemon storage system.

The new and improved version works a lot like the older fishing-only automated pokemon finder; a few wires soldered on to the button contacts control the game. The Teensy 3.0 handles the data logging of all the captured pokemon with an SD card and RTC.

What did [dekuNukem] end up with for all his effort? A lot of shiny pokemon. More than enough to build a great team made entirely out of shinies.

Video below, with all the code available through a link in the description.

Continue reading “Gotta Catch ‘Em All, With An Arduino”

Electronic Phenakistoscope!

phenakistoscope

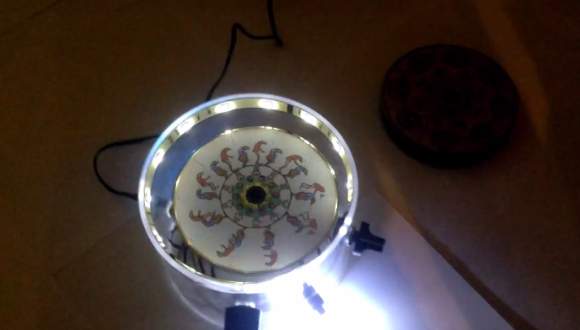
Looking for a clever way to build a Phenakistoscope? Maybe you’re more familiar with its other names; Fantoscope, Phantasmascope, or perhaps its close cousin the Zoetrope?

If you’re still scratching your head, that’s okay — they have really weird names. What we’re referring to here is a type of optical illusion that mimics movement by showing a series of still images at an offset interval — this can be achieved by looking through slots, strobing a light (like in this case) or even by the use of mirrors.

This particular Phenakistoscope is a very simple but clever design that makes use of a recycled stepper motor from a printer, a CD as the animation disk, a strip of LED lighting, a few potentiometers and an Arduino to control the strobe. It works by synchronizing the strobe frequency with the motor rotation, resulting in the image in motion effect.

Stick around after the break for a full gallery of the build and a demonstration video.

Continue reading “Electronic Phenakistoscope!”

USBPass – A Mooltipass-like Project

In our Developed on Hackaday series some readers may recall a sentence we wrote: “if one’s idea is not yet in the market, it’s either completely stupid or people are already working on it”. Well, [Josh] casually mentioned that he was also working on an offline password keeper after having recently subscribed to our google group. Similarly to the Hackaday-developed platform, the USBPass is connected to a computer via USB and is detected as an HID keyboard. As you can see in the picture shown above, it uses very few components: an ATMega32U2, a USB connector, three buttons and a few passives chips.

A total of 20 passwords can be stored in the microcontroller’s memory, which can be ‘typed’ by the platform using the push buttons. The USBPass firmware is based around the LUFA USB stack, to which [Josh] added HID report functionality to allow data transfer from his desktop application. The latter uses the Linux/Windows/OS X HID API library so bringing his software to other operating systems can be done in no time. All the project resources can be found on GitHub, while [Josh] is currently working on a B revision which will include an OLED screen.

Wireless Power Transfer For Quadrotors

quadcopter

Quadrotors are great, but what kind of range can you get on them, really? What if you could charge them up just by flying over high voltage power lines, by or temporarily hovering by a charging station? That’s just what [Dr. Carrick Detweiler] wrote a paper about! (Caution: PDF)

The paper discusses the method of wireless power transfer via magnetic resonance, which, depending on the scale, can transfer power at medium distances (~1 meter). This outperforms inductive coupling which requires a much closer proximity (~1-2 centimeters) for power to transfer. It does still require a certain amount of accuracy, but as we all know, quadrotors have no problem with even the most complex aerodynamic feats!

There is an excellent demonstration video of a small scale wireless quadrotor prototype after the break.

Continue reading “Wireless Power Transfer For Quadrotors”