Modular Arduino Based Infrared Thermometer

IRTemperature

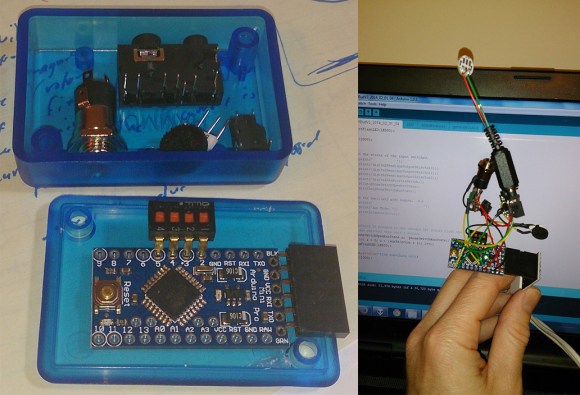
[Brian] started out with a clear and concise goal, “allow a regular human to associate an audible tone with a temperature from an infrared contactless thermometer.” With his latest project, the ESPeri.IRBud, he has achieved this goal.

One of our favorite parts of [Brian’s] post is his BOM. Being able to easily see that the IR temperature sensor costs $26 at DigiKey is unbelievably helpful to readers. This specific sensor was chosen because others have successfully interfaced it with the Arduino. Not having to reinvent the wheel is good thing! For the build, [Brian] decided to hook up the IR temperature sensor to a re-purposed flexible iPhone headset wire. Having used headphone sockets to connect to the sensor and speakers, the actual device is quite modular. Hearing this thing in action is quite cool, it almost sounds like old-school GameBoy music! Check it out after the break.

Have you used an IR temperature sensor in one of your projects? Let us know.

Continue reading “Modular Arduino Based Infrared Thermometer”

USB On The ATtiny10

Atmel’s ATtiny10 is their smallest microcontroller in terms of physical size – it’s an SOT-23-6 package, or about the same size as surface mount transistors. The hardware inside this extremely bare-bones; three I/O lines, 1kB of Flash, 32 bytes of RAM, and a reduced AVR core with 16 registers instead of 32. With such a minimal feature set, you would think the only thing this micro would be good for is blinking a LED. You’d be right, but [cpldcpu] can blink a LED with the ‘tiny10 over USB.

The V-USB interface usually requires about 1.5kB of Flash in its most minimal implementation, and uses 50 bytes of RAM. This just wouldn’t do for the ‘tiny10, and although [cpldcpu] is working on a smaller, interrupt-free V-USB, there were still some hurdles to overcome.

The biggest issue with putting code on the ‘tiny10 is its reduced AVR core – on the ‘big’ 32-register core, direct memory access is two words. On the ’10, it’s only one word. AVR-GCC doesn’t know this, and no one at Atmel seems to care. [cpldcpu] worked around this problem using defines, and further reduced the code size by completely gutting V-USB and putting it in the main loop.

It’s not much, but now [cpldcpu] can blink an LED with a ‘tiny10 over USB. If you’re wondering, 96.4% of the Flash and 93.8% of the SRAM was used for this project.

Magnetic Propeller Balancer Takes Away The Shakes

prop-balancer

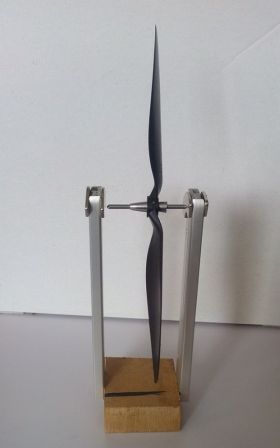
[Danijel0frk’s] friends may call him unbalanced, but his propellers are always spot on. His well-balanced props are thanks to this magnetic balancer he built from scrap PC parts and pilfered office supplies. Propeller balance has always been important for radio controlled models. Flying for hours with a poorly balanced prop can wreak havoc on an air frame and the radio equipment within.  With today’s drones and R/C vehicles carrying cameras, accelerometers, and gyros, propeller balance has become even more important. A vibrating propeller can ruin a picture at best. At worst it can throw gyroscope and accelerometer readings off and cause a crash.

[Danijel0frk’s] balancer is based upon several commercial designs. A steel shaft from a CD-ROM drive is cut and the ends ground to points. A propeller to be balanced is mounted to the shaft. Propellers don’t all have the same hole size so two pen tips are pressed into service as self centering mounts. [Danijel0frk’s] picture shows one tip pointing toward the prop hub while the other points away. The balancer will work better if both tips point inward, ensuring the shaft sits directly in the center of the propeller hub’s hole. Hard drive magnets suspend the prop and shaft from a drive rail and wood frame.  We should note that this type of balancer will only perform a static balance. Dynamic balance would require the propeller to be spinning on a motor with force sensors on the shaft. To perform a static balance, material is added to or removed from the propeller until it balances in any orientation. Click past the break for a good tutorial video on balancing.

Continue reading “Magnetic Propeller Balancer Takes Away The Shakes”

Fluke Issues Statement Regarding Sparkfun’s Impounded Multimeters

fluke-reponds-to-sparkfun-dmm-impounding

Fluke just issued a response to the impounding of multimeters headed for market in the United States. Yesterday SparkFun posted their story about US Customs officials seizing a shipment of 2000 multimeters because of trademark issues. The gist of the response is that this situation sucks and they want to do what they can to lessen the pain for those involved. Fluke is providing SparkFun with a shipment of genuine Fluke DMMs which they can sell to recoup their losses, or to donate. Of course SparkFun is planning to donate the meters to the maker community.

Anyone with a clue will have already noticed the problem with this solution. The impounded shipment of 2k meters will still be destroyed… eh. The waste is visceral. But good for Fluke for trying to do something positive.

Before we sign off let’s touch on the trademark issue for just a moment. We can’t really blame Fluke too much for this. The legal crux of the matter is you either defend your trademark in every case, or you don’t defend it at all. In this case it was the border agents defending the filing, but for ease of understanding we’ll not go into that. On the other hand, speaking in general business terms, the way things are set up it is advantageous to acquire a trademark specification that is as broad as possible because it helps to discourage competitors from coming to market. So trademark is good when it keep hucksters from trying to rip off consumers. But it is bad if applied too broadly as a way of defending a company’s market share.

Where does Fluke come down in all of this? Who knows. There is literally no right answer and that’s why the discussion around yesterday’s post was full of emphatic arguments. A Fluke meter is a cream-of-the-crop device and they have the right (and obligation) to ensure that reputation is not sullied. SparkFun serves a market that probably can’t afford a Fluke at this time but may some day in the future. And this is the reason we can feel okay about this outcome.

[via Twitter]

Fail Of The Week: The Demise Of Lil’ Screwy

fotw-demise-of-lil-screwy

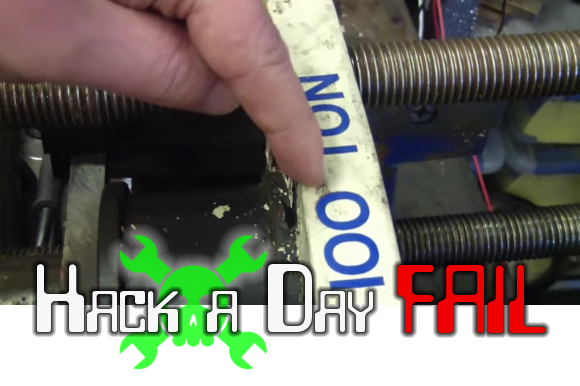
The subject of this Fail of the Week installment is entertaining if nothing else. [Chris] decided to see what kind of forces his home-built 100 ton press could stand up to. Turns out the press failed at punching a 1.5″ hole through 1/2″ plate steel.

If you didn’t see it back in February make sure you take a gander at the premier of Lil’ Screwy. The diminutive press packed quite a bit of punch, using four hand-cranked screws to knock out holes in metal. [Chris] decided to tie-one-on and take his lathe for a spin to machine the larger 1.5″ punch set.

He probably should have known when he switched from a 4-foot ratchet to a crescent wrench with a 12-foot pipe for leverage that this was going to be more than the press could handle. The bottom plate seen in the image above is beginning to cup, which in turn jams up the screws in the off-kilter threads.

We fell a bit guilty in admitting we love to see equipment pushed to the point of failure like this. But perhaps that’s part of what this column is all about. Our favorite is still the PCB shear failure, but this comes in at a close second. Check out the video presentation after the break; just be warned that there’s a bit of rough language as part of the narrative.

Continue reading “Fail Of The Week: The Demise Of Lil’ Screwy”

MRRF: Roundtable And Roundup

Last weekend Hackaday made a trip out to the Midwest RepRap Festival in Goshen, Indiana. We met a ton of interesting people, saw a lot of cool stuff, and managed to avoid the Amish horse and buggies plying the roads around Goshen.

We’ve already posted a few things from MRRF, including [Jordan Miller] and co.’s adventures in bioprinting, a very cool printable object repo that’s backed by a nonprofit LLC, some stuff from Lulzbot that included a new extruder, stretchy filament, and news of a 3D scanner that’s in development, ARM-based CNC controllers including the Smoothieboard and capes for the Beaglebone, 3D printed resin molds, the newest project from [Nicholas Seward], creator or the RepRap Wally, Simpson, and Lisa, and 3D printed waffles. It really was an amazing event and also the largest DIY 3D printer convention on the planet. How this happened in Goshen, Indiana is anyone’s guess, but we’d like to give a shout out to SeeMeCNC for organizing this event.

With so many famous RepRappers in one place, it only made sense to put together a round table discussion on the state of RepRap, 3D printers, and microfabrication. We have a 40-minute long video of that, which you can check out after the break.

Continue reading “MRRF: Roundtable And Roundup”

Piezoelectric Crystal Speaker For Clock Radio Is Alarmingly Easy To Make

cockadoodledooLet’s face it: most of us have trouble getting out of bed. Many times it’s because the alarm isn’t loud enough to rouse us from our viking dreams. [RimstarOrg]’s homeowner’s association won’t let him keep a rooster in the backyard, so he fashioned a piezoelectric crystal speaker to pump up the volume.

[RimstarOrg]’s speaker uses a Rochelle salt crystal strapped to a bean can diaphragm. In his demonstration, he begins by connecting an old clock radio directly to the crystal. This isn’t very loud at all, so he adds a doorbell transformer in reverse. This is louder, but it still won’t get [RimstarOrg] out of bed.

Enter the microwave oven transformer. Now it’s sufficiently loud, though it’s no fire bell alarm. He also demonstrates the speaker using a piezo igniter from one of those long barbecue lighters and a crystal radio earpiece. As always, the video is after the jump. [RimstarOrg] has a lot of relevant linkage in the summary so you can learn how to grow your own Rochelle crystals.

Continue reading “Piezoelectric Crystal Speaker For Clock Radio Is Alarmingly Easy To Make”