Don’t Blink, Ken… Or The Weeping Barbie Will Get You

WeepingBarbies
That which holds the image of an Angel becomes itself an Angel. Have fun with that.

Barbie dolls have been around since 1959, but never before have they been this terrifying. [anthropolywog] decided to kick the creepy factor up a notch by modifying some poor, defenseless Barbie dolls into weeping angels.

If you aren’t familiar with the weeping angel concept, you probably don’t watch Dr. Who. The weeping angel episode, titled “Blink“, is now considered a classic Dr. Who episode. The basic premise is that some creepy, weeping stone statues can move only when no one is looking at them. Even closing your eyes for a moment to blink is enough to get them to move. It’s actually quite terrifying, but also awesome.

[anthropolywog] started by purchasing several ordinary Barbie dolls. She then cut off all of the arms at the elbow. This is because the Barbie arms do not normally bend at the elbow, and this was required to get that classic weeping angel pose. The hair was glued up into a bun, similar to the weeping angels from the show. The Barbies were then hot glued to wooden stands to make it easier to work on them.

Crinkle cotton fabric was then cut into a simple dress shape and draped over the dolls. The entire doll was then sprayed with a mixture of Elmer’s glue and water. This stiffens up the fabric and makes the whole thing look more statuesque.

The most complicated part was the wings. [anthropolywog] hand-made the wings from cardboard and craft feathers. This process took several hours of work in order to get something that would look right.

The dolls were primed for paint separately from the wings. The wings were then attached, and the whole doll was painted with “natural stone” textured spray paint. The final touch was to re-draw the faded eyes and mouths with a fine tipped permanent marker. You can see in the photo that the result turned out very well.

[via Reddit]

DIY Headphone Tube Amp Builds On Existing Design

DIY Tube Headphone Amp

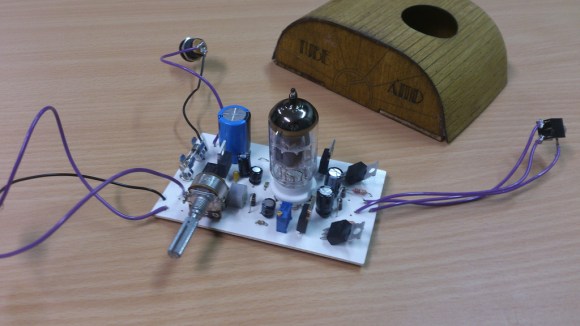
[Simon] wrote in to tell us about a headphone tube amp that he just built. It is based on schematics at diyaudioprojects.com that were actually featured on Hackaday in the past. [Simon’s] design adds an on board regulated power supply and a volume control for the input. Effort was made to keep the PCB single sided to facilitate making this at home.

DIY Tube Headphone AmpThe 12AU7 is popular due to its ruggedness and tolerance for low operational voltages. This amp design uses a plate voltage of 12, although the 12AU7 can handle up to about 330.  Since the 12AU7 is of the Twin Triode variety, one tube can be used to amplify both a left and right audio channel.
The case for the amplifier is laser cut plywood. The top piece is kerfed so that it can bend around the radii of the front and rear panels. The top also has a hole cut in it to allow the tube to peek out through.The pieces look nice but, unfortunately, he doesn’t show the case and amp in an assembled state.

If you’re interested in building one of these, [Simon] made all of the Eagle and Case files available. The total cost of the project was £25, about $43 US. To learn more about how tube amplifiers work, check out this Retrotechtacular from earlier in the year.

Brighten Your Day With Studio Strobe Power Hack

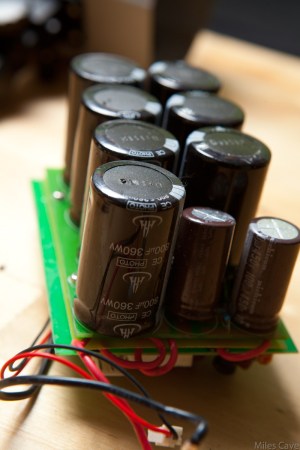
large capacitor bank for flash circuit

[OiD] picked up a couple of cheap studio strobes off eBay and was not happy with the power control. So he rewired it. These lights are like supercharged flashes for professional photographers, and contain some very large capacitor banks. His first hack didn’t work out too well, and he wound up welding the innards of a switch together. He was successful however, in his second attempt to tame the large voltages.

He’s using two 1N5408 diodes, which are rated at 3 amps, for charging the capacitor bank. A massive 60EPS08 diode, rated at 60 amps with a Frankenstein worthy surge rating of 950 amps is used to separate the charge between the two capacitor banks, and allows one to discharge into the flash tube.

Consisting of just a handful of components, [OiD]’s hack greatly improves the performance of the strobe’s power adjustment settings. He does an excellent job at documenting the hack for all to see. Be sure to check out his bog for full details.

Astronaut Or Not — Voter Lottery Tomorrow!

astronaut-or-not-voter-lottery

Fair warning, if you haven’t voted on Astronaut or Not you may come up short tomorrow. [Brian] will once again draw a random hacker number at 10am EDT (GMT -4).

If that hacker has voted in this round (we’re still in the first round of voting) they will win this fabulous oscilloscope. If they haven’t voted… no fancy scope for you!

We’re hoping to close this round of voting early next week at which time we’ll award prizes to the projects that received the most votes and start another round with a different theme.

Fail Of The Week: Blown Light Bulb Controllers

fotw-nyc-resistor-chandelier-driver

We’ve been meaning to get around to this one for many weeks now. It’s been hard to find good fail write-ups… it’s as if hackers are afraid to admit that sometimes projects fail. We hope you’ll shake off that opinion as failure is the fastest path for learning and true understanding!

[xymax] was working on a control system for a chandelier with 150 bulbs which use 5 Watts each. This project was being readied for the NYC Resistor Interactive Party which [Adam Fabio] attended last month. As deadline for the show approached, the last piece was put in place late into the night… but it was connected backwards. In a tale worthy of a slapstick movie, the reverse polarity caused a chip on all seven controller boards for this module to blow like the one seen above. But that’s not all, the laptop being used during prototyping was connected by USB and started smoking!

All of us feel the pain of this type of equipment failure. Luckily [xymax] looked for lessons to learn instead of dwelling on the mistake itself. Use protection diodes, keyed connectors, and write about your failures. Hopefully reading this will help others avoid a similar equipment-destroying mistake.


2013-09-05-Hackaday-Fail-tips-tileFail of the Week is a Hackaday column which runs every Thursday. Help keep the fun rolling by writing about your past failures and sending us a link to the story — or sending in links to fail write ups you find in your Internet travels.

XOXO For The OCXO

HPocxo

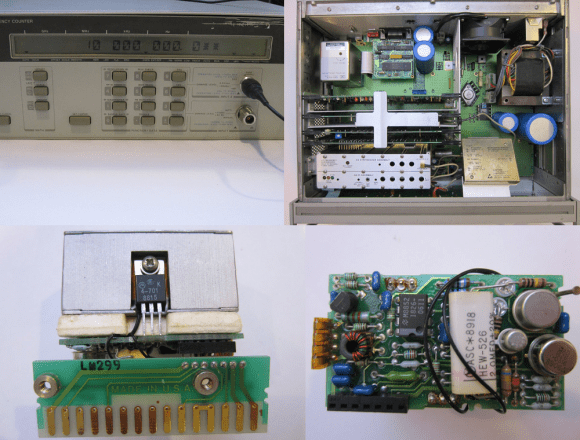
[Kerry Wong] recently got himself a frequency counter. Not just any counter, a classic Hewlett-Packard 5350B Microwave Counter. This baby will go 10Hz all the way up to 20GHz with only one input shift. A true fan of Hackaday Prize judge [Dave Jones], [Kerry] didn’t turn it on, he took it apart. In the process, he gave us some great pictures of late 80’s vintage HP iron.

Everything seemed to be in relatively good working order, with the exception of the oven indicator, which never turned off. The 5350B had three time bases available: a Thermally Compensated Crystal Oscillator (TCXO),  an Oven Controlled Crystal Oscillator (OCXO), and a high stability OCXO. [Kerry’s] 5350B had option 001, the OCXO. Considering it was only a $750 USD upgrade to the 5350B’s $5500 USD base price, it’s not surprising that many 5350B’s in the wild have this option.

[Kerry] checked the wattage of his 5350B, and determined that it pulled about 27 watts at power up and stayed there. If the OCXO was working, wattage would have dropped after about 10 minutes when the oven came up to temperature. Time to tear open an oven!

Armed with a copy of the 5350B service manual from HP’s website, [Kerry] opened up his OCXO. The Darlington transistors used as heaters were fine. The control circuit was fine. The problem turned out to be a simple thermal fuse. The service manual recommended jumping out the fuse for testing. With the fuse jumped, the oven came to life. One more piece of classic (and still very useful) test equipment brought back to full operation.

[via Dangerous Prototypes]

THP Hacker Bio: Radu.motisan

thp-contestant-bio-radu-motisan

Here’s a great example of thinking big while keeping it simple. [Radu Motisan‘s] putting together a global radiation monitoring network as his entry in The Hackaday Prize.

The simplicity comes in the silver box pictured above. This houses the Geiger tube which measures radiation levels. The box does three things: hangs on a wall somewhere, plugs into Ethernet and power, and reports measurements so that the data can be combined with info from all other functioning units.

After seeing the idea we wanted to know more about [Radu]. His answers to our slate of queries are found below.

Continue reading “THP Hacker Bio: Radu.motisan”