Joule Thief Steals Power For A Clock

A common project among electronics tinkerers is the joule thief, a self-oscillating circuit that can “steal” the remaining energy in a battery after the voltage has dropped so low that most devices would stop working. Typically the circuit powers an LED until almost all of the energy is extracted from the battery, but [Lionel Sears] has created a specialized joule theif that uses the “extra” energy to power a clock.

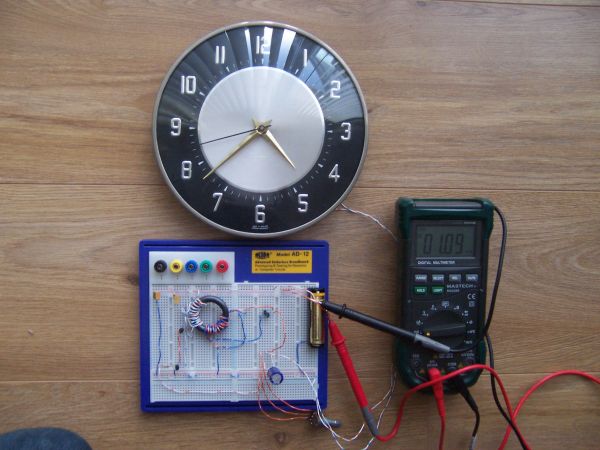
The circuit uses four coils instead of the usual two to extract energy from the battery. The circuit charges a large capacitor which provides the higher current pulses needed to drive the clock’s mechanism. It can power the clock from a single AA battery, and will run until the voltage on the battery is only 0.5 volts.

Normally the clock would stop running well before the voltage drops this low, despite the fact that there’s still a little chemical energy left in the batteries. The circuit can drive the clock for an extended time with a new battery, or could use old “dead” batteries to run the clock for a brief time while the final little bit of energy is drawn from them. If you’re so inclined, you could even use hot and cold water with a joule thief to run your clock! Thanks to [Steven] for the tip.

Transformer Inductive Coupling Simulation Is SFW

[James] has a friend who teaches at the local community college. When this friend asked him to build a transformer coupling simulation, he was more than happy to oblige. Fortunately for us, he also made a video that explains what is happening while  showing the output on a ‘scope.

For the simulation, [James] built primary and secondary coils using PVC pipe. The primary coil consists of 11 turns of 14AWG stranded wire with 4V running through it applied. The first secondary he demonstrates is similarly built, but has 13 turns. As you’ll see, the first coil induces ~1.5V in the second coil. [James] first couples it with the two windings going the same way, which results in the two 2Mhz waveforms being in phase with each other. When he inserts the secondary the other way, its waveform is out of phase with the primary’s.

His second secondary has the same diameter PVC core, but was wound with ~60 turns of much thinner wire—28AWG bell wire to be exact. This match-up induces 10V on the secondary coil from the 4V he put on the primary. [James]’ demonstration includes a brief Lissajous pattern near the end. If you don’t know enough about those, here’s a good demonstration of the basics coupled with an explanation of the mechanics behind them.

Continue reading “Transformer Inductive Coupling Simulation Is SFW”

Auto Bike Light: On When Moving Off When Not

If you’re plagued by perpetually dead bike light batteries you’ll like this one. It’ll also fix the problem of remembering to turn the lights on in the first place. This hack uses an accelerometer to switch the light when the bike is in motion.

In this case the bike light was chosen for its ability to fit the control board inside the case. But with this proof-of-concept you can easily spin a tiny board with uC and accelerometer to replicate the functionality (the Bluetooth module shown above is going unused in this application). Many accelerometer chips have low-power mode that can be used to was a uC so we could easily see this having very little impact on the normally battery life of your light. The one caveat being the need to regulate the voltage as many of these lights take a 12V cell.

The other alternative is to make sure your battery is always charging during the day. This solar setup is one way, but then you won’t want to leave the thing unattended.


Even More Power Wheels Racers

With the Power Wheels Racing series wrapping up for the year, the teams are winding down and writing up their build and rebuild logs for their cars. In previous years, the kids from MIT, a.k.a. MITERS, have brought small electric cars to the races, but nothing like this. It’s a true Power Wheels, or at least the plastic shell, an alternator, a huge battery pack, and a completely custom drivetrain.

[Dane], [Ben], [Rob], [Mike], and [Ciaran] started their build with an alternator that was salvaged from [Charles]’ Chibi-Mikuvan, added a motor from a CDROM drive for a sensor, and basked in the glory of what this cart would become. The frame was crafted from 1″ square tube, a custom disc brake machined, and a 10S2P battery pack built.

The alternator the team used for a motor had a rather small shaft, and there were no readily available gearboxes. The team opted to build their own with helical gears milled on the MITERS Bridgeport mill. That in itself is worth of a Hackaday post. Just check out this video.

With the build held together with duct tape a baling wire, the team headed out to the races in Detroit. Testing the racer before getting to Detroit would have been a good idea. During the endurance race, a set of 10″ rear tires were torn apart in just four laps, impressively bad, until you realize the smaller pink tires that were also from Harbor Freight fared even worse.

After a few races, the MITERS team figured out the weaknesses of their car and managed to get everything working perfectly for the race at Maker Faire NY.

Continue reading “Even More Power Wheels Racers”

Simple Photo Flash Trigger For Water Balloon Photography

Water Balloon Photography

There have been countless projects to make custom photo flash trigger circuits. Usually the circuits react to sound, triggering the camera flash at the moment a certain sound is triggered. That type of trigger can be used to detect the popping of a balloon or shattering of glass. Other triggers detect motion, like a projectile crossing a laser beam for example. [Udo’s] friend had a fun idea to take photos of water balloons popping. Unfortunately neither of those trigger methods would be well suited for this situation. That’s when [Udo] had to get creative.

[Udo] built a unique trigger circuit that uses the water inside the balloon as the trigger. The core component of the circuit is an Arduino. One of the Arduino’s analog pins is configured to enable the internal pull-up resistor. If nothing else is connected to the pin, the Arduino will read 5 volts there. The pin is connected to a needle on the end of a stick. There is a second needle on the same stick, just a short distance away from the first. When these needles pierce the balloon’s skin, the water inside allows for a brief moment of conductivity between the two pins. The voltage on the analog pin then drops slightly, and the Arduino can detect that the balloon has popped.

[Udo] already had a flash controller circuit. He was able to trigger it with the Arduino by simply trying the flash controller’s trigger pin to one of the Arduino’s pins. If the Arduino pulls the pin to ground, it closes the switch on the flash controller and the flash is triggered. Both circuits must share a common ground in order for this to work.

All of the code for [Udo’s] project is freely available. With such spectacular photographs, it’s only a matter of time before we see more of these floating around.

Fail Of The Week: Sonar Submersibility Sealing

For the last decade or so, [Jason] has wanted to build an underwater robot. Can you blame him? More recently, he’s been researching sonar sensing and experimenting with the relatively inexpensive HC-SR04 module. Since he had good luck getting it to work with a PC sound card and a Stellaris Launchpad, he figured it was time to try using it underwater.

Hydrophone research led him to the idea of submerging the sensor in mineral water oil to both seal it and couple it with the water. Unfortunately, the HC-SR04 only sends one pulse and waits for echo. Through the air, it reliably and repeatedly returned a small value. Once inside a pill bottle filled with mineral oil, though, it does something pretty strange: it fluctuates between sending back a very small value and an enormous value. This behavior has him stumped, so he’s going to go back to the Launchpad unless you can help him figure out what’s going on. Should he use a different method to seal it?


2013-09-05-Hackaday-Fail-tips-tileFail of the Week is a Hackaday column which runs every Thursday. Help keep the fun rolling by writing about your past failures and sending us a link to the story — or sending in links to fail write ups you find in your Internet travels.

Get Ready For Hackaday Munich By Attending Make Munich

Need something to get you revved up for the Hackaday get-together in Munich next month? Don’t miss out on this year’s Make Munich.

The two-day festival will be held in Munich on November 1st and 2nd. Last year there were about 2500 in attendance and this year is shaping up to be even bigger! Wander through the exhibits to see what others have been building during their spare time. You’ll see everything from 3D printing, to custom electronics, crafts, art pieces, talks, and more. What a wonderful way to draw inspiration for the projects you want to pull off this winter!

What’s that you say? You have something to show off at Make Munich? You could always just carry it around with you but maybe it’s better to apply for a booth or to give a talk.

Seeing all that Make Munich has to offer should get you excited about doing some hands on hacking and you’ll have the chance just a couple of weeks later. The Hackaday crew is hard at work planning our own afternoon hackathon and evening party. Block out your calendar on Thursday, November 13th. We’re not quite ready to give away free tickets but watch the front page for an announcement soon!

We’re lucky to have a lot of people in the Munich area helping get the word out. A special thanks to [Nils Hitze] who is organizing Make Munich and has already connected us with a lot of interesting parts of the hacker community in the area.