Frappé Coffee Robot Offers Automated PIC-Me-Up

Although [Giorgos Lazaridis] has graced Hackaday several times, we’ve never covered the build of his frappé machine which reader [Jim] encountered after searching for information about the PIC16F1937. His site shows the build as in-progress, but he definitely has a working prototype here, and it’s definitely awesome.

Frappé coffee is made by mixing spray-dried instant coffee, a small amount of cold water, and sugar to taste in a manual shaker or a milkshake machine that uses a single beater. More water and/or milk is added as desired to top off the glass. The method was invented by accident in Thessaloniki, Greece, and has become quite popular.

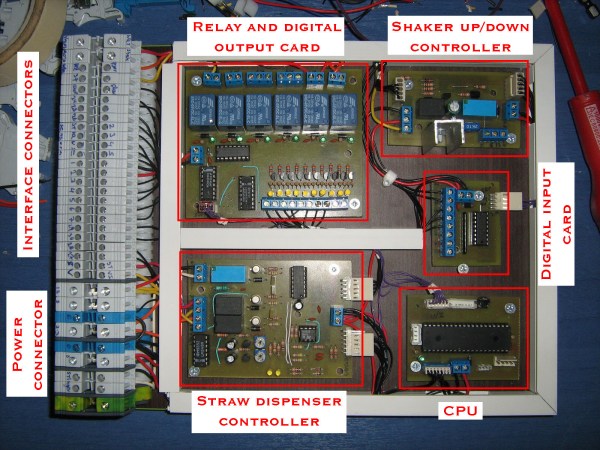
In addition to sixteen pages of detailed build logs, [Giorgos] shot videos that demonstrate each of the modules that make up the machine. The operator puts a glass in a holder attached to a turntable. It moves first to the coffee and sugar dispenser, which fall through the same easily removable funnel. The next stop combines the add-water-and-beat steps beautifully. A length of hose strapped to the beater’s housing dispenses the initial cold water base. Then, the beater lowers automatically to beat the mixture. After mixing, the beater is drawn back up an inch or so, and more water is dispensed to rinse it off. Then the beater is fully withdrawn and the glass is filled the rest of the way. The final stop for the frappé is essential to the process: a bendy straw must be added. This is vitally important, and [Giorgos] handles it admirably with a stinger that shoots a straw into the glass.

[Giorgos]’s coffee robot is built around a PIC16F1937. He rolled his own PCB for the motherboard and each of the machine’s modules. There is a lot of logistical ingenuity going on in this project, and [Giorgos]’ build logs convey it all very well. Be sure to check out [Giorgos]’ machine in action after the break. The full set of eight videos that shows each module and culminates in the one below is well worth your time.

Continue reading “Frappé Coffee Robot Offers Automated PIC-Me-Up”

Micro Word Clock

A word clock – a clock that tells time with words, not dials or numbers – is one of those builds that’s on every Arduino neophyte’s ‘To Build’ list. It’s a bit more complex than blinking a LED, but an easily attainable goal that’s really only listening to a real time clock and turning a few LEDs on and off in the right pattern.

One of the biggest hurdles facing anyone building a word clock is the construction of the LED matrix; each LED or word needs to be in its own light-proof box. There is another option, and it’s something we’ve never seen before: you can just buy 8×8 LED matrices, so why not make a word clock out of that? That’s what [Daniel] did, and the finished project is just crying out to be made into a word watch.

[Daniel]’s word clock only uses eight discrete components: an ATMega328p, a DS1307 real time clock, some passives, and an 8×8 LED matrix. A transparency sheet with printed letters fits over the LED matrix forming the words, and the entire device isn’t much thicker than the LED matrix itself.

All the files to replicate this build can be found on [Daniel]’s webpage, with links to the Arduino code, the EAGLE board files, and link to buy the board on OSH Park.

Turn Cordless Tool Batteries Into USB Chargers

It is the unspoken law of cordless tools – eventually you will have extra batteries lying around from dead tools that are incompatible with your new ones. Some people let them sit in lonesome corners of the garage or basement; others recycle them. [Eggmont] was facing this dilemma with a Makita battery from a broken angle grinder and decided to make a USB charger out of it.

[Eggmont] took the simplistic approach, using an old cigarette lighter-to-USB adapter. First, [Eggmont] removed the battery connector from the bottom of the broken angle grinder. Next, the casing surrounding the cigarette lighter plug was removed so that the adapter’s wires could be soldered to the contacts on the battery connector.  The USB ports were then glued onto the top of the connector. The adapter was rated 9-24V input, so it was fine to use it with the 18V tool battery. Since the battery connector is still removable, the battery can be recharged.

Tool manufacturers are tapping into the market of repurposing old batteries for charging mobile devices. Both DeWalt and Milwaukee Tool have now created their own USB adapters that connect to their batteries. Or, you can purchase the Kickstarter-funded PoweriSite adapter for DeWalt batteries instead. Compared to their cost, [Eggmont’s] project is very economical if you already have the battery at hand – you can find the USB adapter for less than $10 on Amazon.

The Halfbug

[Alex] posted up build details of his robot, Halfbot, on Tinkerlog. We’ve been big fans of his work ever since his Synchronizing Fireflies Instructable way back in the day. [Alex’s] work usually combines an unconventional idea with minimalistic design and precise execution, and Halfbot is no exception.

You’ll have to watch the video (embedded below the break) to fully appreciate the way it moves. The two big front legs alternate with the small front pads to make an always-stable tripod with the caster wheel at the back. It lifts itself up, moves a bit forward, and then rests itself down on the pads again while the legs get in position for the next step. It’s not going to win any speed tournaments, but it’s a great-looking gait.

The head unit also has two degrees of freedom, allowing it to scan around with its ultrasonic rangefinder unit, and adding a bit more personality to the whole affair.

[Alex] mentions that he’d recently gotten a lathe and then a CNC mill. So it’s no surprise that he made all the parts from scratch just to give the machines a workout. We think he did a great job with the overall aesthetics, and in particular the battery pack.

We’re excited to see how [Alex] adds new behaviors as he develops the firmware. No pressure!

Continue reading “The Halfbug”

[Fran]’s New Project: The DSKY

[Fran] has already made a name for herself in some retro cool historical aviation and computer circles by tearing down a flight-ready spare of a Saturn V launch vehicle digital computer, the computer that was responsible for getting all flights to the moon into low earth orbit. Now she’s ready for another project, and again, this is something that hasn’t been done in 40 years. She’s building a DSKY, the control panel for the Apollo Guidance Computer

The Apollo Guidance Computer is a well-documented piece of computing history, with homebrew versions all over the web. The DSKY is only one small part of the AGC, but it is by far the most famous module. Being the only user interface for the AGC, it’s the only part of the AGC that gets all the screen time in Apollo 13, the travesty on BluRay that was Apollo 18, and is the only device that bears any physical resemblance to its real-life counterpart in a number of AGC simulators.

That’s not to say DSKY builds haven’t been attempted before; there are a few out there using LEDs and off-the-shelf buttons for the build, but the DSKY from the mid-60s is much, much cooler than a bunch of LEDs and light pipes. The eery green numbers are actually EL displays. Guess how those displays are controlled? Relays. It’s a masterpiece of technology, made even more impressive in that the folks at MIT who built the thing didn’t have anything better to build the display with.

Because of her deconstruction efforts with the Saturn V LVDC, [Fran] was invited down to the National Air and Space museum in the middle of Washington DC. There, she saw everyones favorite ugliest spacecraft, the Apollo LEM, along with an incredible assortment of paraphernalia from aviation history. The Wright Flyer – yes, the original one – is hanging from the ceiling next to the Spirit of St. Louis, and X-15 rocket plane, right above the command module Columbia from Apollo 11. Copies of probes currently rolling over Mars are on display, and you can walk through a training model of Skylab. If you’ve never been, spend half a day there, then take the metro out to the Udvar-Hazy center, where you’ll find all the stuff they couldn’t fit in the downtown collection like a Space Shuttle and a Concorde.

This is only the first part of [Fran]’s vlog documenting the construction of a copy of the DSKY, and we haven’t even seen the inner guts of the most famous part of the AGC yet. She’s been working on this for a while now, and there’s no doubt she’ll finish the job and come up with the best replica of a DSKY ever.

Second Life world thru Oculus Rift

Ask Hackaday: What Is The Future Of Virtual Reality?

Most of us have heard of Second Life – that antiquated online virtual reality platform of yesteryear where users could explore, create, and even sell content.  You might be surprised to learn that not only are they still around, but they’re also employing the Oculus Rift and completely redesigning their virtual world. With support of the DK2 Rift, the possibilities for a Second Life platform where users can share and explore each other’s creations opens up some interesting doors.

Envision a world where you could log on to a “virtual net”, put on your favorite VR headset and let your imagination run wild. You and some friends could make a city, a planet…and entire universe that you and thousands of others could explore. With a little bit of dreaming and an arduino, VR can bring dreams to life.

Continue reading “Ask Hackaday: What Is The Future Of Virtual Reality?”

Hacklet 24 – Raspberry Pi Projects

Experimenting with embedded Linux used to mean reformatting an old PC, or buying an expensive dev board. In February of 2012, the Raspberry Pi was released, and it has proven to be a game changing platform. According to the Raspberry Pi Foundation, over 3.8 million boards have been sold. 3.8 million translates into a lot of great projects. This week’s Hacklet focuses on some of the best Raspberry Pi projects on Hackaday.io!

rpfpvWe start with [richardginus] and the RpiFPV (aka Raspberry Pi First Person View) project. [Richardginus]  is trying to build a low latency WiFi streaming camera system for radio-controlled models using a Raspberry Pi and camera. He’s gotten the system down into a respectable 160 milliseconds on the bench, but in the field interference from the 2.4GHz R/C transmitter drives latency way up. To fix this, [Richardginus] is attempting to control the plane over the same WiFi link as the video stream. We’d also recommend checking out some of those “outdated” 72 MHz R/C systems on the used market.

piholgaNext up is [James McDuffie] and his RPi Holga. Inspired by [Peter’s] Holga camera project, [James] has stuffed a Raspberry Pi model A, a camera module, and a WiFi adapter into a Holga camera body. The result looks like a stock Holga.  We saw this camera up close at the Hackaday 10th Anniversary event, and it fooled us – we thought [James] was just a lomography buff. It was only after seeing his pictures that we realized there was a Pi hiding inside that white plastic body! Definitely check out [James’] instructions as he walks through everything from hardware mods to software installation.

cluster2No Raspberry Pi list would be complete without a cluster or two, so we have [Tobias W.] and his 3 Node Raspberry Pi Cluster. The Raspberry Pi makes for a cheap and efficient platform to experiment with cluster computing. [Tobias] did a bit more than just slap a few Pis on a board and call it a day though. He custom machined an aluminum plate to hold his 3 node cluster. This makes wire management a snap. The Pi’s communicate through a four port Ethernet hub and all run from a single power supply. He even added a key switch, just like on the “old iron” mainframes. [Tobias] has been a bit quiet lately, so if you run into him, tell him we’re looking for an update on that cluster!

pivenaFrom [Tim] comes the PIvena, a Raspberry Pi laptop which takes its styling cues from [Bunnie Huang’s] Novena computer.  Pivena is a bit smaller though, with a 7” HDMI LCD connected to the Pi. The case is made from laser cut wood and a few 3D printed parts. Everything else is just standard hardware. [Tim] kept the PIvena’s costs down by using a wooden kickstand to hold up the screen rather than Novena’s pneumatic spring system. The base plate of the PIvena includes a grid of mounting holes just like the Novena. There is also plenty of room for batteries to make this a truly portable machine.  The end result is a slick setup that would look great at any Hackerspace. We hope [Tim] creates an update to support the new Raspberry Pi B+ boards!

Our Raspberry Pi-based alarm clock is chiming the hour, so that’s about it for this episode of the Hacklet! As always, see you next week. Same hack time, same hack channel, bringing you the best of Hackaday.io!