Can’t Stand Your Noisy Fan? Here’s A Plan, Man

[Brian] adores his GW Instek GPC-1850D power supply, but it’s annoyingly loud and disruptive to his audio projects. The thing works great, so he decided to regulate the fan’s speed based on usage level to save his sanity.

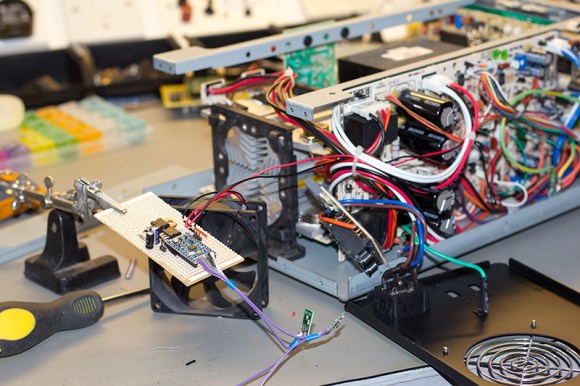
Once [Brian] got under the hood, he found that it actually has four separate heatsinks: one for the bridge rectifiers and one for each power transistor on the three output channels. The heatsinks are electrically and thermally isolated from each other and change temperature based on the channel being used.

[Brian] and his associates had several Microchip MCP9803 temperature sensors kicking around the lab from previous projects, so they put one on each heatsink. The great thing about these is their address selection pins which let all four of them sit together on the I²C bus to Arduinoville. Each sensor is insulated and clamped to its heatsink with a piece of meccano and a dab of thermal paste.

[Brian] used an Arduino Mini and built the circuit on stripboard. The fan runs at 24V, so he’s sharing that with the Arduino through a 7805. He controls the speed of the fan with PWM from the Arduino fed through a MOSFET. The Arduino reads from each sensor and determines which one is hottest. [Brian] wanted the fan to run at all times, so he set a base speed of 20%. When the heatsinks reach 30°C/86°F, the fan speed is increased to 40%. After that, the speed increases at 5°C/9°F intervals until it reaches max speed at 65°C/149°F.

You can grab the code and schematic from [Brian]’s repo. If you want to study your heatsinks, build this heatsink tester first.

Homebrew Phase Laser Rangefinder

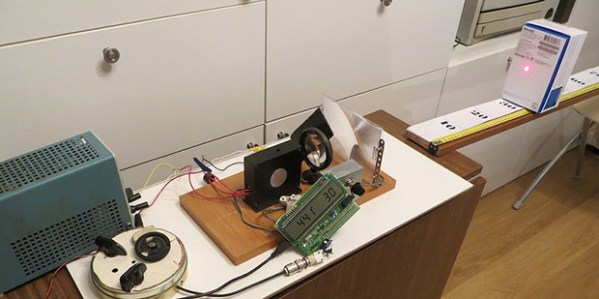
Just when you thought ARM micros couldn’t get any cooler, another project comes along to blow you away. [Ilia] created a phase laser rangefinder (.ru, Google translatitron) using nothing but a laser diode, a pair of magnifying glasses, a few components and an STM32F4 Discovery dev board.

The theory behind this build is using a laser’s phase to determine how far away an object is. By modulating the laser diode’s output at a few hundred Mhz, the reflection from the laser can be compared, giving a fairly reasonable estimate of how far away the target is. This method has a few drawbacks; once the reflection is more than 360 degrees out of phase, the distance ‘loops around’ to being right in front of the detector.

The laser diode used does not have any modulation, of course, but by using an STM32F4 ARM chip, [Ilia]was able to modulate the amplitude of the laser with the help of a driver board hacked out of a 74HC04 chip and a few resistors. Not ideal, but it works.

The receiver for the unit uses a photodiode feeding into the same microcontroller. With an impressive amount of DMA and PLL wizardry (the STM32F4 is really cool, you know), the phase of both the transmission and reflection can be compared, giving a distance measurement.

It’s all an impressive amount of work with a hacked together set of optics, a cheap dev board, and a few components just lying around. For any sort of application in a robot or sensor suite this project would fall apart. As a demonstration of the theory of phase laser rangefinding, though, its top notch.

You can check out a video of [Ilia]’s rangefinder below. Be sure to full screen it and check out the distance measurement on the LCD. It’s pretty impressive.

Thanks [Володимир] for the link.

Continue reading “Homebrew Phase Laser Rangefinder”

Wireless Charging… Have A Heart

wireless heart charger

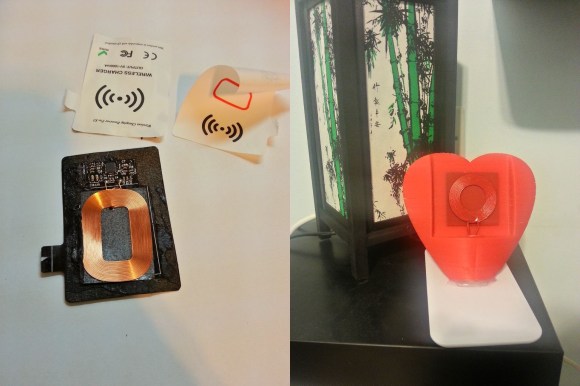
[Gal Naim] recently finished off an awesome Valentine’s day present for special someone. It’s a wireless charging heart for your phone!

He already had the Qi wireless charger but wasn’t much of a fan as it “looks so boring”. So he took it apart to salvage the charging circuit for his new project. As luck would have it, the Qi is very simple on the inside — all he had to do was lengthen the power wires to the coil. He then designed his heart in SolidWorks — Don’t forget to check out our 3D Printering tutorials on this — and printed it out in a nice candy apple red. To maximize the charging current he’s left the inductive loop on the outside so it can be as close to the phone as possible — he spray painted it red and it actually looks pretty cool!

The next step was adding the wireless charging capability to the phone, we’ve covered how to add this to any phone before, but for [Gal] it was as simple as cutting down the Qi Receiver card to fit in the phone.

Continue reading “Wireless Charging… Have A Heart”

Ridiculously Accurate Mission Control Panel

We are absolutely blown away by the level of detail that went into this amazing mission control panel that [Jeff Highsmith] made for his son.

His kid just started school and needed a desk to do homework on. They had recently visited the Kennedy Space Center, and his son found a new interest in all things space — So [Jeff] took the opportunity to make the desk into this mind-boggling control panel. 

We saw a similar project recently, but this one seems to take it to the next level. The desk itself is hand-made from MDF sheet and with oak boards making up the structural members. He’s cut out over a dozen individual control panels, added switches, LEDs and potentiometers, and printed the labels on transparencies which give the whole thing a very professional and finished look. An iPad sits in the middle which plays a curated collection of space videos.

Continue reading “Ridiculously Accurate Mission Control Panel”

Gamebuino: A Handheld Arduino Gaming Console Ready For Prime Time

[Rodot] wrote in to tell us about the Gamebuino, a very nicely designed and easily reproducible version of his handheld Arduino gaming console. We originally featured [Rodot’s] Arduino based gaming console over a year ago.

With the Gamebuino, you too can build your own games and gaming hardware around the Arduino. While there is a lot of information currently missing from the site’s Wiki, such as the layout and game code, [Rodot] plans on making everything open source. The console includes a rechargeable lithium battery, a micro SD card, and I2C expansion connectors. This is one project to keep an eye (and two hands) on, especially since a full game library is going to be provided, letting you easily create your own games. See what the console can do in the demo video after the break.

It would be amazing so see some old Game Boy games ported to run on the Arduino, or maybe one of our readers can make an Game Boy emulator for the Arduino!
Continue reading “Gamebuino: A Handheld Arduino Gaming Console Ready For Prime Time”

Sparkfun’s AVC 2014: Robots, Copters, And Red Balloons Of Death, Oh My!

SparkFunAVC2014

Registration is open for Sparkfun’s 2014 Autonomous Vehicle Competition (AVC)! Every year the fine folks at Sparkfun invite people to bring their robots, rovers, and drones  to Colorado to see who is the king of the hill – or reservoir as the case may be. We see plenty of robots here at Hackaday, but precious few of them are autonomous. To us that means capable of completing complex tasks without human intervention. Sparkfun has spent the last five years working toward changing that. Each year the robots get more complex and complete increasingly difficult tasks.

The competition is essentially a race through the Boulder reservoir. Time is key, though there are multiple ways to gain bonus points. For aerial vehicles there are two classes: fixed and rotary wing. Planes fall under the fixed wing category. Helicopters, gyrocopters, tricopters, quadcopters, and beyond fall into rotary wing. We’re holding out hope that e-volo shows up with their Octadecacopter. Ground vehicles have a few more class options. Micro/PBR class is for robots with a build cost less than $350 total, or small enough to fit into box that’s 10″x6″x4″. The doping class is unlimited. Sparkfun even mentions costs over $1kUSD+, and weights over 25LBS. Non-Traditional Locomotion class is for walkers, WildCats and the like. Peloton is Sparkfun’s class for robots that don’t fit into the other classes.

Sparkfun is also making a few changes to the course this year. A white chalk line will be drawn through the course, so robots don’t have to rely on GPS alone for navigation. We’re hoping to see at least a few vision systems using that chalk line. Aerial robots will have to contend with three “Red Balloons of Death”. Robots can navigate around the balloons without penalty. The balloons can be bumped or even popped for bonus points, but the robot must do this with its own body. Projectile weapons are not allowed. To say we’re excited about the AVC would be an understatement. As much as we enjoy watching the big players at competitions like the DARPA Robotics Challenge, we love seeing individuals and small teams of hobbyists compete every year at the AVC. Click on past the break for Sparkfun’s AVC 2013 wrap up video.

Continue reading “Sparkfun’s AVC 2014: Robots, Copters, And Red Balloons Of Death, Oh My!”

Persistence Of Vision Would Make A Great HUD

povtyp

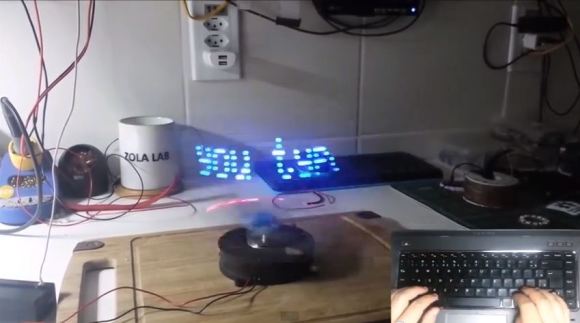
[Eduardo Zola] has just put the finishing touches on this awesome real-time persistence of vision display which displays text as you type!

It looks like the display is mounted on a small DC fan, which [Eduardo] powers using a bench top power supply. This allows him to fine tune the speed manually, without adjusting the the actual POV controller. The display receives the characters from the keyboard via a small USB RF receiver, and it has got a pretty snappy response time.

There isn’t too much more info on the project, but it certainly gives us an idea — could persistence of vision be used to create a kind of heads up display in a vehicle? What do you think?
Continue reading “Persistence Of Vision Would Make A Great HUD”