Using A Computer To Read Braille

braille

[Matthiew] needed to create a system that would allow a computer to read braille. An electromechanical system would be annoying to develop and would require many hardware iterations as the system [Matthew] is developing evolves. Instead, he came up with a much better solution using a webcam and OpenCV that still gets 100% accuracy.

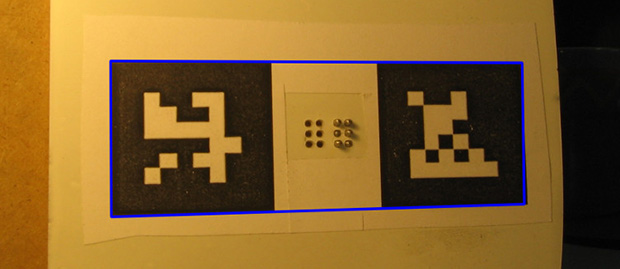
Instead of using a camera to look for raised or lowered pins in this mechanical braille display, [Matthiew] is using OpenCV to detect the shadows. This requires calibrating the camera to the correct angle, or in OpenCV terms, pose.

After looking at the OpenCV tutorials, [Matthiew] found a demo that undistorts an image of a chess board. Using this same technique, he used fiducials from the ARTag project to correctly calibrate an image of his mechanical braille pins.

As for why [Matthiew] went through all the trouble to get a computer to read braille – something that doesn’t make a whole lot of sense if you think about it – he’s building a braille eBook reader, something that just screams awesome mechanical design. We’d be interested in seeing some more info on that project as well.

Upgrading Home Automation To Home Anticipation

geofencingHomeAnticipation

[Bithead’s] already built some home automation to control the lighting and temperature in his house while he’s away, but he wanted to take things a step further and have the house automatically anticipate his arrival and adjust the environment accordingly. The project takes advantage of geofencing to create a perimeter around the home that listens for a transceiver in [Bithead’s] car. We featured a similar project with a Raspi a few months ago, which locked the doors upon driving away.

[Bithead’s] implementation uses a pair of Digi Xbee Pro XSC radios with U.FL antennas to provide an impressive 2+ mile range of communication. The home-based Xbee hooks up to a Parallax Xbee USB adapter and subsequently into his computer—its antenna sits in a nearby window on the top floor of his house to maximize range. For his car, [Bithead] originally opted for an Xbee shield and an Arduino Uno, but he’s recently overhauled the build in favor of an Arduino Fio, which reduced the footprint and increased the range. Check out his page for the build log specifics and more pictures.

Adding An RPM Readout For A Home Made CNC Mill

rpm_lcd

[Rui] recently put the finishing touches on his homemade CNC mill, which utilizes a dremel-like rotary tool. The problem with using rotary tools for this kind of application is you don’t really have an accurate speed readout… so he designed his own RPM gauge.

The sensor is in itself very simple. He’s using a TLE4935L hall effect sensor, a spare 16FE88 microcontroller, a Nokia LCD, and one tiny neodymium magnet. The magnet has been carefully epoxied onto the motor fan, with the hall effect sensor close by. He’s also built a guard around it, just in case the magnet decides to fly off at high speeds.

During testing he hooked up the hall effect sensor to both his home-made circuit, and an oscilloscope to confirm his findings. Once he was assured everything was working properly he sealed it off and mounted the LCD above the spindle as a nice digital readout.

Continue reading “Adding An RPM Readout For A Home Made CNC Mill”

Pneumatic Powered Flight Simulator

FX7UCGEHK6XMQ3G.MEDIUM

Remember that feature a few days ago about the Cessna 172 flight simulator? It was pretty awesome. But do you know what it was missing? It was missing this. A fully motion-controlled, pneumatically driven, flight simulator cockpit.

[Dominick Lee] is a high school senior, and he was able to whip together this awesome flight simulator made out of PVC pipe, pneumatic cylinders, an Arduino, a projector, and a gaming PC — in just a few months time! He calls it the LifeBeam Flight Simulator, and he’s released all the information required to make one yourself.

It’s most similar to a Stewart platform simulator, which features 2 degrees of freedom, but instead of 6 actuators, this one runs on only two pneumatic cylinders. It works by exporting the roll and pitch (X and Y) data from the game, and then parsing it to an Arduino which controls the pneumatic valve amplifier, powering the cylinders.

It’s an amazing project, and it sounds like [Dominick] had an awesome physics professor, [Dr. Bert Pinsky], to help mentor him. Don’t forget to check out the demonstration video!

Continue reading “Pneumatic Powered Flight Simulator”

Building A Tape Recorder In 1949

tape

After telling a few stories about how he built a tape recorder as a 16-year-old boy in post-war Germany, [Hans] was finally cajoled into retelling this story in a proper form, giving the Internet one more example of how clever old-school tinkerers could be.

In 1949, [Hans] was but a wee lad of 16 and having built a crystal and tube radio set at 13 and 14 respectively desperately wanted a tour of the local radio station in Hamburg. A kind engineer responded to a letter and a month after requesting a tour [Hans] and his friend found themselves being guided around a proper radio station. One of the most impressive pieces of technology at the time was a tape recorder, which the engineer demonstrated by recording and playing back the voices of [Hans] and his friend. This was the first time [Hans] had ever heard his voice played back and instantly knew he needed to build one of these for himself.

Technical details on the theory and operation of a tape recorder were sparse, but [Hans] managed to come up with an amplifier, tape transport mechanism, a recording and playback head, and homemade magnetic tape made from a reel of iron filings glued to a reel of 8mm film stock.

Testing the equipment, [Hans] and his friend found the device simply wouldn’t work; the homemade magnetic tape was simply too thick, and you couldn’t just go out and buy a reel of magnetic tape. Undeterred, they mailed BASF, the only manufacturer of magnetic tape, and after a month received a 1000m reel of tape.

With tape that worked, [Hans] set about improving his recorder with a tape transport mechanism built from a turntable and a new recording head. This time, his tape recorder worked. When word got around of this amazing machine that could record music, [Hans] was invited to record the local symphony and the speeches for a senior group.

The first commercial reel to reel recorders were released in Germany a little more than a year after [Hans] completed his project, making this one of the more impressive DIY projects we’ve seen.

Improve Your HT Ham Radio By Adding A Counterpoise Antenna Wire

counterpoise

We found an interesting tip that might just improve the performance of those small affordable handheld ham radios called a “Handy Talky” or HT for short in ham vernacular. [RadioHamGuy] posted an interesting video on adding a counterpoise antenna wire to an HT. He claims it will noticeably improve both transmit and receive by making a quarter-wave monopole into a makeshift dipole antenna system.

Per his instructions you basically add a short wire to the antenna’s outer ground connection or to an equivalent case screw that’s electrically connected to the antenna’s ground side. Apparently this can be referred to as a Tiger Tail and does make it look like your HT has a tail. You would construct a counterpoise antenna wire 11.5 inch for VHF, 6.5 for UHF and about 19.5 inches for an OK performing dual band VHF/UHF radio.

Normally with a handheld radio the counterpoise (ground) is your own body as you are holding the HT. This is because the capacitance of your body makes a good counterpoise under normal conditions. It would be interesting to hear what others find for performance when adding a counterpoise antenna wire.

You can watch [RadioHamGuy’s] full construction tutorial video for multiple radio types after the break.

Continue reading “Improve Your HT Ham Radio By Adding A Counterpoise Antenna Wire”

RasPi Powered ADM-3A Dumb Terminal

ADM3A

[Andrew Curtin] tipped us off to another excellent resurrected vintage one piece ADM-3A dumb terminal. [Andrew] not only resurrected this sexy machine by breathing life into her once more after 37 years but he also got it connected online to retro.hackaday.com for those coveted retro Super Nerd bonus points.

As with other ADM-3A terminals we have seen on Hackaday, the terminal screen can be interfaced over an RS-232 serial connector to a laptop, however, [Andrew] didn’t have a laptop to sacrifice so he utilized the now popular laptop stand-in RasPi. It’s a clever form factor solution which makes it appear more like a standalone computer for the first time in its life.

To make the hack work he needed a serial adapter to link the ADM-3A terminal to the Ras-PI so he constructed one for himself. It’s another clever solution but he didn’t share much information on this build. Maybe he’ll comment below or elaborate on his site with more details on the construction and utilization of the adapter board from the Ras-PI so others could easily repeat this fun hack.