USB2Serial Adapter As An I/O Device

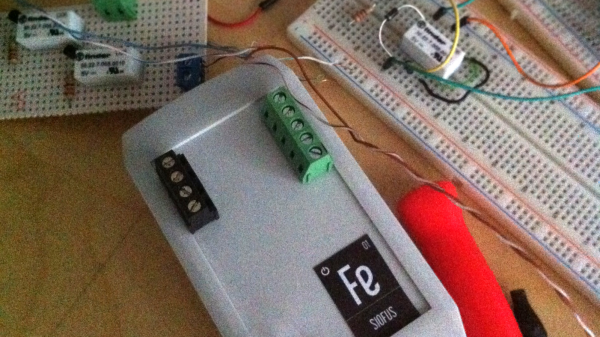
There was a time when computers had parallel ports. For the hacker types, this meant an eight bit data port, and nine additional pins which could be interfaced with the real world via the 25 pin connector. This is no longer the case, although USB does help with suitable hardware. [Jabi] was working on a project that required controlling one relay to switch a strip of LED’s. His solution was to use a USB to Serial Adapter as an I/O device (Spanish, translated here).

He wrote a short C program, SioFus (Simple Input Output from USB2SERIAL), that converts a simple USB to Serial Port Adapter into an I/O device with 4 inputs and 2 outputs. It’s simple and gets the job done. The code uses ioctl and allows DCD, DSR, CTS and RI to act as inputs while DTR and RTS act as outputs. These pins then likely control transistors that switch the relays. The SioFus code is available on github and there are a couple of to-do’s on [Jabi]’s list if you would like to chip in.

The video after the break supposedly shows the hack in action. Seems like some kind of photo booth which then spits out a QR code, possibly a URL to the picture (post in the comments if you figure out what it does).

If you are looking for a more dedicated hardware, check out the Tiny Bit Dingus – a microcontroller stuffed into a USB plug with a few controllable pins.

Continue reading “USB2Serial Adapter As An I/O Device”

Visualizing Magnetic Fields In 3D Space

[John] is working on his PhD in experimental earthquake physics, and with that comes all the trials of becoming a PhD; tuning students into the cool stuff in the field, and demonstrating tech created after 1970 to his advisers. One of the biggest advancements in his line of work in the last 30 or 40 years is all those sensors you can find in your cell phone. The three-axis magnetometer in your phone is easily capable of measuring the Earth’s magnetic field, and this chip only costs a few dollars. To demonstrate this, [John] built a 3D compass to show off the capability of these sensors, and have a pretty light show for the undergrads.

The magnetometer [John] is using is just a simple I2C magnetometer that can be found on Adafruit or Sparkfun. It’s not really anything special, but with a little bit of code, [John] can read the magnetic field strength in the x, y, and z axes.

Having a microcontroller spit out a bunch of numbers related to the local magnetic field just doesn’t seem fun, so [John] picked up two neopixel rings – one inside the other, and set 90 degrees out of plane with each other. This turns his magnetometer and Arduino setup into a real 3D compass. With this device, the local magnetic field can be visualized in the x, y, and z axes. It looks cool, which is great for undergrads, and it’s a great demonstration of what you can do with small, cheap electronic sensors.

[John] put up a screencast of a talk he gave at the American Geophysical Union meeting last year. You can check that out below.

Continue reading “Visualizing Magnetic Fields In 3D Space”

Plywood Camera Dolly

DIY Plywood Camera Dolly Looks Professional

While [Ted] was poking around the ‘net, he came across a neat little product called a camera dolly. These are used to add an artistic flair to filming. They are similar to a camera slider but can roll around on the floor or a table and do not need to follow a track. [Ted] wanted a camera dolly but the cost of a professional product seemed too expensive for what he’d actually be getting, so he set off to make his own.

[Ted] first designed the dolly in a CAD software and printed out templates for the parts. Those templates were then transferred to plywood and cut out with a jig saw. Three inline skate wheels support the frame and allow the unit to roll around. Mounted in the center of the frame is a pan and tilt camera mount.

The extraordinary part of the build is that the angle of each wheel can be adjusted independently.  This allows the dolly to do anything from rolling in a straight line to gradually traveling around a curve or even just spinning the camera in place. Each wheel mount has degree indications so that they can be adjusted very precisely as well as be returned to a previously recorded position.

New Part Day: Nordic’s New Bluetooth SoC

You don’t need to look very hard to find Nordic’s nRF51 wireless module; it’s found in hundreds of products and dozens of projects over on hackaday.io. The nRF51 is a SoC that includes an ARM Cortex M0 processor and a variety of radios for Bluetooth and other protocols. Useful, if a bit limited in processing power.

Now, Nordic has a new SoC. It’s the nRF52, a Cortex M4F processor, a Bluetooth radio, NFC, and a bunch of Flash and RAM to make just about anything you can think of possible. Yes, it’s an upgrade to the nRF51 – a better processor and NFC, and all the possibilities that come with that. Currently there’s only one part and two package options: a 6x6mm QFN48, or a wafer chip that will be covered with impregnable goo.

Already there are SDKs for IAR Workbench, Keil4 and 5, and gcc. The SDKs won’t help you quite yet; it’s not available through the usual distributors yet, but the nRF52 Preview develoment kit is. That’s a single board development kit for the nRF52, with Arduino pinouts and Mbed support.

Thanks [Alvin] for sending this in from Trondheim.

DIY Drill Powered Band Saw

Hand Drill To Band Saw Conversion

Need a band saw but only have a drill kicking around? That may not be a common problem but if you ever run into it, [Izzy] has got you covered. He’s on a mission to make a drill-powered workshop and in his YouTube video, he shows a small bench top band saw he made that is powered by a corded hand drill.

The main frame is made from doubled up 3/4″ plywood. The saw blade is strung between two wooden wheels. Those wheels have tape applied to their outer diameter to create a crowned roller. That crown keeps the saw blade tracking in the middle of the wheel. The bottom wheel is mounted to an axle that is supported by bearings in the main frame. That axle pokes out the back and is connected to the drill. The top wheel has integrated bearings and ride on a stud mounted to the frame. The blade seems to be pretty tight although there is no noticeable tensioning system.

The video shows that this DIY band saw can cut through 1.5 inch wood fairly easily. Even so, there are clearly some needed features, like guide bearings for the blade and an overall cover to prevent accidental lacerations. But we suppose, even professional saws can be dangerous if not treated with respect.

Hackaday Prize Entry: A Reagent Robot

If you’re testing the amount of ammonia, nitrates, or just the pH of a pond, pool, or aquaculture setup, there’s two ways to do it. The first is with test tubes and chemicals: put some water in the test tube, add some chemicals, and match it to a color card. The second option is with expensive sensors.

[James] has a better idea. Since pumps, RGB LEDs, and light sensors exist, he’s building a reagent robot that will be able to measure ammonia, chlorine, nitrates, and pH without purely electronic sensors. The idea is to fill a clear container with water, add those fancy chemicals that come from aquarium supply stores, and measure the color of the water.

Right now, [James] has a bunch of stepper motors, valves, and solenoids all working together to pump water into his clear container. The next step will be to mount some RGB LEDs, a light sensor, and calibrate everything so colors can be measured.

It’s a great idea for electronic monitoring of aquaponics, ponds, and aquariums; those indicator chemicals are pretty inexpensive compared to electronic sensors, and once [James] has one measurement/reagent working, adding another is just a matter of putting in a few more tubes and pumps. You can check out a video of the progress so far below.


The 2015 Hackaday Prize is sponsored by:

Continue reading “Hackaday Prize Entry: A Reagent Robot”

Castrol Virtual Drift: Hacking Code At 80MPH With A Driver In A VR Helmet

Driving a brand new 670 horsepower Roucsh stage 3 Mustang while wearing virtual reality goggles. Sounds nuts right? That’s exactly what Castrol Oil’s advertising agency came up with though. They didn’t want to just make a commercial though – they wanted to do the real thing. Enter [Adam and Glenn], the engineers who were tasked with getting data from the car into a high end gaming PC. The computer was running a custom simulation under the Unreal Engine. El Toro field provided a vast expanse of empty tarmac to drive the car without worry of hitting any real world obstacles.

The Oculus Rift was never designed to be operated inside a moving vehicle, so it presented a unique challenge for [Adam and Glenn]. Every time the car turned or spun, the Oculus’ on-board Inertial Measurement Unit (IMU) would think driver [Matt Powers] was turning his head. At one point [Matt] was trying to drive while the game engine had him sitting in the passenger seat turned sideways. The solution was to install a 9 degree of freedom IMU in the car, then subtract the movements of that IMU from the one in the Rift.

GPS data came from a Real Time Kinematic (RTK) GPS unit. Unfortunately, the GPS had a 5Hz update rate – not nearly fast enough for a car moving close to 100 MPH. The GPS was relegated to aligning the virtual and real worlds at the start of the simulation. The rest of the data came from the IMUs and the car’s own CAN bus. [Adam and Glenn] used an Arduino with a Microchip mcp2515 can bus interface  to read values such as steering angle, throttle position, brake pressure, and wheel spin. The data was then passed on to the Unreal engine. The Arduino code is up on Github, though the team had to sanitize some of Ford’s proprietary CAN message data to avoid a lawsuit. It’s worth noting that [Adam and Glenn] didn’t have any support from Ford on this, they just sniffed the CAN network to determine each message ID.

The final video has the Hollywood treatment. “In game” footage has been replaced with pre-rendered sequences, which look so good we’d think the whole thing was fake, that is if we didn’t know better.

Click past the break for the final commercial and some behind the scenes footage.

Continue reading “Castrol Virtual Drift: Hacking Code At 80MPH With A Driver In A VR Helmet”