VCF East X: Amigas And Non-Apple Macs

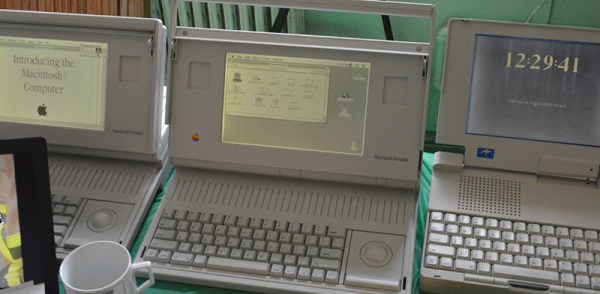
The Amiga 1000, the original Amiga, was introduced in 1985, making this the 30th anniversary of the Commodore Amiga. Of course this needed to be represented at the Vintage Computer Festival, and [Bill Winters] and [Anthony Becker] were more than up to the task:

The guys brought with them a representation of nearly every Amiga, and also have a few neat gadgets to plug into these cool little boxes. The Amiga 1200 has been heavily upgraded with a compact flash drive. With the proper adapters and cards, this neat machine can be upgraded with Ethernet, WiFi, or just about every conceivable networking solution.

Attached to the A500 is a Gotek floppy drive emulator, a relatively standard if weird device that turns a PC floppy drive connector into a USB mass storage solution. This floppy emulator did not originally support Amiga disk formats, but with a firmware modification, everything just works. That’s a great story in itself, and something we should probably cover another time.

If you’re wondering what it was like for [Bill] and [Anthony] to dig through their garage for their exhibit, here you go.

Portable Macintoshen

The first Macintosh was released in 1984. Macintosh users wanted a slightly more portable machine, but the first ‘luggable’ Mac wouldn’t be released until late 1989. The market was there to fill the gap, with some bizarre machines exhibited by [Matt Bergeron]:

The Outbound laptop and notebook were unlicensed clones of the Macintosh. Instead of pirating the Apple ROMs, the Outbound computers required buyers to pull the ROM chips from their Macs and install them in the slightly more portable version. This was, of course, inconvenient, and we can imagine there were more than a few ROM chips cloned.

The Dynamac was a different beast, using the entire PCB from a mac SE or SE/30. To this, the creators of the Dynamac added a custom video card and electroluminescent display that was also capable of driving an external monitor. Very cool stuff.

A DIY Fourier Transform Spectrometer

Typical spectrometers use prisms or diffraction gratings to spread light over a viewing window or digital sensor as a function of frequency. While both prisms and gratings work very well, there are a couple of downsides to each. Diffraction gratings produce good results for a wide range of wavelengths, but a very small diffraction grating is needed to get high-resolution data. Smaller gratings let much less light through, which limits the size of the grating. Prisms have their own set of issues, such as a limited wavelength range. To get around these issues, [iliasam] built a Fourier transform spectrometer (translated), which operates on the principle of interference to capture high-resolution spectral data.

[iliasam]’s design is built with an assortment of parts including a camera lens, several mirrors, a micrometer, laser diode, and a bunch of mechanical odds and ends. The core of the design is a Michelson interferometer which splits and recombines the beam, forming an interference pattern. One mirror of the interferometer is movable, while the other is fixed. [iliasam]’s design uses a reference laser and photodiode as a baseline for his measurement, which also allows him to measure the position of the moving mirror. He has a second photodiode which measures the interference pattern of the actual sample that’s being tested.

Despite its name, the Fourier transform spectrometer doesn’t directly put out a FFT. Instead, the signal from both the reference and measurement photodiodes is passed into the sound card of a computer. [iliasam] wrote some software that processes the sampled data and, after quite a bit of math, spits out the spectrum. The software isn’t as simple as you might think – it has to measure the reference signal and calculate the velocity of the mirror’s oscillations, count the number of oscillations, frequency-correct the signal, and much more. After doing all this, his software calculates an interferogram, performs an inverse Fourier transform, and the spectrum is finally revealed. Check out [iliasam]’s writeup for all the theory and details behind his design.

Earth Day: Electric Vehicles

Electric vehicles are the wave of the future, whether it’s from sucking too much oil out of the ground, or because of improved battery technology. Most internal combustion engines are unsustainable, and if you’re thinking about the environment – or working on an entry for The Hackaday Prize – an electric vehicle is the way to go.
Here are a few electric vehicle projects that are competing in The Hackaday Prize that show off the possibilities for the electric vehicles of the future.

An Electric Ninja

Motorcycles are extremely efficient already, but if you want a torquey ride with a lot of acceleration, electric is the way to go. [ErikL] is hard at work transforming a 2005 Ninja 250R into an electric vehicle, both to get away from gas-sipping engines and as a really, really cool ride. Interestingly, the battery technology in this bike isn’t that advanced – it’s a lead acid battery, basically, that reduces the complexity of the build.

And They Have Molds To Make Another

Motorcycles aren’t for everybody, but neither are normal, everyday, electronic conversion cars. [MW Motors] is building a car from scratch. The body, the chassis, and the power train are all hand built.

The amazing part of this build is how they created the body. It’s a fiberglass mold that was pulled off of a model carved out of a huge block of foam. There’s a lot of composite work in here, and a lot of work had to happen before digging into the foam; you actually need to choose your accessories, lights, and other bits and bobs before designing the body panels.

While the suspension and a lot of the mechanical parts were taken from a Mazda Miata, the power and drive system are completely custom. Most of the chassis is filled with LiFeMnPO4 batteries, powering four hub motors in each wheel. It’s going to be an amazing car.

Custom, 3D Printed Electric Motors

If you’re designing an electric car, the biggest decision you’re going to make is what motor you’re going to use. This is a simple process: open up a few catalogs and see what manufacturers are offering. There’s another option: building your own motor. [Solenoid] is working on a piece of software that will calculate the specifications of a motor given specific dimensions. It will also generate files for a 3D printed motor given the desired specs. Yes, you’ll still need to wind a few miles of copper onto these parts, but it’s the beginning of completely custom electronic motors.

RetroPie SNES Portable

RetroPie Portable Looks Like SNES Gameboy

[Mat] wanted a portable RetroPie project he could take while travelling. He made one with a laser cut plastic housing and, according to him, it turned out to be a ‘hideous deformed beast’. In version 2 he took a different approach and we must say it came out looking pretty nice.

This time [Mat] went with a 3D printed case. He designed it himself in SketchUp. Unfortunately, [Mat] doesn’t have access to a 3D printer so he had to send it out to a professional printing company to the tune of £60 ($90). Although that was a large chunk of change, he was happy with the quality of the print. The final exterior dimensions of the case is 13 x 13 x 2.5 cm.

A quick look at the controls will remind anyone of an SNES controller. [Mat] took the innards of an SNES-like USB gamepad and modeled the new case around it. Not having to cut up or otherwise modify the controller PCB makes for an easy addition to the project. Conveniently, the width of the controller was just about the same as the 4.3 inch LCD used for the gamepad’s display. Both fit nicely together.

Under the hood is a Rasberry Pi running RetroPie. An internal 2600mAh Lithium Ion battery provides up to 3.5 hours of game play. Battery charging management is provided by an Adafruit Powerboost 500 which also has a micro USB port that makes connecting an external charger easy.

Slow Stick Auto Gyro

RC Plane Converted To Autogyro

Out in the RC Airplane world, there is a great airframe called the Slow Stick. There is not much going on with this plane as it only has the bare necessities, a motor, wing, tail and a fiberglass tube (hence the ‘stick’ part of Slow Stick) as the fuselage. Yes, and as the name suggests it is slow. Although it’s intent is to be a starter plane for beginners, even experienced pilots like it because it is cheap, easy to repair and fun to modify. [StephanB] is the type of guy who likes to modify things so he set out to convert his Slow Stick to an Autogyro.

An Autogyro can be described as a cross between a plane and a helicopter. Like a plane it has a propeller that provides forward thrust. Unlike a plane, it does not have a wing. To provide lift, there is a large helicopter-like rotor on top of the craft but this rotor is not powered. It only spins when the craft is moving forward. Lift is created when the rotor is spinning, allowing the Autogyro to take off.

[StephanB] started by removing his Slow Stick’s wing. This takes all of 2 seconds and consists of only removing 2 rubber bands. Next he built a frame for the rotor. It was made to fit the wing mounts of the Slow Stick so that it could be quickly converted back to a plane. With a spinning Autogyro rotor, the side that the rotor is traveling in the forward direction creates more lift than the side of the rotor traveling rearward. To compensate for this unequal lift, [StephanB] added a sideways tilting rotor mount. An RC servo is connected to the mount and allows remote control of the rotor to balance out the lift.

Slow Stick Auto Gyro

Reading Analog Values With A MagSafe Port

The MagSafe adapter in MacBooks and MacBook Pros is probably the greatest single advancement in laptop technology in the last 10 years. Interestingly, the MagSafe port is also a an analog volt meter that can be read by the OS, and it’s not just limited to monitoring battery voltage; with the right software, you can turn a MagSafe port into a terrible and expensive analog sensor, letting scripts on the computer run based on analog values.

[Peter] created a voltmeter application for his mac after realizing the System Management Controller – the chip responsible for charging the battery – was accessible through low-level kernel calls. If you care enough to chop an Apple power adapter in half, the MagSafe port can read other analog inputs.

The SMC Voltmeter app [Peter] wrote samples the voltage every second and displays values on a graph. This app also allows you to run scripts. While you won’t be able to do much with an extremely expensive, very slow, one-channel data logger (the battery is going to run down eventually), we’re sure we’ll see something that’s held together with duct tape and prayer that uses this weird tool.

These Builds Grow Food In Cities

You’ve probably heard the term food desert: locations where it’s difficult to get access to fresh fruits and vegetables. One way to help alleviate the problem is to promote urban farming. This week we challenged you to think of ideas that would make growing fresh food in urban areas easier and more enticing. Let’s take a look:

The IKEA Model:

IMG_0429
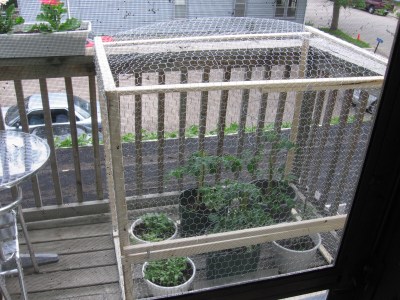
One concept that was popular with this week’s theme was ready-to assemble gardening kits. From personal experience I think this is of huge importance. Once upon a time in a crappy apartment far, far away my wife and I set out to grow tomatoes on the balcony. The plants flourished and bore fruit which the squirrel population of the neighborhood immediately stole while still green. I built this produce cage the following year and we were able to enjoy the fruit of our labors. But not everyone can whip up such a solution without help.

Aker is a set of designs for a modular farming system. The idea is to find a hackerspace or other group with a CNC router and use the plans to cut out different farming “furniture” like a chicken coop, tiered gardening container rack, a wall garden, compost system, and a bee hive. The coop design would serve as caged garden if need be.

Along the same vein is [Eric’s] Urban Gardening IKEA Style. He’s excited to pass along the knowledge he has accumulated over the years. Part of this is a simple to build gardening table that holds rectangular potting containers.

Modular Greenhouse:

modular-hyrdoponics

Next up is the concept of modular farming. We like this because the gardens can be scaled based on available space.

Seen here is the Modular Vertical Farming mockup. The system specs different size and features for each pod based on what is being grown inside. Also included in the concept is a monitoring and feedback system which will help each urban farmer achieve success.

Combining modularity with water conservation is the Hydropod project. It’s not purely hydroponics, but the vertical cylinders are designed to pump water up to the top and reclaim it as it exits the bottom.

We don’t want to move on without a brief mention of the HydroPI Garduino. Kudos on maximum-buzz-wordiness in the title. We’re into the concept of including common tools to help monitor and control this hydroponic garden. But for city-dwellers who frequently move, the portable emphasis is valuable.

Uber-Conservation:

capture-condensate-from-ac
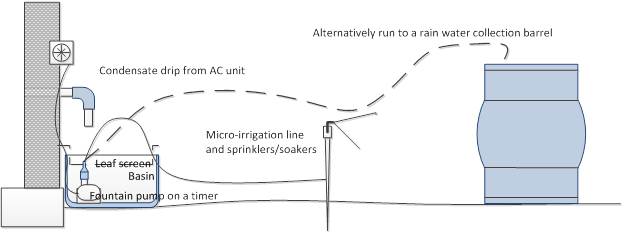
This one is quite an interesting thought. If you live in a climate where air conditioning is used constantly, chances are pretty good that the humidity the condenser coil removes from the air is going right down the drain. The Condesnate Capture for Micro-Irrigation project wants to change that by sequestering the water for the next urban garden irrigation cycle. We’d love to see some solid data on average condensate output per square foot of building.

This Week’s Winners

time-for-the-prize-week-4-prizes

First place this week goes to Aker and will receive an RGB Shades Kit.

Second place this week goes to Modular Vertical Farming and will receive a GoodFET42 JTAG programmer and debugger.

Third place this week goes to Condensate Capture for Micro-Irrigation and will receive a Hackaday CRT Android tee.

Next Week’s Theme

We’re moving to a new set of weekly giveaways that are more numerous and valuable. This week we’ll be giving away thirty (30) prizes. Each will be a $50 code to spin some PCBs. More details on that in our next Time for the Prize post. For now make sure you submit an official entry. Start your project on Hackaday.io and use the “Submit-To” button below the picture on the left to submit it for the 2015 Hackaday Prize.


The 2015 Hackaday Prize is sponsored by: