Feel Extreme Workbench Envy After Seeing The Tempel

For those of us with space to spare, our workbenches tend to sprawl. The others who are more space limited will certainly feel envy at [Love Hultén]’s beautiful Tempel workbench.

The workbench appears at first to be a modern interpretation of a secretary’s desk. There are some subtle hints that it is no ordinary piece of furniture. The glowing model of our solar system on the front, for example.

With the front folded down, rather than the expected leather writing pad and letter sized drawers, a few more oddities become apparent. The back is a pegboard which holds a small selection of tools. To the left, a checkered grid obscures speakers. Knobs control volume There are even USB ports. On the right sits another speaker. Banana jacks let you use the analog voltmeter. Most appealingly, the indestructible Hakko 936 soldering iron has been entirely integrated into the structure of the desk.

If you press the right button on the front, the desk will reveal its last secret. It contains an entire workstation somewhere behind the array of drawers on the front. A linear actuator pushes a computer monitor up from inside the cabinet, covering the pegboard in the back. Awesome.

There is a build log, but unfortunately it’s been imageshacked and only the words remain. We think [Love Hultén] has finally managed to build a soldering station that’s welcome in every room of the house except for the garage.

R/C Hot Rod Built Completely From Scratch

[ossum]’s R/C hot rod shows what’s possible when a talented hacker takes full advantage of all the modern resources available to them. The results are stunning.

[ossum] had a stack of Amazon and Shapeways credits lying around after winning a few competitions. He had this dream of building an R/C car for a while, and decided now was the time. After ordering all the needed parts from Amazon, he made an extremely nice model of the car in Fusion 360. The CAD model is a great learning resource. If you want to learn how to use reference photos, parts, and more to build a detailed and useful CAD model we recommend downloading it as a Fusion archive and scrubbing through the timeline to see how he did it.

Some of the parts were sent off for laser cutting. Others were 3D printed. The rest he made himself. Thanks to his model, they all went together well. You can see his R/C rod racing in the video after the break.

Continue reading “R/C Hot Rod Built Completely From Scratch”

Emulating A Remote Control Ceiling Fan Transmitter In An FPGA

[Joel] has a remote control ceiling fan. It’s nothing special, the controller has a low-power 350MHz transmitter and a Holtek encoder to send commands by keying the transmitter’s output. Desiring something a little better, he set about reverse engineering the device’s protocol and implementing it on a Lattice iCE40 FPGA.

To decode the device’s packets he reached for his RTL-SDR receiver and took a look at it in software. GQRX confirmed the presence of the carrier and allowed him to record a raw I/Q file, which he could then supply to Inspectrum to analyse the packet structure. He found it to be a simple on-off keying scheme, with bits expressed through differing pulse widths. He was then able to create a Gnu Radio project to read and decode them in real time.

Emulating the transmitter was then a fairly straightforward process of generating a 350MHz clock using the on-board PLL and gating it with his generated data stream to provide modulation. The result was able to control his fan with a short wire antenna, indeed he was worried that it might also be doing so for other similar fans in his apartment complex. You can take a look at his source code on GitHub if you would like to try something similar.

It’s worth pointing out that a transmitter like this will radiate a significant amount of harmonics at multiples of its base frequency, and thus without a filter on its output is likely to cause interference. It will also be breaking all the rules set out by whoever the spectrum regulator is where you live, despite its low power. However it’s an interesting project to read, with its reverse engineering and slightly novel use of an FPGA.

Wireless remote hacking seems to be a favorite pastime here in the Hackaday community. We’ve had 2.4GHz hacks and plenty of wireless mains outlet hacks.

Refurbishing Armored Tablets

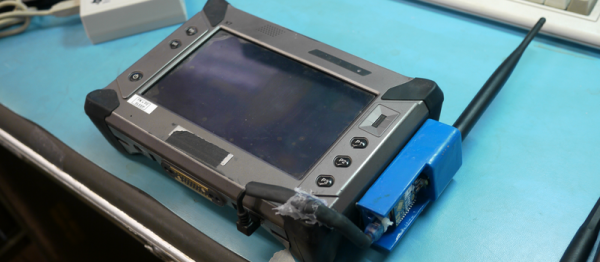
Who can resist the insane deals on bizarre hardware that pop up on auction websites? Not [Dane Kouttron], for sure. He stumbled on Armor X7 ruggedized tablets, and had to buy a few. They’d be just perfect for datalogging in remote and/or hostile locations, if only they had better batteries and were outfitted with a GSM data modem… So [Dane] hauled out his screwdrivers and took stuff apart. What follows is a very detailed writeup of the battery management system (BMS), and a complete teardown of this interesting tablet almost as an afterthought.

First, [Dane] tried to just put a bunch more batteries into the thing, but the battery-management chip wouldn’t recognize them. For some inexplicable reason, [Dane] had the programmer for the BMS on-hand, as well as a Windows XP machine to run the antiquated software on. With the BMS firmware updated (and the manufacturer’s name changed to Dan-ger 300!) everything was good again.

Now you may not happen to have a bunch of surplus X7 ruggedized tablets lying around. Neither do we. But we can totally imagine needing to overhaul a battery system, and so it’s nice to have a peek behind the scenes in the BMS. File that away in your memory banks for when you need it. And if you need even more power, check out this writeup of reverse-engineering a Leaf battery pack. Power to the people!

Retrotechtacular: DC To DC Conversion By Vibrator

Electricity comes in two basic forms: Alternating Current (AC) and Direct Current (DC). DC is handy to use and is easy to analyze. However, AC has some useful properties too. In particular, AC current can operate a transformer which can step it up or down easily. Power is conserved, of course (well, actually, you get less power because of losses in the transformer).

You can’t do that trick with pure DC. You can reduce a voltage, although that typically wastes power in heat (for example, a voltage divider or linear regulator). You can’t readily increase a DC voltage unless you convert it into some sort of AC first.

This was a particularly bad problem in the era of tubes–especially tubes in car radios. The car’s voltage was probably 12V but the tube’s plates might take hundreds of volts. What do you do? Some old car radios used what is called a dynamotor. This is just a motor and a generator in one box. You could spin the motor with 12V and have the generator produce a different voltage (even a DC voltage).

Continue reading “Retrotechtacular: DC To DC Conversion By Vibrator”

IPhone Polarizing Camera Solves Filter Orientation Problem Using Flash

One of last year’s Hackaday Prize finalists was the DOLPi, [Dave Prutchi]’s polarimetric camera which used an LCD sheet from a welder’s mask placed in front of a Raspberry Pi camera. Multiple images were taken by the DOLPi at different polarizations and used to compute images designed to show the polarization of the light in each pixel and convey it to the viewer through color.

The polarizer and phototransistor taped to the iPhone.

[Dave] wrote to tip us off about [Paul Wallace]’s take on the same idea, a DOLPi-inspired polarimetric camera using an iPhone with an ingenious solution to the problem of calibrating the device to the correct polarization angle for each image that does not require any electrical connection between phone and camera hardware. [Paul]’s camera is calibrated using the iPhone’s flash. The light coming from the flash through the LCD is measured by a phototransistor and Arduino Mini which sets the LCD to the correct polarization. The whole setup is taped to the back of the iPhone, though we suspect a 3D-printed holder could be made without too many problems. He provides full details as well as code for the iPhone app that controls the camera and computes the images on his blog post.

We covered the DOLPi in detail last year as part of our 2015 Hackaday Prize finalist coverage. You can also find its page on Hackaday.io, and [Dave]’s own write-up on his blog.


Looptaggr: Endless Graffiti

If your problem is how to put out a maximum amount of repetitive graffiti with a minimum amount of effort, we’ve got your solution. Or rather, [Ariel Schlesinger] and [Aram Bartholl] had your solution way back in 2010. The banner image says it all.

Of course, it doesn’t have to be graffiti that you’re spraying. This idea could be easily adapted to stencil that repeating floral pattern that my grandmother had on her walls too. It’s like a patterned paint roller, but for a spray can.

There’s room for improvements here. For instance, we can’t cut out stencils to save our life but we know where to find a laser cutter. From the look of things, they could use a slightly bigger stencil and something to catch the drips. There’s probably an optimal size for this gizmo, which calls for experimentation.

We’re somewhat obsessed with graffiti machines. Whether it’s a graffiti quadcopter or the elegant and non-permanent sidewalk-chalker style bots, we like machines that make “art”. What’s your favorite graffiti hack?

Thanks [n0p;n0p;n0p;] for the (archival) tip!