Hackaday Prize Entry: Infrared Vein Illumination

Phlebotomy is a fun word, and the fine art of finding veins. While the skill of putting needles in arms is honed by nurses and physicians over the course of decades, there are, of course, technological solutions to finding veins. One of the more impressive medical devices that does this uses near-infrared imaging — basically looking under the skin with almost visible light. These devices cost a fortune.

One project in the Hackaday Prize is looking to change that. It’s a near-infrared vein finder. Instead of the thousands of dollars professional unit costs, this one can be built for under one hundred bucks.

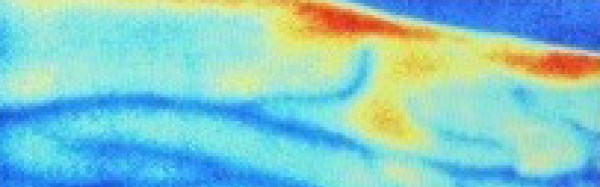
As far as this build goes, veins are illuminated via IR light at about 950nm. The backscatter of this light is captured via a Raspberry Pi NoIR camera, with regular old photography film blocking visible light. From there, it’s just a simple matter of image processing and hitting enhance several times until veins appear on a display.

The team behind this project has already developed a mobile version of the device, complete with 3D printed parts. It’s a handy device and a great entry for the Hackaday Prize.

3D Printing At Maker Faire

The current trend of cheap, desktop, consumer 3D printers arguably began at the World Maker Faire in New York several years ago. What began with just a single printer exploded into a mindless proliferation of extrusion boxes, and by 2012, every single booth had to have a 3D printer on display no matter how applicable a CNC machine was to what they were actually selling.

Now we’re in the doldrums of the hype cycle and 3D printers just aren’t cool anymore. This year at the World Maker Faire, 3D printers were relegated to a tiny corner of the faire, right next to the portajohns. It’s the smallest showing of 3D printing I’ve ever seen at the New York Maker Faire.

Of course, this doesn’t mean the state of 3D printing isn’t constantly improving. 3D printers have never been cheaper, more capable, or more popular. This is how technology works, really: it doesn’t get good until it gets boring. Still, there were some impressive displays of the current state of 3D printing at the World Maker Faire this weekend. You can check that out below.

Continue reading “3D Printing At Maker Faire”

The Tiny, $25 PocketBeagle

It was announced a day or two ago, but now the PocketBeagle has made its first real-world appearance at the World Maker Faire in New York this weekend. This is a tiny, tiny Linux computer that’s small enough to fit on a keychain, or in an Altoids mini tin. It’s only $25 USD, and from the stock lists on Mouser and Digikey, there are plenty to go around.

The specs for the PocketBeagle are more or less exactly what you would expect from any BeagleBone. There’s an ARM Cortex-A8 running at 1GHz, 512 MB of RAM, and SD card storage. I/O is eight analog inputs, up to 44 digital GPIOs, up to 3 UARTs, 2 I2C busses, 2 SPI busses, and 4 PWM outputs. All of this is packed into the OSD3358 System on a Chip from Octavo Systems.

This isn’t the first time we’ve seen Octavo Systems’ ‘BeagleBone on a Chip’ — Before the release, head Beagle herder [Jason Kridner] built a PocketBone in Eagle, which was shortly followed by [Michael Welling]’s similar efforts in KiCad. The PocketBeagle has been a reality for months, but now it’s accessible to hackers who don’t want to deal with soldering BGA packages.

This version of the PocketBeagle is getting close to as Open Source as you can get, with the design files available in Eagle and KiCad. One interesting feature of the PocketBeagle is which pins, busses, and peripherals are enabled by default. The killer feature of the BeagleBone has always been the PRUs — programmable real-time units — that enable vast arrays of LEDs, fast steppers for CNC machines, and DMA tomfoolery. The pins for the PRUs on the PocketBeagle are set up by default, with no need to screw around with configurations, modules, or drivers.

Continue reading “The Tiny, $25 PocketBeagle”

Quick And Dirty Blimp Mount For A Shotgun Mike

Sometimes you don’t have the hardware you need, and you can either do without or let the project’s needs inspire you to create an alternative. That’s pretty sweet, and it’s even sweeter when you find a solution that’s dirt cheap.

[Chu_st] created a sub-$10 blimp mount for his shotgun mike. It consists of a PVC pipe which attaches to the microphone’s shock mount. Plastic gardening grid is used for the shell, shaped by hand into the desired blimp shape and secured with zip ties and gaffer tape. [Chu_st] suggests using nylon stocking as a wind screen. The microphone itself attaches to a length of bicycle seat tube using a standard mic clamp.

For DIY microphone projects, we got you covered, with everything from a low noise floor microphone to one built out of a hard drive published previously.

Building This TARDIS Is Anything But A Snap

As an avid fan of the show Dr Who, [Adam Sifounakis] saw a model for a laser-cut TARDIS that piqued his curiosity that eventually grew into a multi-week project involving multiple setbacks, missteps, revamps and — finally — gratification. Behold, his sound activated TARDIS.

First and foremost, assembling and painting the model was a fun puzzle — despite a few trips to the store — with a little backtracking on the painting due to impatience. Next, the creation of a pulsing soft white LED circuit timed with an audio clip to really sell the image of a mini-TARDIS proved to be a tedious ordeal, paying off in the end with a satisfying glow through the vellum-diffused windows on the model.

How to trigger the lights? [Sifounakis] initially wanted a capacitive sensor to trigger the sound effects, but that way lay dragons — and madness — so he went with snap-activated effect to activate the TARDIS like the Doctor himself. After struggling with building his own microphone setup, he switched to an electret mic with adjustable gain which worked like a charm. Setting up this TARDIS’ Adafruit Pro Trinket brain involved a snag or two, and after that it was smooth sailing!

Until he hit another hitch with the power circuit too, that is. Luckily enough, adding a capacitor to give the circuit a bit more juice on boot solved the issue. All that was left to do was dismantle and rebuild his circuit after all this troubleshooting and substitutions, and — finally — install it in his model.

With much satisfaction and a final rework of the LED pulsing effect, it was done. Check it out!

Continue reading “Building This TARDIS Is Anything But A Snap”

Scooter Wheels Keep DIY Barn Doors On Track

[MotoGeeking] built a giant spray booth and is in the process of making customized, air-filtering barn doors for it. When it came to buy hardware to move the doors, though, he found all the ready-made options to be prohibitively expensive. You know what comes next: he designed barn door hardware from the ground up, and did it as cheaply as possible.

After intensely studying many images of barn doors and hardware, [MotoGeeking] decided on the right wheels and went from there. Kick scooter wheels fit the bill nicely, since they are designed to support a lot of weight and come with their own bearings and spacers. And they’re cheap, too — just $9 for a pair.

[MotoGeeking] found some C channel extruded aluminium that seemed to be a perfect match for the wheels, but the wheel was quick to bind whenever it touched the sides. He solved that one by epoxying a length of round bar into the bottom corners. This allows the wheel to move freely while forcing it to stay centered in the track.

In designing the 1/4″ aluminium brackets, [MotoGeeking] took a measure thrice, order once approach to selecting the fasteners. You probably know by now that McMaster-Carr has free CAD drawings for every little thing. [MotoGeeking] imported the ones he liked into Illustrator and built around them. This helped him get it right the first time and kept the headaches and hair-tearing away. Watch the giant door skeleton glide effortlessly on its track after the break.

Continue reading “Scooter Wheels Keep DIY Barn Doors On Track”

Cheap, Full-Duplex Software Defined Radio With The LimeSDR

A few years ago, we saw the rise of software-defined radios with the HackRF One and the extraordinarily popular RTL-SDR USB TV tuner dongle. It’s been a few years, and technology is on a never-ending upwards crawl to smaller, cheaper, and more powerful widgets. Now, some of that innovation is making it to the world of software-defined radio. The LimeSDR Mini is out, and it’s the cheapest and most capable software defined radio yet. It’s available through a Crowd Supply campaign, with units shipping around the beginning of next year.

The specs for the LimeSDR mini are quite good, even when compared to kilobuck units from Ettus Research. The frequency range for the LimeSDR Mini is 10 MHz – 3.5 GHz, bandwidth is 30.72 MHz, with a 12-bit sample depth and 30.72 MSPS sample rate. The interface is USB 3.0 (the connector is male, and soldered to the board, but USB extension cables exist), and the LimeSDR is full duplex. That last bit is huge — the RTL-SDR can’t transmit at all, and even the HackRF is only half duplex. This enormous capability is thanks to the field programmable RF transceiver found in all of the LimeSDR boards. We first saw these a year or so ago, and now these boards are heading into the hands of hackers. Someone’s even building a femtocell out of a Lime board.

The major selling point for the LimeSDR is, of course, the price. The ‘early bird’ rewards for the Crowd Supply campaign disappeared quickly at $99, but there are still plenty available at $139. This is very inexpensive and very fun — on the Crowd Supply page, you can see a demo of a LimeSDR mini set up as an LTE base station, streaming video between two mobile phones. These are the golden days of hobbyist SDR.