Go Retro To Build A Spectre And Meltdown-Proof X86 Desktop

[Yeo Kheng Meng] had a question: what is the oldest x86 processor that is still supported by a modern Linux kernel? Furthermore, is it actually possible to use modern software with this processor? It’s a question that surely involves experimentation, staring into the bluescreen abyss of BIOS configurations, and compiling your own kernel. Considering Linux dropped support for the 386 in 2012, the obvious answer is a 486. This supposition was tested, and the results are fantastic. You can, indeed, install a modern Linux on an ancient desktop.

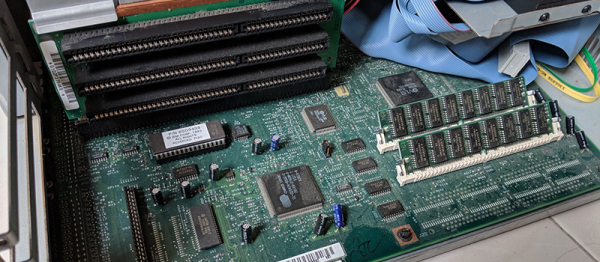
This project got its start last month at a Super Silly Hackathon where [Yeo] and [Hui Jing] installed Damn Small Linux on an ancient IBM PS/1 desktop of 1993 vintage. The hardware consists of an AMD 486 clone running at 133MHz, 64 MB of RAM, a 48x IDE CDROM drive (wow!), a floppy emulator, a Sound Blaster, 10Mbps Ethernet card, and a CompactFlash to IDE adapter. By any account, this is a pimped-out rig for 1993 that would have cost more than a car at the time. The hardware works, but can you run a modern Linux kernel on it?

[Yeo] decided to install the Gentoo x86 minimal installation, but sanity and time constraints meant compiling a kernel on a 486 wasn’t happening. That was done on a modern Thinkpad after partitioning all the drives, verifying all the compilation parameters, and configuring the kernel itself. The bootloader is LILO (Grub2 didn’t work), but for the most part, this is entirely modern software running on a 25-year-old machine. The step-by-step instructions for becoming a /g/entooman on a 486 are available on GitHub.

The entire (boring) boot process can be seen in the video below. One interesting application of this build is that the 486 does not support out-of-order execution, making this completely safe from Meltdown and Spectre attacks. It’s an impressive retrocomputing achievement that right now could not be more timely.

Continue reading “Go Retro To Build A Spectre And Meltdown-Proof X86 Desktop”

Retro Rear-Projection Numeric Display Gets A Teardown

We recently featured an entertaining project here, a digital clock with a variety of different retro display technologies forming its numerals. Among those was an extremely unusual device, a rear-projection display with an array of bulbs each able to shine through a different letter or numeral slide. There was such interest in this device that its owner [Suedbunker] subjected one to a teardown for all to see.

The displays came from an organ which he suggests may have been manufactured around 1900. We suspect that may be a rather early estimate due to its use of a printed circuit board, but it is no less a fascinating device for it. A rectangular enclosure secured by twist-tabs opens to reveal a matrix of small filament bulbs on a PCB and supported by a stack of resin boards, in front of which was placed a slide with a letter or number for each one. Before that lies a sheet of glass, and then a molded plastic lens assembly which provides an individual lens for each of the 12 bulbs. When a bulb is illuminated with these in place, the letter or number is projected on the screen at the front of the unit.

It has the advantage of simplicity, no need for a high voltage, and high-quality characters and flexibility in displaying alternatives through different slides, though at the expense of quite a bulky package. The bulbs are quite energy-sapping, so for his clock he replaced them with LEDs. We like it as one of the more practical retro numeric displays, but its size means we probably won’t see a comeback.

You can see our write-up of the clock using the projection display here.

Hackaday Links Column Banner

Hackaday Links: January 7, 2018

Whelp, Spectre and Meltdown are the tech news du jour right now, and everyone is wondering: what is the effect of this problem on real hardware in real server rooms? Epic Games patched their machines and found something shocking. The CPU utilization for one of their online services increased about 100%. We don’t know what this server is doing, or what this process is, but the Spectre and Meltdown patches will increase CPU load depending on the actual code running. This is bad for Epic — they now have to buy an entirely new server farm. This is doubly bad for Intel, and there is speculation of a class action suit floating around the darker corners of the Interwebs.

It is with a heavy heart that I must report the passing of John Young, the only person to have commanded four different classes of spacecraft (five if you include the lunar rover), including the first launch of the Space Shuttle. He was, simply, the most badass astronaut to ever live. Need proof of that? His heart rate during the launch of a Saturn V was seventy.

By the time this post is published, you’ll have less than twenty-four hours to submit your project to the Coin Cell Challenge. Get to it!

A short reminder that Shmoocon is a mere two weeks away. What is Shmoocon? A totally chill cyber/sec/hacker con at the Washington D.C. Hilton (yes, where Reagan was shot). We’ll be there, and we’re looking for some like-minded Hackaday peeps to chill out with. Want a meetup? Reply in the comments.

A few years ago, the ESP8266 appeared out of the blue in a few Chinese reseller’s web shops, and everything has been gravy since. Now there’s a new magic do-everything chip appearing on AliExpress and Taobao. It’s the RDA5981, a chip with an ARM Cortex M4 core, 32Mbit of Flash, 192k or user RAM, b/g/n WiFi, I2S, and enough peripherals to be useful. Given the support for a MIC, line in, MP3, WAV, WMA and AAC, it appears this is an all-in-one chip designed for Bluetooth speakers or some other audio application. You can find modules on Alibaba and a few breakout boards on Taobao.

According to my sources (the press releases that somehow slipped through the ‘CES’ filter on my email), the world’s fastest, smallest, biggest, least expensive, and newest drone is set to be unveiled at CES in Vegas this week.

Robotic Drive Train Is Nearly All 3D Printed

There are lots of ways to move a robot ranging from wheels, treads, legs, and even propellers through air or water. Once you decide on locomotion, you also have to decide on the configuration. One possible way to use wheels is with a swerve drive — a drive with independent motors and steering on each wheel. Prolific designer [LoboCNC] has a new version of his swerve drive on Thingiverse. The interesting thing is that it’s nearly all 3D printed.

You do need a few metal parts, a belt, two motors, and — no kidding — airsoft BBs, used as bearings. There are 3 parts you have to fabricate, which could take some work on a lathe, so it isn’t completely 3D printed.

[LoboCNC] points out that the assembly is lightweight and is not made for heavy robots. Apparently, though, his idea of lightweight is no more than 20 pounds per wheel, so that’s still pretty large in our book. The two motors allow for one motor to provide drive rotation while the other one — which includes an encoder — to steer. Of course, the software has to account for the effect of steering each wheel separately, but that’s another problem.

This robotic drivetrain is just thing for a car-like robot. If you are a little lonesome you could always print out ASPIR, instead. Or if you want an exotic 3D printed way to move things, you might get some inspiration from Zizzy. If you want a swerve drive that doesn’t require any machining or 3D printing, you might enjoy the video from another FIRST team, below.

Continue reading “Robotic Drive Train Is Nearly All 3D Printed”

Afroman Teaches Intro To Servos, Builds Laser Turret

After a longish hiatus, we were pleased to see a new video from [Afroman], one of the most accessible and well-spoken teachers the internet has to offer. If you’re new to electronics, see the previous sentence and resolve to check out his excellent videos. The new one is all about servos, and it culminates in a simple build that provides a foundation for exploring robotics.

[Afroman] leaves no gear unturned in his tour de servo, which is embedded after the break. He explains the differences between open vs. closed loop motor systems, discusses the different sizes and types of servos available, and walks through the horns and pigtails of using them in projects. Finally, he puts this knowledge to use by building a laser turret based on a pan-tilt platform.

The Arduino-driven turret uses two micro servos controlled with pots to move by degrees in X/Y space. Interestingly, [Afroman] doesn’t program the board in the Arduino IDE using wiring. Instead, he uses an open-source microcontroller language/IDE called XOD that lets you code by building a smart sort of schematic from drag-and-drop components and logic nodes. Draw the connections, assign your I/O pin numbers, and XOD will compile the code and upload it directly to the board.

Continue reading “Afroman Teaches Intro To Servos, Builds Laser Turret”

Scrap A Hard Drive, Build A Rotary Encoder

There’s something to be said for the feel of controls. Whether it’s the satisfying snap of a high-quality switch or the buttery touch of the pots on an expensive amplifier, the tactile experience of the controls you interact with says a lot about a device.

[GreatScott!] knows this, and rather than put up with the bump and grind of a cheap rotary encoder, he decided to find an alternative. He ended up exploring hard drive motors as encoders, and while the results aren’t exactly high resolution, he may be onto something. Starting with a teardown of some old HDDs — save those magnets! — [Scott!] found that the motors fell into either the four-lead or three-lead categories. Knowing that HDD motors are brushless DC motors, he reasoned that the four-lead motors had their three windings in Wye configuration with the neutral point brought out to an external connection. A little oscilloscope work showed the expected three-phase output when the motor hub was turned, with the leading and lagging phases changing as the direction of rotation was switched. Hooked to an Arduino, the motor made a workable encoder, later improved by sending each phase through a comparator and using digital inputs rather than using the Nano’s ADCs.

It looks like [GreatScott!]’s current setup only responds to a full rotation of the makeshift encoder, but we’d bet resolution could be improved. Perhaps this previous post on turning BLDC motors into encoders will help.

Continue reading “Scrap A Hard Drive, Build A Rotary Encoder”

A Mini Stacker Arcade Cabinet

For [LumoW], what started as a school project turned into a passion project. He and his team made a hardware implementation of an arcade game called Stacker. Never heard of it? It’s pretty fun, kind of like an inverse Tetris. You can play the flash version here and see their mini arcade version after the break.

The game is based around the Mojo FPGA which the class required, and it’s programmed entirely in bitwise operators. It uses WS2812 RGB LEDs to represent the individual tower building blocks, and these are mounted on plywood in a matrix and separated into cells by a grid of foam board. After some trial and error, the team found the perfect shade of acrylic to diffuse the bright dots into glowing squares.

Since the game only needs one input, we don’t think [LumoW] should apologize at all for using the biggest, baddest button they could find. Besides, the game has that edge-of-your-seat action that can turn panic into heavy-handedness and cool DIY arcade games into shards of sadness.

Looking for something more advanced to do with an FPGA? Try your hand at vector games.

Continue reading “A Mini Stacker Arcade Cabinet”