The Engineering Of An Ultrasonic Phased Array

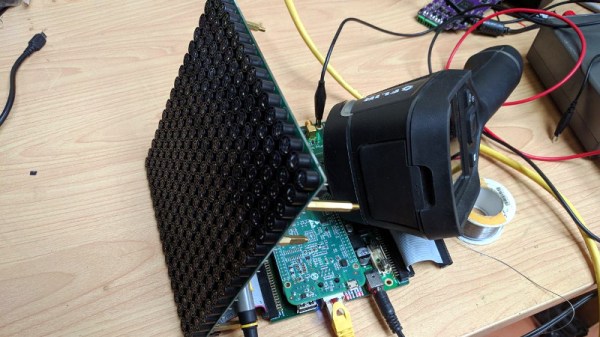
Ultrasonic phased arrays are one of the wonders of the moment, with videos of small items being levitated by them shared far and wide. We’ve all seen them and some of us have even wondered about building them, but what about the practical considerations? Just how would you drive a large array of ultrasonic transducers, and how would you maintain a consistent phase relationship between their outputs? It’s a problem [Niklas Fauth] has been grappling with over the three iterations so far of his ultrasonic phased array project, and you can follow his progress on the latest build.

The arrays themselves are a 16 by 16 grid of cheap ultrasonic transducers on a PCB, fed by HV583 high-voltage shift registers. These chips have proven to be particularly problematic, their drivers having a relatively high internal resistance which leaves them prone to overheating.

An interesting solution to a problem comes from the transducers having a polarity, but because it doesn’t matter in their usual application, that polarity not being marked. He’s overcome this by using the STM32 he has managing power alongside his BeagleBone to listen through a sensor as the ‘Bone supplies each transducer in turn with a known phase. An internal map can then be created, such that the appropriate phase can be applied on a transducer-by-transducer basis.

It’s the fascination with the subject that we find appealing, this is version three and version two worked. Most of us would make one and call it a day. It’s something we’ve seen before from [Niklas], after all this is someone who plays with turbomolecular pumps for fun. Meanwhile if you would like to learn more about ultrasonic arrays and acoustic levitation, it was the subject of one of this year’s Hackaday Belgrade talks.

Restoring 100-year-old vice

Restoring A 100 Year Old Vice To Pristine Condition

We love our vices. They hold pipes for us to saw away at, wood while we carve, and circuit boards so that we can solder on components. So we keep them in shape by cleaning and greasing them every now and then, [MakeEverything] went even further. He found a 100-year-old vice that was in very rough shape and which was going to be thrown out and did a beautiful restoration job on it.

It was actually worse than in rough shape. At some point, one of the jaws had been replaced by welding on a piece of rebar where the jaw would normally go. So he made entirely new jaws from solid brass as well as the pins to hold them firmly in place. We applaud his attention to detail. After removing all the old paint and corrosion, he painted it with a “hammered” spray paint to give it a nice hammered look. Though when he made the raised letters stand out by applying gold paint to them using an oil-based paint marker, we felt that was just showing off. The result is almost too gorgeous to use, but he assures us he will use it. You can see his process, as well as have a good look at the newly revived vice in the video below.

Continue reading “Restoring A 100 Year Old Vice To Pristine Condition”

Hackaday Links Column Banner

Hackaday Links: August 19, 2018

If you want to creep everyone out, [Hunter Irving] has your back. He found a weird, creepy knock-off Thomas the Tank Engine toy and mounted a servo to it. This animatronic face is really, really creepy and has the aesthetic of a pastel plastic hell of the forgotten toys destroyed in a day care in 1991. It probably smells like a thrift shop. This rosy-cheeked locomotive shall derail your soul. It sings karaoke.

Like badges? Sure you do. Ph0xx is the badge for the upcoming Fri3d Camp, a family hacker, maker, and DIY camp in Belgium with 600 attendees. The badge features an ESP-32, two 5×7 LED arrays, accelerometer, an 18650 battery with protection and a charger, expansion headers, and this badge is compatible with Lego Technic. Oh yes, they went there.

We’re filing this under ‘but why’. It’s a custom Mercedes-Benz motorcycle, with a sidecar, that looks like an early 80s Benz convertible. [Maarten] stumbled upon a few pics of this, but the google-fu is weak in trying to get some information about this build. Who built it? Why? Does it run?

Here’s something near and dear to my heart: my greatest contribution to humanity so far. The Shitty Add-On spec for this year’s batch of Def Con badges is the reason badges now have their own badges. Now it’s time for a slight upgrade to the standard, and I need your help. The SAO standard 1.1bis will retain the VCC/GND/SDA/SCL layout of the first revision, but to increase mechanical stability and decrease the complexity of populating the headers, we’re adding two pins. Here’s the question: what should these two extra pins do? The current options are adding TX and RX to the standard, or two GPIOs that are undefined, but able to be utilized by each badge team for their own purposes. Those are the two options, but I’m looking for your input in the comments. Hurry up, because we have Superconference badges to build.

You should know the Primitive Technology channel on YouTube. This week he made another step towards the iron age. The basic idea behind this channel is a guy in Australia playing Minecraft in real life, building everything he can, starting with the technology of punching trees. The latest video shows his process for smelting iron. The iron comes from iron-bearing bacterial sludge found in a creek. The geologic disadvantages of northeastern Australia notwithstanding, he’s doing everything else right. He’s making charcoal, and turning that sludge into something that could be a bloom of iron.

Wiring The ESP-32 To Ethernet

Since its introduction years ago, the ESP-8266 has taken over the world. It’s the chip inside thousands of different projects, and the basis for dozens of different IoT thingamadoos. The follow-up to the 8266, the ESP-32, is even more capable. It has a ton of peripherals inside, including an Ethernet MAC. What’s that? Yes, it’s possible to put Ethernet on an ESP-32, and give an IoT board PoE. That’s what [Patrick] is doing for his Hackaday Prize project, and it’s an awesome idea.

This build began as you would expect, with an ESP-32 module attached to one side of a board with some breakouts for the GPIOs and a USB to Serial chip. The tricky part here is the PoE part of the Ethernet, which requires MagJack Ethernet connectors, a flyback transformer, and a PoE-PD controller. These were expensive parts, and the design of such a board requires some thinking — you need isolation across the transformer, and proper ground planes for this mess.

There’s something slightly brilliant about using an ESP-32 in a wired configuration. Far too often, we see these modules used as wireless nodes in a sensor net. The battery consumption is significant, and all those makers are adding USB power input to their fancy WiFi sensor nets. If you’re running wires for power anyway, why not add Ethernet and do away with all that mucking around with WiFi setup. It’s a great project, and one of the better entries in this year’s Hackaday Prize.

Getting Resourceful To Build A Home CNC

CNC really is a game changer when it comes to machining. If your motor skills or ability to focus aren’t all there, you don’t need to worry – the computer will handle the manual task of machining for you! These builds are popular for DIYers to undertake, as they enable the production of all manner of interesting and advanced parts at home once they’re up and running. However, parts to build a CNC machine can get spendy; [Brenda] decided to take a recycling-based approach to her build instead (Youtube link).

The build uses motion parts from an old silicon wafer fabrication machines, an IKEA table for the work surface, and a scavenged computer to run the show. Control is via the popular LinuxCNC software, a viable candidate for anyone doing a similar build at home. In a neat twist, the holes for hold-downs on the work table were drilled by the machine itself!

Overall it’s a tidy build, broken up over a series of videos that each go into great detail on the work involved.  Interested in your own bargain CNC build? Check out this $400 setup.

Continue reading “Getting Resourceful To Build A Home CNC”

[Cody] Builds A Chlorine Machine

In his continuing bid to have his YouTube channel demonetized, [Cody] has decided to share how he makes chlorine gas in his lab. Because nothing could go wrong with something that uses five pounds of liquid mercury and electricity to make chlorine, hydrogen, and lye.

We’ll be the first to admit that we don’t fully understand how the Chlorine Machine works. The electrochemistry end of it is pretty straightforward – it uses electrolysis to liberate the chlorine from a brine solution. One side of the electrochemical cell generates chlorine, and one side gives off hydrogen as a byproduct. We even get the purpose of the mercury cathode, which captures the sodium metal as an amalgam. What baffles us is how [Cody] is pumping the five pounds of mercury between the two halves of the cell. Moving such a dense liquid would seem challenging, and after toying with more traditional approaches like a peristaltic pump, [Cody] leveraged the conductivity of mercury to pump it using a couple of neodymium magnets. He doesn’t really explain the idea other than describing it as a “rail-gun for mercury,” but it appears to work well enough to gently circulate the mercury. Check out the video below for the build, which was able to produce enough chlorine to dissolve gold and to bleach cloth.

We need to offer the usual warnings about how playing with corrosive, reactive, and toxic materials is probably not for everyone. His past videos, from turning urine into gunpowder to mining platinum from the side of the road, show that [Cody] is clearly very knowledgeable in the ways of chemistry and that he takes to proper precautions. So if you’ve got a jug of mercury and you want to try this out, just be careful.

Continue reading “[Cody] Builds A Chlorine Machine”

NASA Wants You… To Design Their Robot

No one loves a good competition more than Hackaday. We run enough to keep anyone busy. But if you have a little spare time after designing your one inch PCB, you might check out the competition to develop a robotic arm for NASA’s Astrobee robot.

Some of the challenges are already closed, but there are quite a few still open for a few more months (despite the published closing date of and these look like great projects for a hacker. In particular, the software architecture and command, data, and power system are yet to start.

But don’t let the $25,000 fool you. That’s spread out over a number of awards for the entire series. Each task has an award that ranges from $250 to $5,000. However, you also have to win that award, of course. If you register, however, you do get a sticker that has flown on the space station.

If you haven’t seen Astrobee, it is a flying robot made to assist astronauts and cosmonauts on the International Space Station. The robot is really a floating sensor platform that can do some autonomous tasks but can also act as a telepresence robot for flight controllers. You might enjoy the second video below if you haven’t seen Astrobee, before.

We covered the Astrobee before. If you’d like to visit the space station yourself, it isn’t quite telepresence, but Google can help you out.

Continue reading “NASA Wants You… To Design Their Robot”