Measure Resistance The Colourful Way

One of the first things anyone with an interest in electronics learns is the resistor colour code. The colour of the first band reveals the first figure, the second the subsequent figure, and the third a power-of-ten multiplier. At first you learn these colours, but eventually you just recognise the values through familiarity. You don’t have to think about multipliers when you see orange-orange-red, you just know that it’s a 3K3 resistor.

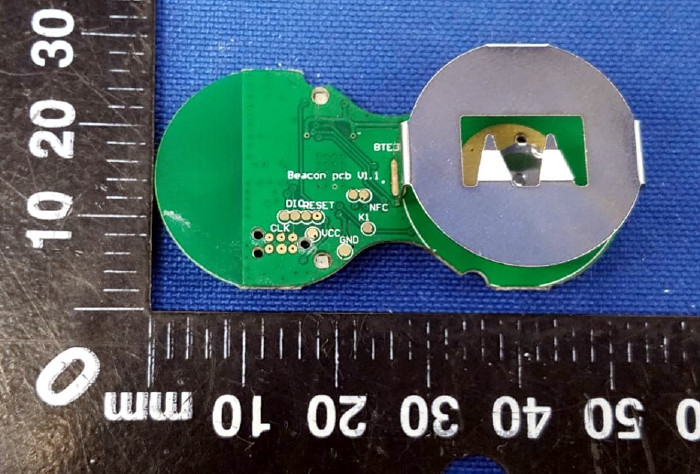
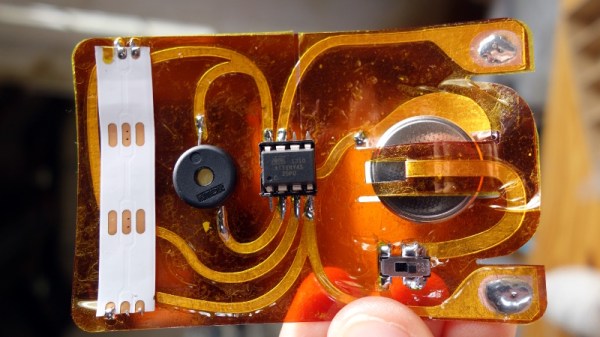
[Plusea] has come up with an entertaining interface for an ohmmeter, which instead of displaying the resistance on an LCD or a meter shows it as the colours of the code, via a set of addressable LEDs. The work is done by an ATtiny85 microcontroller, and the whole thing is mounted on a flexible PCB (fabrication of which is itself interesting, placing cut copper traces on a sheet of kapton and covering with a second kapton layer cut to be the solder mask). There is even a clever integration of a CR2032 battery holder from the PCB itself, though they admit that it could be made more compact with the use of SMD components instead of through-hole.

The write-up and associated photo album tells us a lot about the project, but is missing a crucial detail: a shot of it working. We’ll give them the benefit of the doubt on that front though, because we like the idea and its execution.

Strangely, this isn’t the first ohmmeter to use the resistor colour code in this way, we’ve previously brought you one featuring a light-up giant resistor.

Ask Hackaday Answered: The Tale Of The Top-Octave Generator

We got a question from [DC Darsen], who apparently has a broken electronic organ from the mid-70s that needs a new top-octave generator. A top-octave generator is essentially an IC with twelve or thirteen logic counters or dividers on-board that produces an octave’s worth of notes for the cheesy organ in question, and then a string of divide-by-two logic counters divide these down to cover the rest of the keyboard. With the sound board making every pitch all the time, the keyboard is just a simple set of switches that let the sound through or not. Easy-peasy, as long as you have a working TOG.

I bravely, and/or naïvely, said that I could whip one up on an AVR-based Arduino, tried, and failed. The timing requirements were just too tight for the obvious approach, so I turned it over to the Hackaday community because I had this nagging feeling that surely someone could rise to the challenge.

The community delivered! Or, particularly, [Ag Primatic]. With a clever approach to the problem, some assembly language programming, and an optional Arduino crystalectomy, [AP]’s solution is rock-solid and glitch-free, and you could build one right now if you wanted to. We expect a proliferation of cheesy synth sounds will result. This is some tight code. Hat tip!

Squeezing Cycles Out of a Microcontroller

Let’s take a look at [AP]’s code. The approach that [AP] used is tremendously useful whenever you have a microcontroller that has to do many things at once, on a rigid schedule, and there’s not enough CPU time between the smallest time increments to do much. Maybe you’d like to control twelve servo motors with no glitching? Or drive many LEDs with binary code modulation instead of primitive pulse-width modulation? Then you’re going to want to read on.

There are two additional tricks that [AP] uses: one to fake cycles with a non-integer number of counts, and one to make the AVR’s ISR timing absolutely jitter-free. Finally, [Ag] ended up writing everything in AVR assembly language to make the timing work out, but was nice enough to also include a C listing. So if you’d like to get your feet wet with assembly, this is a good start.

In short, if you’re doing anything with hard timing requirements on limited microcontroller resources, especially an AVR, read on!

Continue reading “Ask Hackaday Answered: The Tale Of The Top-Octave Generator”

Giant 3D Printed Lock Helps Teach Picking

Despite what the media might tell you, picking locks isn’t just for spies and guys wearing balaclavas. Those who pick as a hobby, or even competitively, think of locks as logic puzzles. Each lock is a unique challenge, and defeating it requires patience, dexterity, and perhaps most importantly the experience that comes from regular practice. But where does one start if they want to get into the world of recreational lock picking, also known as locksport?

Many people begin their journey on a practice lock, usually made of clear plastic so you can see its inner-workings. That’s fine for the individual, but what if you’re trying to demonstrate lock picking to a group? [John Biggs] may have the solution for you, assuming you’ve got the time and material. His huge 3D printed cutaway lock, and appropriately sized tools, allow even the folks in the back of the room to see how basic picking techniques work.

A print of this size is nothing to sneeze at; a quick peek on the reference printer here at the Hackaday Chamber of Secrets indicates you’re probably looking at the better part of 20 hours to print everything out. Once printed you’ll likely need to take a file and some sandpaper to all the surfaces to make sure things operate smoothly. It doesn’t appear to be a terribly challenging print all things considered, but we wouldn’t call it a beginner’s project either.

The only non-printed part in this design is the springs, which [John] mentions he hasn’t quite found the solution for yet. They need to be fairly weak or else the lock is too hard to pick, but springs large enough to work with the pins are usually pretty strong. This might be a perfect application for some custom wound springs.

After you’ve mastered the PLA lock, it might be time to make your own picks and see if anyone is giving free lock picking workshops in your area.

FCC Filing Reveals Tasty Hardware McSecrets

If you’ve visited a McDonald’s recently, you might have noticed something of a tonal shift. Rather than relying on angsty human teenagers to take customer orders, an increasing number of McDonald’s locations are now using self-serve kiosks. You walk up, enter your order on a giant touch screen, and then take an electronic marker with you to an open table. In mere minutes your tray of nutritious delicious cheap food is brought to you by… well that’s still probably going to be an angsty teenager.

Thanks to a recent FCC filing pointed out to us by an anonymous tipster, we now know what kind of tech Ronald has packed into the electronic table markers (referred to as “tents” in McDonald’s parlance). It turns out they are Bluetooth Low Energy beacons powered by the Nordic nRF52832 chipset, and include some unexpected features such as an accelerometer to detect falls.

The Nordic nRF52832 features a 32-bit ARM Cortex M4F processor at 64 MHz with 512 KB flash and 64 KB SRAM. Quite a bit of punch for a table marker. Incidentally, this is the same chip used in the Adafruit Feather nRF52 Pro, so there’s already an easily obtainable development toolchain.

A image of the backside of the PCB shows a wealth of labeled test points, and we imagine figuring out how to get one of these table markers doing your own bidding wouldn’t be too difficult. Not that we condone you swiping one of these things along with your Quarter Pounder with Cheese. Though we are curious to know just why they need so much hardware to indicate which table to take a particular order to; it seems the number printed on the body of the device would be enough to do that.

This isn’t the first time we’ve taken a peek behind the Golden Arches. From reverse engineering their famous fries to hacking the toys they give out with Happy Meals, there’s more to do at the local McDonald’s than get thrown out of the ball pit again.