Teardown: D50761 Aircraft Quick Access Recorder

Everyone’s heard of the “black box”. Officially known as the Flight Data Recorder (FDR), it’s a mandatory piece of equipment on commercial aircraft. The FDR is instrumental in investigating incidents or crashes, and is specifically designed to survive should the aircraft be destroyed. The search for the so-called “black box” often dominates the news cycle after the loss of a commercial aircraft; as finding it will almost certainly be necessary to determine the true cause of the accident. What you probably haven’t heard of is a Quick Access Recorder (QAR).

While it’s the best known, the FDR is not the only type of recording device used in aviation. The QAR could be thought of as the non-emergency alternative to the FDR. While retrieving data from the FDR usually means the worst has happened, the QAR is specifically designed to facilitate easy and regular access to flight data for research and maintenance purposes. Its data is stored on removable media and since the QAR is not expected to survive the loss of the aircraft it isn’t physically hardened. In fact, modern aircraft often use consumer-grade technology such as Compact Flash cards and USB flash drives as storage media in their QAR.

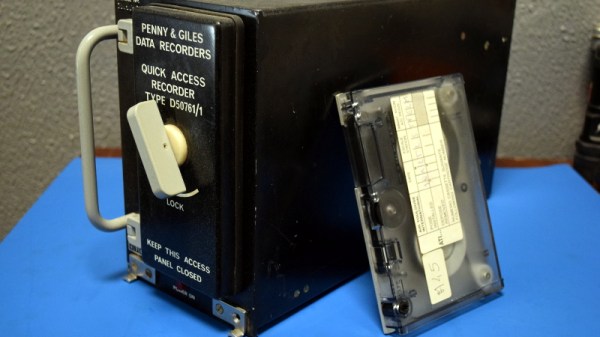
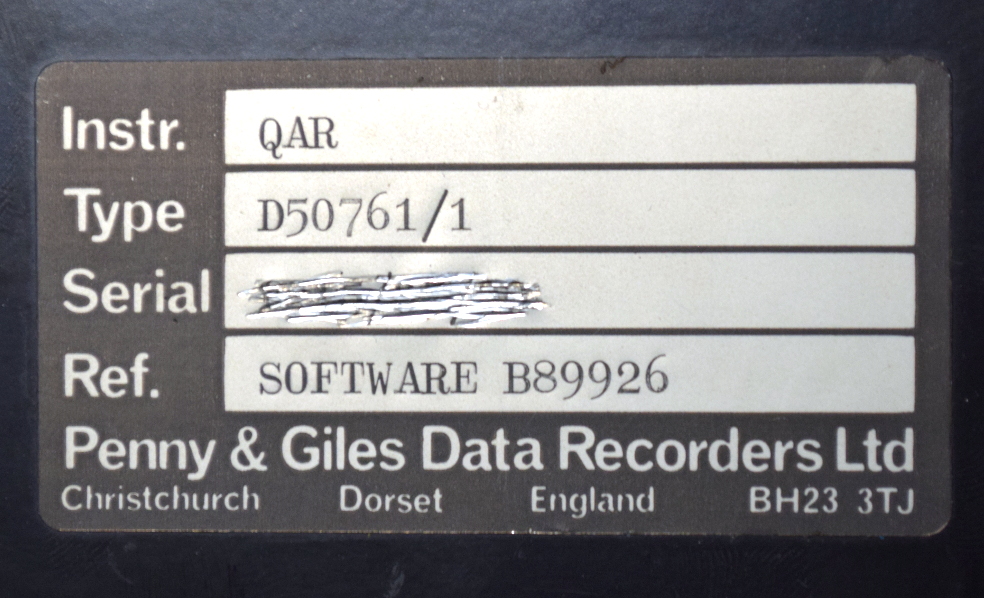
Through the wonders of eBay, I recently acquired a vintage Penny & Giles D50761 Quick Access Recorder. This was pulled out of an aircraft which had been in service with the now defunct airline, Air Toulouse International. Let’s crack open this relatively obscure piece of equipment and see just what goes into the hardware that airlines trust to help ensure their multi-million dollar aircraft are operating in peak condition.

Continue reading “Teardown: D50761 Aircraft Quick Access Recorder”

The 3D Printed Plotter You Didn’t Know You Needed

We’ve been seeing an influx of repurposed 3D printers recently. Thrifty hackers have been leveraging cheap 3D printers as a way to bootstrap their builds, on everything from laser engravers to pick and place machines. There’s nothing wrong with that, and honestly when you can get a cheap 3D printer for less than the cost of the components separately thanks to the economies of scale, you’d be foolish not to.

But there’s still something to be said for the classic RepRap mentality of building things using printed parts and smooth rods. Case in point, the largely 3D printed plotter that [darth vader] sent in for our viewing pleasure. This isn’t somebody sicking a pen on the extruder of their open box Monoprice special, this is a purpose built plotter and it shows. In the video after the break you can see not only how well it draws, but also how large of a work area it has compared to a modified 3D printer.

If you know your way around a 3D printer, most of it should look pretty familiar to you. Using the same GT2 belts, steppers, end stop switches, and linear bearings which are ubiquitous in 3D printers, it shouldn’t be difficult to source the parts to build your own. It even uses a Mega 2560 with RAMPS 1.4 running Marlin 1.1.9 for control.

The biggest difference is the physical layout. Since there’s no heavy hotend or extruder assembly to move around, the plotter has a cantilever design which gives it far greater reach. As it only needs to sightly lift the pen off the paper, there’s no need for a complex Z axis with leadscrews either; a simple servo mounted to the end of the arm is used to raise and lift the pen. We especially like the use of a tape measure as strain relief for his wiring, a fantastic tip that we (and many of you) fell in love with last year.

While it’s hard to beat just tossing a pen onto the business end of your desktop 3D printer in terms of convenience, we think it’s pretty clear from this build that the results don’t quite compare. If you want a real plotter, build a real plotter.

Continue reading “The 3D Printed Plotter You Didn’t Know You Needed”

Construction Cranes Versus Hurricanes

When engineers are designing buildings, bridges, or other large construction projects, a lot of thought is given to the environment. Some of these considerations might seem obvious, like designing a skyscraper in San Francisco to tolerate earthquakes, building a stadium in New York City to hold up not only its own weight but the weight of several feet of snow on the roof, or constructing bridges in any coastal area to be able to tolerate salt spray. Not everything is this straightforward, though. Not only do the structures themselves have to tolerate the environmental conditions they are in, but the equipment that is used to build them must tolerate these conditions as well, specifically the large cranes that are often semi-permanently attached to their construction sites.

Perhaps the most extreme example of this in recent memory was during Typhoon Manghut as it hit Hong Kong. There were several large construction cranes that didn’t fare too well with the high winds. At least one toppled as a result and catching the free-spinning of another on video is more than enough to make you gasp. Other videos of construction cranes surfaced from this typhoon showing some concerning, but surprisingly well-designed, emergency operation of the same type of crane.

Continue reading “Construction Cranes Versus Hurricanes”

Shedding A Bit Of Light On Some Logic

When it comes to logic technologies, we like to think we’ve seen them all here at Hackaday. But our community never ceases to surprise us with its variety and ingenuity, so it should be a surprise that [Dr Cockroach] has delivered one we’ve not seen before. Light logic doesn’t use the conventional active devices you’d expect such as transistors, tubes, or even relays. Instead, it uses LEDs and CdS cells to make rudimentary switches. So far there is a NAND, a NOR, and a set-reset latch that appears in the video below the break, and it is not inconceivable that much more complex devices could be crafted.

The CdS cell switch is not too far different in operation to a transistor, with the CdS cell forming half of a potential divider as a rough equivalent of a collector-emitter circuit, and the LED feeding its light to the cell and forming a rough equivalent of a base circuit. It would probably not form a very good analog of a transistor and it seems likely that is will not be the fastest of devices, but we applaud the ingenuity in coming up with it.

CdS cells are a component that seems almost to come from another era, redolent of childhood electronic kits from days of yore. It’s no surprise we don’t see them too often, though, they pop up in the occasional automatic sunglasses.

Continue reading “Shedding A Bit Of Light On Some Logic”

DIY degaussing coil

Degaussing Coil To Restore Gameplay Like It’s 1985

You may think that cathode ray tube (CRT) TVs and monitors have gone the way of the dinosaur, but you’d be wrong. Many still have them for playing video games at home or in arcades, for vintage computing, and yes, even for watching television programs. [Nesmaniac] uses his TV for playing Super Mario Bros but for several years it had a red area in the top right corner due to a nearby lightning strike. Sadly, it stood out particularly well against the game’s blue background. His solution was to make a degaussing coil.

Homemade degaussing coilWe have an article explaining degaussing in detail but in brief, the red was caused by that area of the metal shadow mask at the front of the display becoming magnetized by the lightning strike. One way to get rid of the red area is to bring a coil near it and gradually move the coil away. The coil has AC from a wall socket running through it, producing an oscillating magnetic field which randomizes the magnetic field on the shadow mask, restoring the colors to their former glory.

You’ll find [Nesmaniac’s] video explaining how he made it below. It’s a little cartoonish but the details are all there, along with the necessary safety warnings. His degaussing coil definitely qualifies as a hack. The coil itself came from a 15″ CRT monitor and his on/off switch came from a jigsaw. A 100 watt light bulb serves as a resistance to minimize current and if more or less current is needed then the bulb can be swapped for one with a different wattage.

To demonstrate it in action and give a few more construction details, we’ve included a second video below by [Arcade Jason] who made his for degaussing arcade game screens.

Continue reading “Degaussing Coil To Restore Gameplay Like It’s 1985”

Arduino 3D wire bending machine

DIY Wire Bender Gets Wires All Bent Into Shape

It’s been a while since we’ve shown a DIY wire bending machine, and [How To Mechatronics] has come up with an elegant design with easy construction through the use of 3D-printed parts which handle most of the inherent complexity. This one also has a Z-axis so that you can produce 3D wire shapes. And as with all wire bending machines, it’s fun to watch it in action, which you can do in the video below along with seeing the step-by-step construction.

One nice feature is that he’s included a limit switch for automatically positioning the Z-axis when you first turn it on. It also uses a single 12 volt supply for all the motors, and the Arduino that acts as the brains. The 5 volts for the one servo motor is converted from 12 using an LM7805 voltage regulator. He’s also done a nice job packaging the Arduino, stepper motor driver boards, and the discrete components all onto a single custom surface mount PCB.

Wire straightener and feeder

The bender isn’t without some issues though, such as that there’s no automatic method for giving it bending instructions. You can write code for the steps into an Arduino sketch, which is really just a lot of copy and paste, and he’s also provided a manual mode. In manual mode, you give it simple commands from a serial terminal. However, it would be only one step more to get those same commands from a file, or perhaps even convert from G-code or some other format.

Another issue is that the wire straightener puts too much tension on the wire, preventing the feeder from being able to pull the wire along. One solution is to feed it pre-straightened wire, not too much to ask for since it’s really the bending we’re after. But fixing this problem outright could be as simple as changing two parts. For the feeder, the wire is pulled between copper pipe and a flat steel bearing, and we can’t help wondering whether perhaps replacing them with a knurled cylinder and a grooved one would work as the people at [PENSA] did with their DIWire which we wrote about back in 2012. Sadly, the blog entries we linked to no longer work but a search shows that their instructable is still up if you want to check out their feeder parts.

As for the applications, we can think of sculpting, fractal antennas, tracks for marble machines, and really anything which could use a wireframe for its structure. Ideas anyone?

Continue reading “DIY Wire Bender Gets Wires All Bent Into Shape”

Glasses For The Hearing Impaired?

If you don’t have hearing loss, it is easy to forget just how much you depend on your ears. Hearing aids are great if you can afford them, but they aren’t like glasses where they immediately improve your sense in almost every way. In addition to having to get used to a hearing aid you’ll often find increased noise and even feedback. If you’ve been to a theater lately, you may have noticed a closed caption display system somewhere nearby that you can sit within visual range of should you be hard of hearing. That limits your seat choices though, and requires you to split your attention between the stage and the device. The National Theatre of London is using Epson smart glasses to put the captions right in your individual line of vision (see video below).

The Epson glasses are similar to the Google Glass that caused such a stir a few years ago, and it seems like such a great application we are surprised it has taken this long to be created. We were also surprised to hear about the length of the project, amazingly it took four years. The Epson glasses can take HDMI or USB-C inputs, so it seems as though a Raspberry Pi, a battery, and the glasses could have made this a weekend project.

Continue reading “Glasses For The Hearing Impaired?”