Visualizing LEDs For More Efficient Pin Packing

The archetypal “blink an LED” is a great starter project on any platform, but once the bug takes hold that quickly turns into an exploration of exactly how many LEDs a given microcontroller can drive. And that often leads to Charlieplexing. A quick search yields many copies of The Table describing how many LEDs can be driven by a given number of pins but that’s just the most rudimentary way to describe it. Way back in 2013 [M Rule] developed a clever trick to describe the number of LED matrices which can be driven by a Charlieplexed array of a given size that makes this process much more intuitive. The post may be old, but we promise the method is still fresh.

[M Rule] was specifically looking to drive those big, cheap single color LED matrices which are often used to make scrolling signs and the like. These parts are typically a matrix of LEDs with a row of common cathodes and one of common anodes. Internally they are completely dumb and can be driven by row/column scanning, or any other way a typical matrix can be controlled. The question is, given known matrix sizes, how many can be driven with a a number of Charlieplexed LED drive pins?

The first step is to visualize the 1D array of available pins as a 2D matrix, as seen to the right. Note each numbered pin is the same on the X and Y, thus the black exclusion zone of illegal drive pin combinations slicing across the graph (you can’t drive an LED connected to one pin twice). The trick, if one were to say it resides in a single place, would be titling the axis anode and cathode, representing two “orientations” the drive pins can be put in. With this diagram [M Rule] observed you can simply drop a matrix into the array. If it fits outside the exclusion zone, it can be driven by those pins!
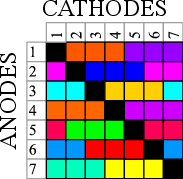
To the left is what this looks like with two 8×8 matrices, one connected between pins 1-8 and 9-16, the other connected between 9-16 and 1-8. This isn’t terribly interesting, but the technique works just as well with single LEDs and any size matrix, including 7-segment displays. Plus as long as an element doesn’t overlap itself it can wrap around the edges leading to some wild visuals, like 14 RGB LEDs on seven pins to the right.

The most extreme examples are pretty exotic. Check out [M Rule]’s post for the crown jewel; 18 pins to drive six 5×7 modules, six 7-segment displays, 12 single LEDs, and 18 buttons!

If this color coded diagram seems familiar, you may be remembering [openmusiclabs]’ excellent diagram describing ways to scan many of buttons. Or our coverage of another trick of matrix topology by [M Rule] from a few weeks ago.

Etching Large Brass Sheets Is Harder Than You Think

One of my favorite ways to think of engineering is that a glass is not half empty or half full, only twice as large as it needs to be. As useful as that idea is, it also means that I rarely put any effort into the aesthetics of my projects – I learn or accomplish what I need, desolder and recycle the components, then move on. Few of my projects are permanent, and custom cases tend to be non-reusable, so I skip the effort and expense.

Once in a while though, I need to make a gift. In that case form and function both become priorities. Thankfully, all that glitters is not gold – and over the last year I’ve been learning to etch the copper alloys commonly classified as ‘brass’. We’ve covered some truly excellent etched brass pieces previously, and I was inspired to try and etch larger pieces of metal (A4 and larger) without sacrificing resolution. I thought this would be just like etching circuits. In fact, I went through several months of failed attempts before I produced anything halfway decent!

Although I’m still working on perfecting my techniques, I’ve learned enough in the meantime to give a report. Read on if you’re feeling the need for more fancy brass signs in your life.

Continue reading “Etching Large Brass Sheets Is Harder Than You Think”

The Process Behind Manufacturing That Mac Pro Grille

Apple released a monitor stand not so long ago with an eye-watering price tag, and in the resulting fuss you might almost be forgiven for missing the news that they also released a new computer. The distinctive grille on the new Mac Pro caused some interest among Hackaday editors, with speculation rife as to how it had been machined. It seems we’re not alone in this, because [J. Peterson] sent us a link to his own detailed analysis.

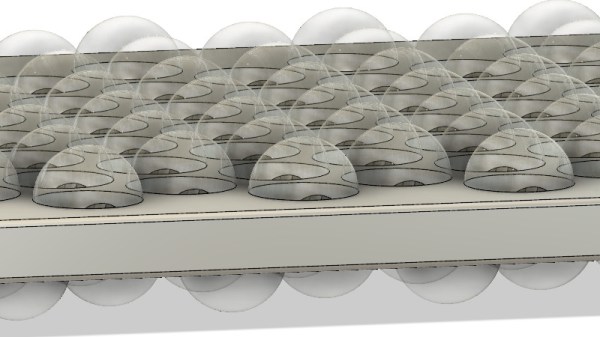
The key to the pattern lies in hemispherical holes milled part-way-through a piece of metal on a triangular tessellation, and intersecting with an identical set of holes milled at an offset from the other side. The analysis was done purely from online information as he doesn’t have a real Mac Pro, but using some clever trigonometry he is able to calculate the required offset as well as the hole depth. There are some STL files on Thingiverse, for the curious.

Should you wish to make your own copy of a Mac Pro grille you should therefore be able to use this information in programming a CNC mill to carve it from a piece of alloy plate. The interesting side of it from a manufacturing perspective though is that this is a complex shape that would be difficult to produce in numbers without either CNC or a very specialist one-off machine tool for this single purpose, and neither is a normal expenditure for a mere grille. Perhaps you might come close by rolling alloy plate between rollers whose profile matched the hole pattern, but in that event you would not equal the finish that they have achieved. Apple’s choice to use a relatively time-intensive CNC process in mass-production of a cosmetic part is probably in a large part a quality statement for their particular brand of consumer, but also sets a high bar to any would-be imitators. We applaud it for its engineering, even if we won’t be shelling out for that monitor stand.

Reverse Engineering The Sound Blaster

The first sound card to output PCM audio — the kind you need for audio samples — wasn’t the Sound Blaster. The AdLib Music Synthesizer Card could output PCM audio over software. The AdLib card also cost $200 at the time of its release. This was too much for some, and in time the Creative Labs Sound Blaster was released for the rock-bottom price of $125. This was a more capable card, and in the years since prices on the used market have gone through the roof. In 1990, you could buy a Sound Blaster for a Benjamin and a half, in 2019, prices on eBay are reaching and exceeding $400.

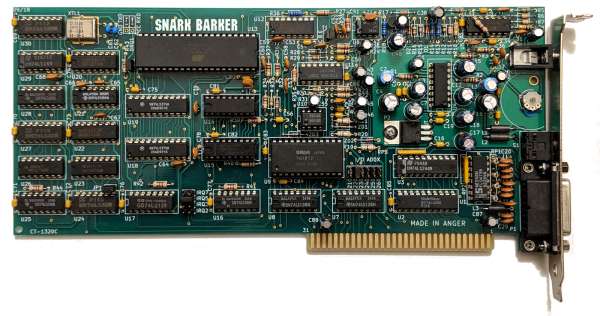
With the prices of used cards so high, we start to get into the territory where it starts to make sense to reverse engineer and re-manufacture the entire card. This hasn’t been done before, but that’s no matter for [Eric Schlaepfer], or [@TubeTimeUS]; he’s done crazier projects before, and this one is no different.

In reverse-engineering the Sound Blaster, there are a few necessary components. The Sound Blaster had an OPL2 chip for sound synthesis, which you can get through various vendors. The trick, though, is the microcontroller. This is really just an 8051 with a custom mask ROM.

The goal of this project is actually just to dump the ROM on the Intel 8051-alike microcontroller. This is something that’s relatively commonly done in high-tech labs, and luckily the Bay Area has [John McMaster], the guy who will take you into his lab and strip a die from its epoxy. Looking at the chip under the microscope, it was discovered the mask ROM on this chip was an implant ROM, with the ones and zeros represented by invisible ions in the substrate itself. There was no hope of reverse-engineering this chip from a purely visual inspection, but there was a sense amplifier on one of the data lines. By probing this sense amplifier while running through the address space, [Eric] was able to dump all the bytes of the ROM one bit at a time.

However, and there’s always a however, there are clone Sound Blasters out there, usually from China, and you can dump these chips if you’re lucky enough to get your hands on one. [Eric] reached out to the community and found these clone microcontrollers didn’t have the code protect bit set; dumping these was easy. This ROM was compared to the work [Eric] did with the sense amplifier, and after figuring out the order of the bits, it was found the code matched. The code was successfully cloned, and now new Sound Blasters can be made. Don’t tell eBay that, because someone is trying to sell one of [Eric]’s clone cards for $180.

All the code, files, materials, and everything needed to clone a Sound Blaster can be found in [Eric]’s GitHub, although there are a few open questions as to what’s going on in the Sound Blaster’s microcontroller. There’s a ‘secret’ 512-byte ROM on the die, and no one outside of an Intel NDA knows what it does. This could be used for a manufacturing test, but who knows. Other than that, there are a few features in the code that weren’t used, like previously unknown DSP commands, an ADPCM lookup table, and a routine that plays from SRAM without using DMA. It’s a deep dive into the inner workings of the most popular sound card of all time, and it’s quite simply amazing.