There’s Life In That Beard Trimmer Yet!

You just can’t get a decent beard trimmer these days! At least that’s what [Peter Franck] found when his trusty Panasonic finally expired after a couple of decades and a few replacement batteries. The shaver’s PCB contained a mains-powered NiCd charger which had comprehensively released its magic smoke, and the expensive replacement trimmers he bought simply didn’t cut the mustard.

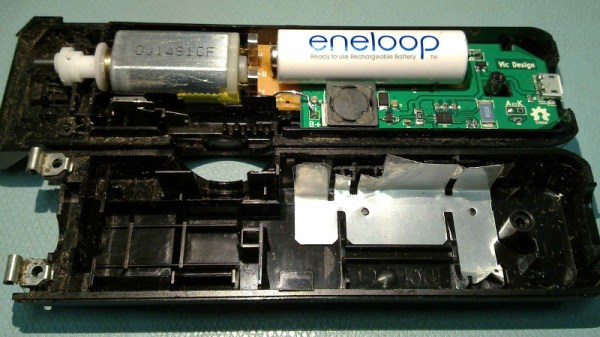
Many people would have given up in despair, but he persevered, and produced a custom replacement board containing a Maxim DS2710 single-sell NiMH charger, and an AA NiMH cell. It fits perfectly into the space vacated by the previous board, and takes its charge through a micro-USB socket on the edge of the PCB.

It’s interesting to note that NiMH-based projects have in recent years become a comparative rarity on these pages compared to ones using Li-ion or Li-poly cells. This is an inevitable progression on cost, size, and power density grounds, but it’s still worth knowing about projects using the older battery chemistry. He remarks that his razor is now future-proofed, but we’d probably have fitted a USB-C conector before making that assertion. Either way, it’s a neat piece of work that has achieved its aim of making an expired razor useful again. We’ve brought you another razor fix in the past, though a much less sophisticated one.

How To 3D Print Your Identical Twin

It’s possible to have an enjoyable weekend touring a city with a stolen cardboard cutout from some advertising display or other. However, it’s 2019, and 3D printing means you can go so much further. [Simon] of RCLifeOn went so far as to print a lifesized body double of himself, and it’s only slightly creepy! (Video, embedded below.)

The model was sourced from a 3D scan [Simon] had done with commercial hardware. An Optimus P1 industrial-grade 3D printer was used to print the parts, with total printing time being around 200 hours. Adhesive was used to join the various segments together, and the assembly was then sanded and primed, ready for paint.

Unwilling to tackle the task alone, [Simon] enlisted a professional painter to help put the finishing touches on the piece. The end result is impressive, particularly from a distance. [Simon 2.0] was then sent out to the city centre, aiming to raise money from bewildered passers by.

We suspect the market for custom body doubles will only increase as the technology to create them becomes more widespread. If you’ve tackled a similar project, be sure to let us know. Video after the break.

Continue reading “How To 3D Print Your Identical Twin”

IREnE Goes Around

Timelapse rigs are awesome because you can spice up your videos with more interesting panning and tilting timelapse shots. So, why not build yourself one? That’s what [td0g] decided to do, and the result is IREnE, a rather nice homemade 3DOF rig that fits onto a standard tripod. 3DOF means that it has three degrees of freedom: the camera can be rotated on the tripod, moved linearly on an extending arm away from the tripod head and rotated around its own axis. In other words: it can pan past an object while rotating the camera to keep the object centered in the frame.

IREnE stands for Inverted Radial Extension Eggtimer, a play on the dual radial nature of the device and how photographers use egg timers for this sort of thing. It’s also a sneaky tribute to a foe of Sherlock Holmes. The rig is driven by three NEMA 17 motors and an ATMega328p, all powered by a Dewalt powertool battery and his own DeWatt power adapter. the rig also has a secondary function with minor modifications as a pancake printer.

Breakfast aside, there are a few caveats to this project. While a tripod is fine for stabilizing a camera on the top of it, offsetting the weight like this makes the tripod unstable. [td0g] did add a few welded stabilizer bars that brace it to more stable, but the whole thing should be used with some caution. The camera sits on a 1-inch square aluminium extruder that [td0g] claims is robust enough to hold his Canon D7, but I am not sure I would trust it with my expensive equipment.

This is the fifth high-quality build we have seen from [td0g]: we previously covered the excellent high-speed LED flash, great telescope mount, high-speed chronograph, and wood-burning ATX power supply hack.

Continue reading “IREnE Goes Around”

Echo And Reverb In A Pretty Little Box

These days, if there’s a chip worth using, there will be a cheap pre-built module on eBay to make using it even easier. It’s a great time saver, and projects that used to take a couple of weekends can now be completed in a rainy afternoon. [lonesoulsurfer] knows how it is, and took advantage of this very approach to build this tidy echo & reverb effects box.

The build starts with a PT2399 echo/delay line module sourced of eBay, a part that we’ve learned much about thanks to the hard work of others. A resistor is cut off the board, enabling echo as well as reverb functionality. It’s laced up in a box with a couple of pots and a switch to control the effect, and hooked up with 6.5mm audio jacks to enable it to be easily used with guitars, synths, or karaoke machines.

It’s a fun build, and one that could serve as as a useful component in a larger setup. Adding a 3PDT switch could make it more useful as a guitar pedal, or it could be integrated into a Eurorack module, too. We’d particularly love to see the results possible from stuffing five of the modules in a single box and routing them into each other in new and exciting ways. If you pull that off, drop us a line.

Replica Marshmello Helmet Is A Tidy Halloween Build

As the saying goes – you don’t need a stylized, bedazzled helmet to have a successful career in EDM, but it helps. Marshmello is the latest in a long line of musicians to sport bespoke headgear, and [MikeTheSuperDad] undertook the construction of a replica for Halloween.

The build starts with a piece of concrete form tube as the base of the helmet. This is combined with 3D printed components to create a grid in which to place WS2812B LED strings. These are controlled by an Arduino Pro Mini, which is responsible for handling the animations. Further 3D printed parts are used as templates to cut out the characteristic eyes and mouth, as well as to cover the top. Plastic sheeting is then used over the top of everything to diffuse the LEDs and provide the final look, with black mesh behind the eyes and mouth making them properly stand out.

Marshmello should be lauded for creating a helmet with a distinctive visual style, while remaining easy to replicate, unlike popular Daft Punk builds of years past. Building a replica could serve as good practice before starting out on your own unique build. Video after the break.

Continue reading “Replica Marshmello Helmet Is A Tidy Halloween Build”

Icosahedron Glows With The Best Of Them

Glowables come in all shapes and sizes, and we’re always keen to see the multitude of different ways hackers find to put great masses of LEDs to good use. [cabrera.101] wanted to get in on the action, and whipped up a rather flashy icosahedron.

The build uses high-density 144-LED-per-meter strips for the edges, with 60-LED-per-meter strips used for the tubes that connect to the stainless steel ball in the centre. An Arduino Mega controls the Neopixel strips, with the wiring carefully planned out to ensure all LEDs have adequate power and signal to operate correctly. Not one to skimp on the juice, [cabrera.101] outfitted the rig with a 5V, 60A power supply – something that would have seemed ridiculous in 1992, but barely raises an eyebrow today.

It’s a build that would make a perfect whatchamacallit for a science fiction film. The reflections of the edge lights on the central sphere are particularly scintilliating. If you’re new to the realm of glowables, it’s easy to start – there are plenty of tools to help, too. Video after the break.

Continue reading “Icosahedron Glows With The Best Of Them”

Feel The Virtual Road With Force Feedback

When you’re driving your virtual supercar around the Italian countryside the last thing you want is an inauthentic steering wheel feel, that’s where Open FFBoard comes in. Racing game enthusiasts will go to impossible and sometimes incredibly expensive lengths to build extravagant simulators. [Yannick] feels many of these products are just a little too pricey without much need.

Right now his board is still in a process of iteration, though it can integrate with Assetto Corsa already. You can see in the demo video after the break that it responds quite realistically to the video game state, however problems keep cropping up in search of solutions. Motor drivers burn out and power resistors are added: that energy has to go somewhere. Next up will be switching to the increasingly popular Trinamic drivers. Either way we can’t wait to see the next revision and to get another amazing simulator build sent in to us, maybe centered around the Open FFBoard.

Continue reading “Feel The Virtual Road With Force Feedback”