Hackaday Belgrade Early Bird Tickets On Sale Right Now

Tickets for Hackaday Belgrade 2020 just went on sale. If you’re quick you can grab an Early Bird ticket at half the price of general admission!

Hackaday’s premiere European hardware conference returns for the third time on May 9th, 2020, bringing together talks, workshops, hardware hacking, food and drink, entertainment, and of course the best gathering of hardware geeks you’ll find anywhere. It’s awesome, because you’re awesome — and I do mean you. Whether you’re submitting a talk proposal or just grabbing a ticket to make this the first conference you’ve ever been to, we can’t do it without you.

Hackaday’s Home in Serbia

We’ll be at Dom Omladine again this year. The venue has feels like a home for Hackaday with a large space for talks, a workshop area, and a huge open area for lobby-con where you’ll find Belgrade’s finest baristas, a great spread of food, and a beer tap to keep the day rolling. Bring along your hardware projects to hack alongside the conference’s custom hardware badge designed by Voja Antonic as we open up the bar and get the live IDM sets started.

It’s still early in our planning (these are Early Bird tickets after all) but it’s very likely we’ll have a meetup the night before the conference. Friends old and new often get together on Sunday to keep the fun going. On Saturday, doors for the conference will open around 9 am and the fun will continue well beyond the 2 am “official” end. We recommend you make travel plans to include the full weekend.

Elliot Williams demos Logic Noise live on stage

Don’t just ask for Friday off of work, bring your friends and co-workers along with you. If you’re most comfortable digging through datasheets while a hot soldering iron idles on your bench and a 3D-printer whirs away in the corner, Hackaday Belgrade is calling you. I encourage those who were at the first two events in 2016 and 2018 to share their stories below.

Don’t miss this one, it only comes around in even-numbered years and tickets will sell out.


Hackaday Belgrade 2020 Posters by Aleksandar Bradic (click for full size download link):

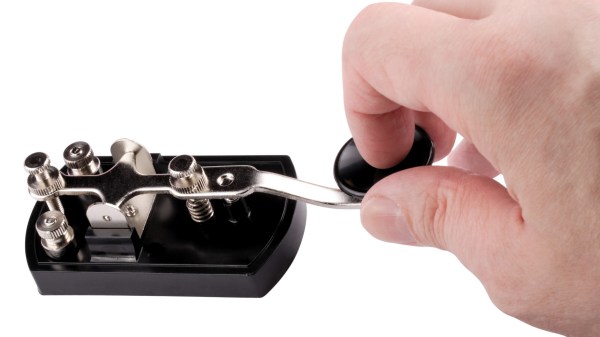
Machine Learning System Uses Images To Teach Itself Morse Code

Conventional wisdom holds that the best way to learn a new language is immersion: just throw someone into a situation where they have no choice, and they’ll learn by context. Militaries use immersion language instruction, as do diplomats and journalists, and apparently computers can now use it to teach themselves Morse code.

The blog entry by the delightfully callsigned [Mauri Niininen (AG1LE)] reads like a scientific paper, with good reason: [Mauri] really seems to know a thing or two about machine learning. His method uses curated training data to build a model, namely Morse snippets and their translations, as is the usual approach with such systems. But things take an unexpected turn right from the start, as [Mauri] uses a Tensorflow handwriting recognition implementation to train his model.

Using a few lines of Python, he converts short, known snippets of Morse to a grayscale image that looks a little like a barcode, with the light areas being the dits and dahs and the dark bars being silence. The first training run only resulted in about 36% accuracy, but a subsequent run with shorter snippets ended up being 99.5% accurate. The model was also able to pull Morse out of a signal with -6 dB signal-to-noise ratio, even though it had been trained with a much cleaner signal.

Other Morse decoders use lookup tables to convert sound to text, but it’s important to note that this one doesn’t. By comparing patterns to labels in the training data, it inferred what the characters mean, and essentially taught itself Morse code in about an hour. We find that fascinating, and wonder what other applications this would be good for.

Thanks to [Gordon Shephard] for the tip.

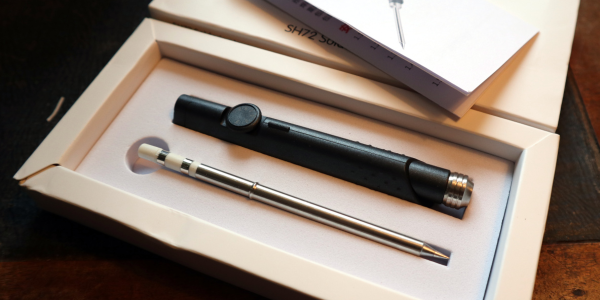
Review: SanErYiGo SH72 Soldering Iron

When the Miniware TS100 first emerged from China nearly three years ago, it redefined what we could expect from a soldering iron at an affordable price. The lightweight DC-powered temperature controlled iron brought usable power and advanced features in a diminutive package that was easy in the hand, a combination only previously found in much more expensive soldering stations. All this plus its hackability and accessible hardware made it an immediate hit within our community, and many of us have adopted it as our iron of choice.

A surprise has been that it has attracted no serious competitors of a similar type, with the only iron mentioned in the same breath as the TS100 being Miniware’s own USB-C powered TS80. Perhaps that is about to change though, as before Christmas I noticed a new Chinese iron with a very similar outline to the TS100. Has the favourite finally generated a knock-off product? I bought one to find out. Continue reading “Review: SanErYiGo SH72 Soldering Iron”

It’s An LED Cube, But Maybe Not Quite What You Were Expecting

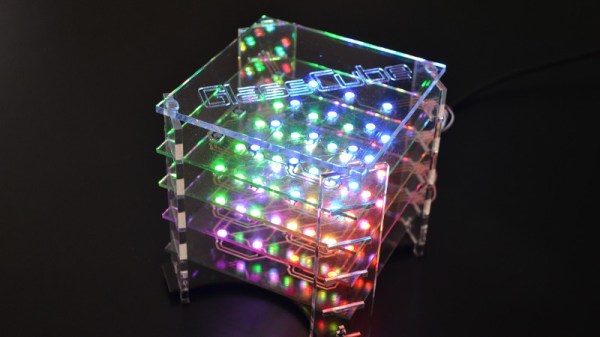
LED cubes are a pleasing ornament and still something of a talking point, but now they have reached the point of being available as inexpensive kits from China. The simpler ones don’t have quite the cachet they used to. It’s still a project that can deliver a few surprises though, as [Moritz v. Sivers] shows us very well with his glass LED cube. Instead of the usual wire frame construction he’s employed a novel technique of applying each layer of WS2812 LEDs to its own glass PCB.

The PCBs are created with self-adhesive copper foil, cut out with a CNC cutter and painstakingly transferred to the glass substrate with the help of a piece of transfer paper. The LEDs are soldered on, and once each board has been tested they are mounted in the manner of a toast rack to laser cut acrylic corner pieces. There are four layers of 16 LEDs each, which might not make for the largest cube, but still makes for a respectable show. The addressable LEDs take it a level above the 3D matrix type of cube with which you might already be familiar, and the extra time required to load each value into them doesn’t seem to slow the display down.

There are a couple of videos we’ve placed below the break, one showing it in action and the other taking us through the build process. This last one should provide plenty of inspiration for anyone with an interest in creating this type of PCB on glass or any other unusual substrate. Continue reading “It’s An LED Cube, But Maybe Not Quite What You Were Expecting”

All The Games In One Cartridge

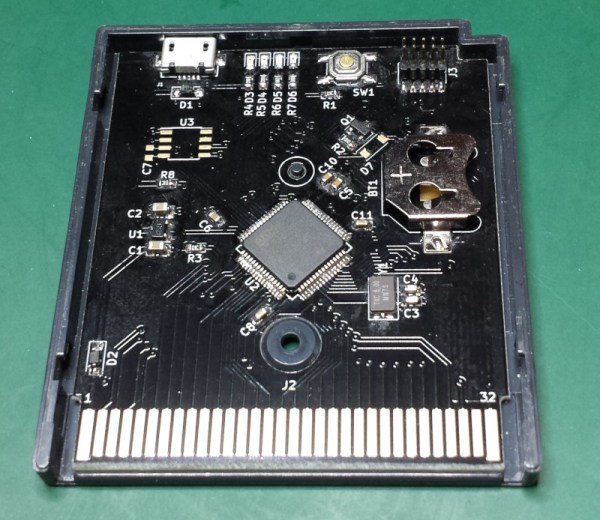
The original Game Boy was a smash success for Nintendo and has an amazing collection of games. You might relive some childhood nostalgia by booting up a Game Boy emulator, but to really get the full experience you’ll need the battery-draining green-tinted original hardware. Thanks to modern technology you can also load all of the games at one time on the original hardware with this STM32 cartridge that fits right in.

The device can load any Game Boy game (and homebrews) and ROMs can be sent to the cartridge via USB. There were are a lot of hurdles to getting this working properly, the largest of which is power management. A normal cartridge has a battery backup for save data, but using a small coin cell to run an STM32 would kill the battery quickly. To get around that, the cartridge writes the states to nonvolatile memory and then shuts itself off, although this has the side effect of crashing the Game Boy.

The creator of this project, [Emeryth], noted that we featured a similar project from [Dhole] a few years ago, also involving an STM32. [Emeryth] decided that it would be fun to build his own project anyway, and it’s certainly an interesting take on GameBoy hacking. He also has the files for this project available on his Git Hub page.

Can You Help 3D Print A Selectric Ball?

The IBM Selectric changed typewriters as we knew them. Their distinctive ball element replaced the clunky row of typebars and made most people faster typists. When [Steve Malikoff] thought about 3D printing a type ball — colloquially known as a golf ball — it seemed like a great idea.

The problem? It just doesn’t work very well. According to [Steve], it is likely because of the low resolution of the printer. However, it isn’t clear the latitudes of the characters are correct. and there are a few other issues. It is possible that a resin printer would do better and there’s a call for someone out there to try it and report back. We are guessing a finer nozzle and very low layer height might help on an FDM printer.

Judging from the images, it looks like some of the balls do pretty well, but don’t get a full strike at the tilt angle. So it could be something else. However, it does sound like cleaning up the print so it fits is a major problem.

The Selectric was notable for several reasons — you can see an ad for the machine in the video below. The type ball meant you couldn’t jam keys. Since you didn’t have to unjam keys and you had the ribbon in a cartridge, you would have to work really hard to get ink on your fingers, even if you used the cloth ribbon instead of the arguably better carbon film ribbon. The Selectric II could even use a special tape to lift the carbon ribbon off the paper for correcting mistakes. No white-out liquid or fussing with little strips of correction paper. The fact that the ball moves means you don’t have to clear space on the side of the machine for the platen to travel back and forth.

Can you help? If you have a Selectric I or II and a high-quality printer, this would be a fun project to try and report back your results to [Steve]. If you are familiar with the later issue typeballs, you might not have seen the wire clip that [Steve] uses to hold the ball in place. However, you can see them in the video ad below. More modern balls use a plastic lever that acts as a handle so even with cloth ribbons you have less chance of getting ink on your hands.

Although there were Selectrics meant to interface with a computer, you can refit any of them to do it with some work. The Selectric also has a role in one of the great techno spy stories of all time: The GUNMAN project.

Continue reading “Can You Help 3D Print A Selectric Ball?”

Teardown And Analysis Of A Cheap Solar Lamp

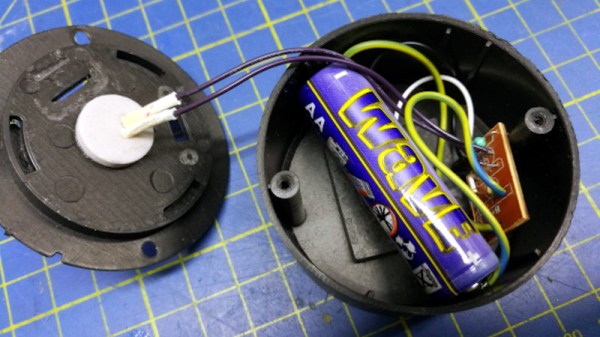
If you walk the aisles of a dollar store one constant that you will see worldwide is the Chinese solar lamp. Your dollar gets you a white LED behind plastic, mounted on a spike to stick into the ground, and with a solar cell on top. It charges in the sunlight during the day and then lights the LED for a few hours at nightfall. They are in gardens everywhere, and no doubt landfill sites are full of them because they do not last very long. [Giovanni Bernardo] had one that stopped working, so he subjected it to a teardown to find out what was up, and what made it tick (Italian, Google Translate link).

As expected, the culprit proved to be a leaking and corroded 1.2 volt NiMh cell, and its replacement with an AA cell brought the lamp back to life. But the interesting part of this tale comes from his teardown and analysis of the lamp’s components. It’s centered around a YX8016 battery charger and power management chip. The device has an amazing economy of design with only four components including the solar cell and the LED. The final component is a small inductor that forms part of the boost converter to keep the LED lit as the battery voltage falls. The chip switches at 580kHz, and produces a 3.2 volt supply.

If this is a subject that interests you, don’t forget to take a look at the power harvesting challenge we ran a while back.