Code Your Own Twitch Chat Controls For Robots — Or Just About Anything Else!

Twitch Plays Pokemon burst onto the then nascent livestreaming scene back in 2014, letting Twitch viewers take command of a Game Boy emulator running Pokemon Red via simple chat commands. Since then, the same concept has been applied to everything under the sun. Other video games, installing Linux, and even trading on the New York Stock Exchange have all been gameified through Twitch chat.

TwitchPlaysPokemon started a craze in crowdsourced control of video games, robots, and just about everything else.

You, thirsty reader, are wondering how you can get a slice of this delicious action. Fear not, for with a bit of ramshackle code, you can let Twitch chat take over pretty much anything in, on, or around your computer.

It’s Just IRC

The great thing about Twitch chat is that it runs on vanilla IRC (Internet Relay Chat). The protocol has been around forever, and libraries exist to make interfacing easy. Just like the original streamer behind Twitch Plays Pokemon, we’re going to use Python because it’s great for fun little experiments like these. With that said, any language will do fine — just apply the same techniques in the relevant syntax.

SimpleTwitchCommander, as I’ve named it on Github, assumes some familiarity with basic Python programming. The code will allow you to take commands from chat in two ways. Commands from chat can be tabulated, and only the one with the most votes executed, or every single command can be acted on directly. Actually getting this code to control your robot, video game, or pet viper is up to you. What we’re doing here is interfacing with Twitch chat and pulling out commands so you can make it do whatever you like. With that said, for this example, we’ve set up the code to parse commands for a simple wheeled robot. Let’s dive in.

Continue reading “Code Your Own Twitch Chat Controls For Robots — Or Just About Anything Else!”

Compute Module 4 NAS With Custom Carrier Board

At this point, we’ve seen more Raspberry Pi Network Attached Storage (NAS) builds than we can possibly count. The platform was never a particularly ideal choice for this task due to the fact it could only connect to drives over USB, but it was cheap and easy to work with, so folks made the best of it. But that all changed once the Compute Module 4 introduced PCIe support to the Raspberry Pi ecosystem.

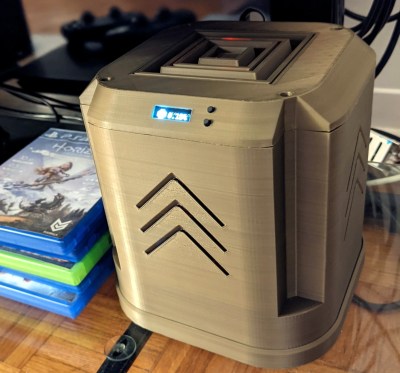
If this impressive NAS built by [mebs] represents the shape of things to come, we’re more than a little excited. On the outside, with its 3D printed case and integrated OLED display to show system status, it might look like plenty of builds that came before it. But pop the top of this cyberpunk-styled server, and you realize just how much work went into it.

At the heart of this NAS is a purpose-built carrier board that [mebs] designed based on the KiCad files the Raspberry Pi Foundation released for their official CM4 IO Board. While not much larger than the CM4 itself, the NAS board breaks out the board’s PCIe, Ethernet, HDMI, and USB. There’s also a header for I2C, used primarily for the OLED display but naturally expandable to additional sensors or devices, and nine GPIO pins for good measure.

Of course, that alone doesn’t make a NAS. Into that PCIe port goes a four channel SATA controller card, which in turn is connected to the hard disk drives that are nestled into their respective nodes of the printed case. A central fan blows over the electronics at the core, and thanks to clever design and a few cardboard seals, pulls air over the drives by way of intake vents printed into the sides.

As impressive as this build is, not everyone will need this level of performance. If you don’t mind being limited to USB speeds, you can 3D print a NAS enclosure for the standard Raspberry Pi. Or you could always repurpose an old PC case if you’d like something a bit more substantial.

Big Clive Hacks LED Bulbs With OpenSCAD

After accidentally crushing the plastic envelope on a cheap LED light bulb, [bigclivedotcom] figured out he could make custom ones using OpenSCAD in any shape he wants. He previously hacked a bunch of these inexpensive LED bulbs last month, discovering they all shared a similar circuit topology. All the ones he experimented with drove the LEDs hard, something that’s bound to reduce bulb lifetime. By reverse engineering the current control regulator, it turns out it is easy to adjust the drive current by changing a resistor or two. Reducing the current should not only increase lifetime, but could allow repurposing the bulb for other uses, such as decorative lighting.

Tweaking the LED Current

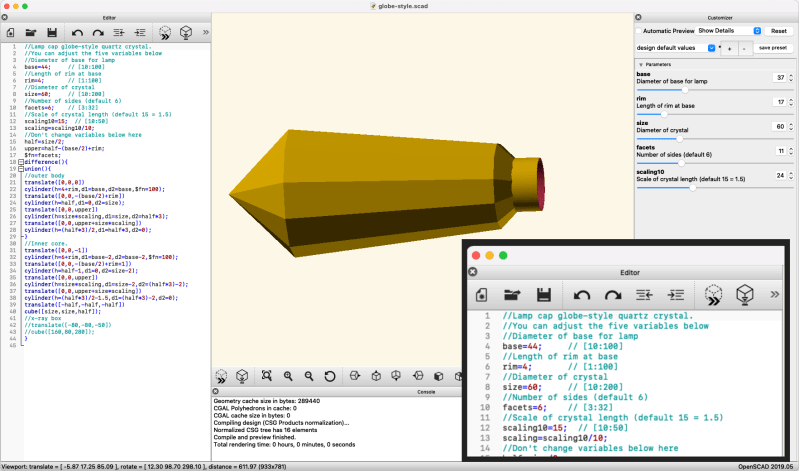
Three OpenSCAD scripts are provided which generate what he calls diamond, obelisk, and globe styles. Basic parameters for each style can be tweaked by the user, such as feature sizes and number of facets. He mentions the lack of OpenSCAD customizers in his script — this can easily be added as shown in the following example (this section of the User Manual on customizers explains the syntax). Note that you can’t make the slider generate real numbers, only whole numbers, which is why the scaling factor is multiplied by 10.

Adding Parameter Customization Sliders is Easy

These fancy globes can be used as night lights and possibly outdoor lighting, if you can make a good seal with the base. Custom chandeliers, anyone? Indicator lamps for very large panels? Any other ideas? If you want to explore the LED lifetime issue further, inveterate tinkerer Ted Yapo wrote a deep dive into the mythical 100,000 hour LED bulb. Thanks to [Cliff Claven] for the tip.

Continue reading “Big Clive Hacks LED Bulbs With OpenSCAD”