3D Printing The Key To A Bass Clarinet

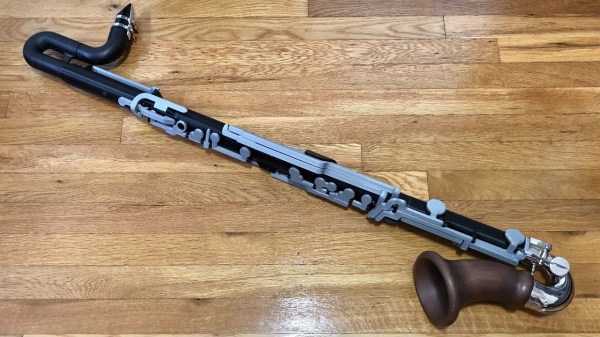
Playing music as part of a group typically requires that not only are all of the instruments tuned to each other, but also that the musicians play in a specific key. For some musicians, like pianists and percussionists, this is not terribly difficult as their instruments are easy to play in any key. At the other end of the spectrum would be the diatonic harmonica, which is physically capable of playing in a single key only. Other orchestral instruments, on the other hand, are typically made for a specific key but can transpose into other keys with some effort. But, if you have 3D printed your instrument like this bass clarinet from [Jared], then you can build it to be in whichever key you’d like.

The bass clarinet is typically an instrument that comes in the key of B flat, but [Jered] wanted one that was a minor third lower. Building a traditional clarinet is not exactly the easiest process, so he turned to his 3D printer. In order to get the instrument working with the plastic parts, he had to make a lot of the levers and keys much larger than the metal versions on a standard instrument, and he made a number of design changes to some of the ways the keys are pressed. Most of his changes simply revert back to clarinet designs from the past, and it’s interesting to see how simpler designs from earlier time periods lend themselves to additive manufacturing.

While [Jared] claims that the two instruments have slightly different tones, our amateur ears have a hard time discerning the difference. He does use a standard clarinet bell but other than that it’s impressive how similar the 3D printed version sounds to the genuine article. As to why it’s keyed differently than the standard, [Jared] points out that it’s just interesting to try new things, and his 3D printer lets him do that. We’d be happy to have another instrument in our 3D printed orchestra, too.

Continue reading “3D Printing The Key To A Bass Clarinet”

Japan Wants To Decarbonize With The Help Of Ammonia

With climate change concerns front of mind, the world is desperate to get to net-zero carbon output as soon as possible. While direct electrification is becoming popular for regular passenger cars, it’s not yet practical for more energy-intensive applications like aircraft or intercontinental shipping. Thus, the hunt has been on for cleaner replacements for conventional fossil fuels.

Hydrogen is the most commonly cited, desirable for the fact that it burns very cleanly. Its only main combustion product is water, though its combustion can generate some nitrogen oxides when burned with air. However, hydrogen is yet to catch on en-masse, due largely to issues around transport, storage, and production.

This could all change, however, with the help of one garden-variety chemical: ammonia. Ammonia is now coming to the fore as an alternative solution. It’s often been cited as a potential way to store and transport hydrogen in an alternative chemical form, since its formula consists of one nitrogen atom and three hydrogen atoms.However, more recently, ammonia is being considered as a fuel in its own right.

Let’s take a look at how this common cleaning product could be part of a new energy revolution.

Continue reading “Japan Wants To Decarbonize With The Help Of Ammonia”

Current Loop Extends Wired Microphones Past 1 Km

A problem which beset early telephone engineers was that as the length of their lines increased, so did the distortion of whatever signal they wanted to transmit. This was corrected once they had gained an understanding of the capacitance and inductance of a long cable. The same effects hamper attempts to place microphones on long lines, and [Leo’s Bag of Tricks] has a solution for doing that using Cat5 cable. The application is audio surveillance, but we think the technique is useful enough to have application elsewhere.

The solution which you can see in the video below the break will be familiar to teletype aficionados who have encountered current loops, in that it creates an analogue current loop. There is a standing DC current in the tens of miliamperes, and this has the audio imposed upon it by an amplifier and  shunt transistor. The audio can be easily retrieved using a pair of small transformers, leading to efficient transfer over as much of a kilometer of Cat5 cable. We’re guessing it’s not quite audiophile quality, but it’s useful to know that a current loop can be just as useful in the analogue domain as in the digital. If the subject interests you, we did a feature on them a few years ago.

Continue reading “Current Loop Extends Wired Microphones Past 1 Km”

Cursing The Curse Of Cursive

Unlike probably most people, I enjoy the act of writing by hand — but I’ve always disliked signing my name. Why is that? I think it’s because signatures are supposed to be in cursive, or else they don’t count. At least, that’s what I was taught growing up. (And I’m really not that old, I swear!)

Having the exact same name as my mother meant that it was important to adolescent me to be different, and that included making sure our signatures looked nothing alike. Whereas her gentle, looping hand spoke to her sensitive and friendly nature, my heavy-handed block print was just another way of letting out my teen angst. Sometime in the last couple of decades, my signature became K-squiggle P-squiggle, which is really just a sped-up, screw-you version of my modern handwriting, which is a combination of print and cursive.

But let’s back up a bit. I started learning to write in kindergarten, but that of course was in script, with separate letters. Me and my fellow Xennial zeigeistians learned a specific printing method called D’Nealian, which was designed to ease the transition from printing to cursive with its curly tails on every letter.

We practiced our D’Nealian (So fancy! So grown-up!) on something called Zaner-Bloser paper, which is still used today, and by probably second grade were making that transition from easy Zorro-like lowercase Zs to the quite mature-looking double-squiggle of the cursive version. It was as though our handwriting was moving from day to night, changing and moving as fast as we were. You’d think we would have appreciated learning a way of writing that was more like us — a blur of activity, everything connected, an oddly-modular alphabet that was supposed to serve us well in adulthood. But we didn’t. We hated it. And you probably did, too.

Continue reading “Cursing The Curse Of Cursive”

£D printed parts with glossy toner transfer images on

Add Full-Color Images To Your 3D Prints With Toner Transfer

Toner transfer is a commonly-used technique for applying text and images to flat surfaces such as PCBs, but anybody who has considered using the same method on 3D prints will have realized that the heat from the iron would be a problem. [Coverton] has a solution that literally turns the concept on its head, by 3D printing directly onto the transparency sheet.

instrument panel design with toner transfer markings
The fine detail is great for intuitive front-panel designs

The method is remarkably straightforward, and could represent a game-changer for hobbyists trying to achieve professional-looking full-color images on their prints.

First, the mirrored image is printed onto a piece of transparency film with a laser printer. Then, once the 3D printer has laid down the first layer of the object, you align the transparency over it and tape it down so it doesn’t move around. The plastic that’s been deposited already is then removed, and a little water is placed on the center of the bed. Using a paper towel, the transparency gets smoothed out until the bubbles are pushed off to the edges.

Another few pieces of tape hold the transparency down on all corners, and the hotend height is adjusted to take into account the transparency thickness. From there, the print can continue on as normal. When finished, the image should be fused with the plastic. If it’s hard to visualize, check out the video after the break for a step-by-step guide.

There are, of course, some caveats. Aligning the transfer and the print looks a little fiddly at the moment, the transparency material used (obviously) has to be rated for use in laser printers, and it only works on flat surfaces. But on the other hand, there will be some readers who already have everything they need to try this out at home right now — and we’d love to see the results!

We’ve covered some other ways to get color and images onto 3D prints in the past, such as this hydrographic technique or by using an inkjet printhead, but [Coverton]’s idea looks much simpler than either of those.  If you’re interested in toner transfer for less heat-sensitive materials, then check out this guide from a few years back, or see what other Hackaday readers have been doing on wood or brass.

Continue reading “Add Full-Color Images To Your 3D Prints With Toner Transfer”

Building An Old Guitar From A New One

Anyone who’s ever played guitar to at least the skill level required to form a terrible garage band knows the names of the most legendary guitars. The driving sound of the Gibson Les Paul played by Jimmy Page, the upside-down and smooth Fender Stratocaster from Jimi Hendrix, or the twangy Rickenbacker made famous by George Harrison are all lusted-after models. The guitar that [Frank] really wanted was a Danelectro DC59 and since they’ve been steadily creeping up in price, he decided to build his own.

The body of the clone guitar is hollow and made from effectively scrap wood, in this case plywood. As the original guitars were in fact famous for using the least expensive materials possible, this makes it a great choice for a clone. [Frank] made the guitar using almost exclusively hand tools and glued everything together, but did use a few donor parts from a modern Stratocaster-type guitar. With most of the rough shape of the guitar finished, it was time to add the parts that make the guitar sound the way that a real Danelectro should: the lipstick-style pickups. He purchased these completely separately as they are the most important part to get right to emulate the tone and feel of the original.

With everything finally soldered and assembled, [Frank] got right to work recording a sample audio track which is included at the end of the video. It certainly sounds like the original to our untrained ears, and for around $100 it’s not a bad value either. If you’d like to see a guitar built from the ground up without using another as a clone, take a look at this build which brings a completely original guitar into existence, entirely from scratch.

Continue reading “Building An Old Guitar From A New One”

Measuring Impedance Virtually

We always enjoy a [FesZ] video and we wonder if the “Z” stands for impedance? That’s the topic of his latest video series: measuring impedance with LTSpice. Of course, he also does his usual thorough job of mapping the virtual world to the real one. You can see the video below.

It is simple enough. Impedance is very similar to resistance. That is to say, we have a ratio of voltage and current. However, since it is an AC quantity, you need a complex number to represent it and there is an associated phase shift.

Continue reading “Measuring Impedance Virtually”