At Last! A Cyberdeck You Might Want To Use

Cyberdecks make for interesting projects, some are a bit rough while others are beautiful, but it’s maybe something that even the most ardent enthusiast might agree — these home-made portable computers aren’t always the most convenient to use. Thus we’re very pleased to see this machine from [TRL], as it takes the cyberdeck aesthetic and renders it in a form that looks as though it might be quite practical to use.

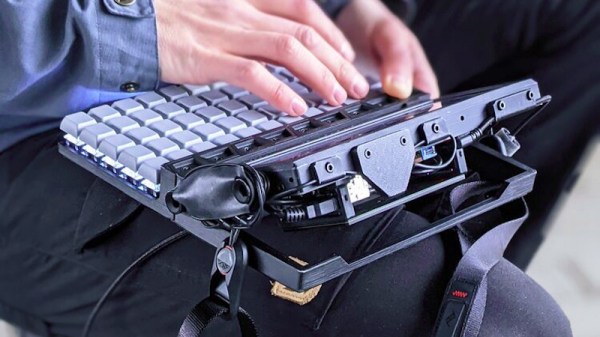
It takes a Raspberry Pi and a Waveshare 1280×400 capacitive touch screen, and mounts this combo with a keyboard in an uncommonly well-designed 3D printed chassis.  With the screen flat it resembles the venerable TRS-80 Model 100 “slab” computer of the early 1980s, but flip it up, and a surprisingly usable laptop appears. Power comes from an external battery pack with a lead, but this is due more to thermal management issues with PSU boards than it is to necessity. The finishing touch is a stylish custom laptop bag, making for a combo we’d take on the train to bang out Hackaday articles any day.

Looking around, we think perhaps it might give the Clockwork DevTerm a run for its money. Alternatively, you might take a look at this upgraded TRS-80 model 100.

Continue reading “At Last! A Cyberdeck You Might Want To Use”

Junk I Bought: My PSU Just Won’t Do

I have an Acer monitor that I’ve owned for around 15 years, and thanks to my having paid extra at the time for the model sporting a DVI socket for HDMI compatibility it still finds a place as one of my desktop monitors. It has a power brick that supplies it with 1 2V at 4.5 A, and over the years this has developed an annoying whine. Something’s loose in the magnetics, and I really should replace it. So off to AliExpress I went, and dropped in an order for a 12 V, 5 A power brick.

It’s No Heavyweight

A PSU brick, marked as 12V 5A
So far so good…

These units are pretty standard, a box about 130 mm by 60 mm with an IEC socket at one end and a trailing cable at the other for the low voltage. I’ve had enough of them pass through my hands over the years to know what to expect, so I was dismayed to find when I received my PSU that it was suspiciously light. 86 g compared to the around 250 g I’d expect, so I began to smell a rat. Time for a teardown, and a descent into the world of small switch-mode mains power supplies.

Normally it should be easier to break into Fort Knox than to crack open a mains power supply, because for safety they are ultrasonic welded together. The few times I’ve done it have required some Dremel time and a bit of swearing, so when this case turned out to open fairly easily by levering with a screwdriver it was evident this wasn’t a high-quality item. Sure enough my suspicions were confirmed, for there inside was a much smaller board. It’s clear this isn’t a 5 A power supply, so just what have I received? Continue reading “Junk I Bought: My PSU Just Won’t Do”

Panelize PCBs Graphically With Hm-panelizer

When you’re working with PCBs and making single units to knock out in those Chinese fabs, going from layout to manufacturable Gerber files is just a few button presses, no matter what PCB layout tool you prefer. But, once you get into producing sets of PCBs that form a larger system, or are making multiple copies for efficient manufacturing, then you’re not going to get far without delving into the art of PCB panelization. We’ve seen a few options over the years, and here’s yet another one that’s looking quite promising —  hm-panelizer by [halfmarble] is a cross platform Python GUI application, which leverages Kivy, so it should run on pretty well on most major platforms without too much hassle. The tool is early in development, so is restricted to handling only straight PCB edges, with horizontal mouse-bites for now, but we’re sure it will quickly grow more general purpose capabilities given time and support.

In an ideal world, open source tools like KiCAD would have a built-in panelizer, but for now we can dream and hm-panelizer might just be good enough for some people. For more choices on panelizing, checkout our guide to making it easy, and just to muddy the waters here’s another way to do it.

Making The Case For COBOL

Perhaps rather unexpectedly, on the 14th of March this year the GCC mailing list received an announcement regarding the release of the first ever COBOL front-end for the GCC compiler. For the uninitiated, COBOL saw its first release in 1959, making it with 63 years one of the oldest programming language that is still in regular use. The reason for its persistence is mostly due to its focus from the beginning as a transaction-oriented, domain specific language (DSL).

Its acronym stands for Common Business-Oriented Language, which clearly references the domain it targets. Even with the current COBOL 2014 standard, it is still essentially the same primarily transaction-oriented language, while adding support for structured, procedural and object-oriented programming styles. Deriving most of its core from Admiral Grace Hopper‘s FLOW-MATIC  language, it allows for efficiently describing business logic as one would encounter at financial institutions or businesses, in clear English.

Unlike the older GnuCOBOL project – which translates COBOL to C – the new GCC-COBOL front-end project does away with  that intermediate step, and directly compiles COBOL source code into binary code. All of which may raise the question of why an entire man-year was invested in this effort for a language which has been declared ‘dead’ for  probably at least half its 63-year existence.

Does it make sense to learn or even use COBOL today? Do we need a new COBOL compiler?

Continue reading “Making The Case For COBOL”

On the left, the Thunderbolt chip as mounted on the motherboard originally. On the right, the shim installed in place of a Thunderbolt BGA chip, with the IPEX connector soldered on

Macbook Gets NVMe SSD With Help Of A BGA-Imitating PCB

Recently, we stumbled upon a video by [iBoff], adding an M.2 NVMe port to a 2011-2013 MacBook. Apple laptops never came with proper M.2 ports, especially the A1278 – so what’s up? The trick is – desoldering a PCIe-connected Thunderbolt controller, then soldering a BGA-like interposer PCB in place of where the chip was, and pulling a cable assembly from there to the drive bay, where a custom adapter PCB awaits. That adapter even lets you expose the PCIe link as a full-sized PCIe 4x slot, in case you want to connect an external GPU instead of the NVMe SSD!

The process is well-documented in the video, serving as an instruction manual for anyone attempting to install this specific mod, but also a collection of insights and ideas for anyone interested in imitating it. The interposer board ships with solder balls reballed onto it, so that it can be installed in the same way that a BGA chip would be – but the cable assembly connector isn’t installed onto the interposer, since it has to be soldered onto the mainboard with hot air, which would then melt the connector. The PCB that replaces the optical drive makes no compromises, either, tapping into the SATA connector pins and letting you add an extra 2.5mm SATA SSD.

Adding an NVMe drive is an underappreciated way to speed up your old laptop, and since they’re all PCIe under the hood, you can really get creative with the specific way you add it. You aren’t even limited to substituting obscure parts like Thunderbolt controllers – given a laptop with a discrete GPU and a CPU-integrated one, you could get rid of the discrete GPU and replace it with an adapter for one, or maybe even two NVMe drives, and all you need is a PCB that has the same footprint as your GPU. Sadly, the PCB files for this adapter don’t seem to be open-source, but developing a replacement for your own needs would be best started from scratch, either way.

We’ve seen such an adapter made for a Raspberry Pi 4 before, solderable in place of a QFN USB 3.0 controller chip and exposing the PCIe signals onto the USB 3 connector pins. However, this one takes it up a notch! Typically, without such an adapter, we have to carefully solder a properly shielded cable if we want to get a PCIe link from a board that never intended to expose one. What’s up with PCIe and why is it cool? We’ve talked about that in depth!

Continue reading “Macbook Gets NVMe SSD With Help Of A BGA-Imitating PCB”

Ultra Light VORON X-Beam Milled From Aluminium Tube Stock

Voron X/Y carriage overview.

When it comes to 3D printing using fused deposition modeling (FDM) technology, there are two main groups of printers: Cartesian and CoreXY, with the latter being the domain of those who wish to get the fastest prints possible, courtesy of the much more nimble tool head configuration. Having less mass in the X/Y carriage assembly means that it can also move faster, which leads to CoreXY FDM enthusiasts to experiment with carbon fiber and a recent video by [PrimeSenator] in which an X-beam milled out of aluminium tube stock that weighs even less than a comparable carbon fiber tube is demonstrated.

As the CoreXY FDM printer only moves in the Z-direction relative to the printing surface, the X/Y axes are directly controlled by belts and actuators. This means that the faster and more precise you can move the extruder head along the linear rails, the faster you can (theoretically) print. Ditching the heavier carbon fiber for these milled aluminium structures on a Voron Design CoreXY printer should mean less kinetic inertia, with the initial demonstrations showing positive results.

The interesting thing about this ‘speed printing’ community is that not only the raw printing speeds, but also that in theory CoreXY FDM printers are superior in terms of precision (resolution) and efficiency (e.g. build volume). All of which makes these printers worthy of a look next time one is shopping for an FDM-style printer.

Continue reading “Ultra Light VORON X-Beam Milled From Aluminium Tube Stock”

Expired Certificate Causes German Payment Meltdown

For most Hackaday readers the process of buying groceries this weekend has been a relatively painless one, however we’re guessing some of our German friends will have found their cards unexpectedly declined. The reason? A popular model of payment card terminal, the Verifone H5000, has suffered what has been described as a “software malfunction”. So exactly what has happened? The answer is as simple as it is unfortunate: a security certificate for German transaction processing stored on the device has expired.

The full story exposes the flaws in assuming that a payment terminal is an appliance rather than a computer and its associated software that needs updating like any other. The H5000 is an old terminal that ceased production back in the last decade and has reached end-of-life, however it has remained in use and perhaps more seriously, remained in the supply chain to merchants buying a terminal. With updates requiring a site visit rather than an over-the-air upgrade, it’s likely that the effects of this mess could last a while.

In case the hardware for this type of equipment interests you, we’ve had a teardown on another Verifone terminal in the past.