OLED Display Lets Vintage PC Engage Turbo Mode In Style

Back in the 486 days, it was common to see a “Turbo” button on the front panel of many PCs, which was used to toggle between the CPU’s maximum speed and a slower clock rate that was sometimes necessary for compatibility with older software. Usually an LED would light up to show you were running at this higher speed, or if your machine was very fancy, it might even have a numerical display that would show the current CPU frequency.

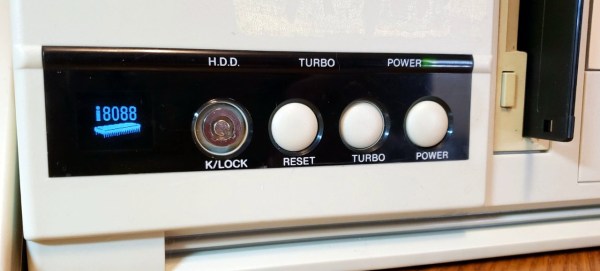
[Joshua Woehlke] wanted to add a similar display to his 486, but figured that with modern technology, he could do something a bit more interesting. Especially when he realized that the spot on his case where the two-digit LED display would have originally been mounted was the perfect size to hold a common 0.96″ SSD1306 OLED. From there it was just a matter of wiring it up to an Arduino and writing some code to display different graphics depending on the computer’s current CPU speed.
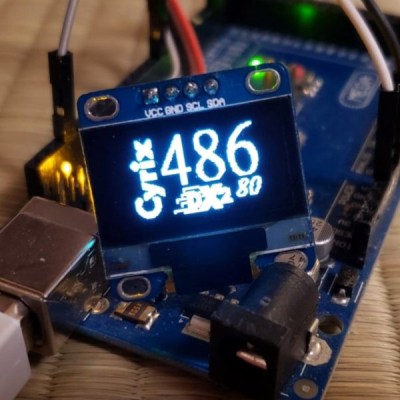
Just like the frequency indicators of yore, the Arduino doesn’t actually measure the CPU’s frequency, it’s simply reading the state of the Turbo LED on the front panel. When the LED is off the Arduino shows an image of a i8088 CPU on the screen to indicate the computer is running in compatibility mode, and when the LED is on, the screen shows the Cyrix Cx486 DX2 logo. When the button hasn’t been pressed in awhile, the display defaults to a star field screensaver.

Regular readers may recall we recently covered a similar project that used an Arduino to add a little flair to an era appropriate seven-segment LED display. We’d say there’s still a good deal of romanticism about computers having a big “TURBO” button you can smash whenever you feel the need for speed.

Understanding And Using Unicode

Computer engineer [Marco Cilloni] realized a lot of developers today still have trouble dealing with Unicode in their programs, especially in the C/C++ world. He wrote an excellent guide that summarizes many of the issues surrounding Unicode and its encoding called “Unicode is harder than you think“. He first presents a brief history of Unicode and how it came about, so you can understand the reasons for the frustrating edge cases you’re bound to encounter.

There have been a variety of Unicode encoding methods over the years, but modern programs dealing with strings will probably be using UTF-8 encoding — and you should too. This multibyte encoding scheme has the convenient property of not changing the original character values when dealing with 7-bit ASCII text. We were surprised to read that there is actually an EBCDIC version of UTF still officially on the books today:

UTF-EBCDIC, a variable-width encoding that uses 1-byte characters designed for IBM’s EBCDIC systems (note: I think it’s safe to argue that using EBCDIC in 2023 edges very close to being a felony)

Continue reading “Understanding And Using Unicode”

The ESP32 Doesn’t Need Much

For those looking to add wireless connectivity to embedded projects or to build IoT devices, there is perhaps no more popular module than the ESP32. A dual-core option exists for processor intensive applications, the built-in WiFi and Bluetooth simplify designs, and it has plenty of I/O, memory, and interoperability for most applications. With so much built into the chip itself, [atomic14] wondered how much support circuitry it really needed and set about building the most minimalist ESP32 development board possible.

Starting with the recommended schematic for the ESP32, the most obvious things to remove are a number of the interfacing components like the USB to UART chip and the JTAG interface. The ESP32 has USB capabilities built in, so the data lines from a USB port can be directly soldered to the chip instead of using a go-between. A 3.3V regulator eliminates the need for many of the decoupling capacitors, and the external oscillator support circuitry can also be eliminated when using the internal oscillator. The only thing [atomic14] adds that isn’t strictly necessary is an LED connected to one of the GPIO pins, but he figures the bare minimum required to show the dev board can receive and run programs is blinking an LED.

Building the circuit on a breadboard shows that this minimalist design works, but instead of building a tiny PCB to solder the ESP32 module to he attempted to build a sort of dead-bug support circuit on the back of the ESP32. This didn’t work particularly well so a tiny dev board was eventually created to host this small number of components. But with that, the ESP32 is up and running. These modules are small and compact enough that it’s actually possible to build an entire dev board setup inside a USB module for a Framework laptop, too.

Continue reading “The ESP32 Doesn’t Need Much”

Splitting 3D Prints Into Parts Can Add Strength

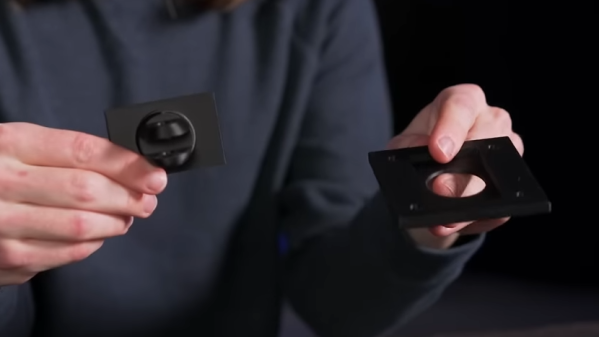
One of the great things about 3D printers is their ability to make a single part all at once. Separating a part into multiple pieces is usually done to split up objects that are too big to fit on the 3D printer’s print bed. But [Peter] at Markforged (manufacturers of high-end 3D printers) has a video explaining another reason: multi-part prints can benefit from improved strength.

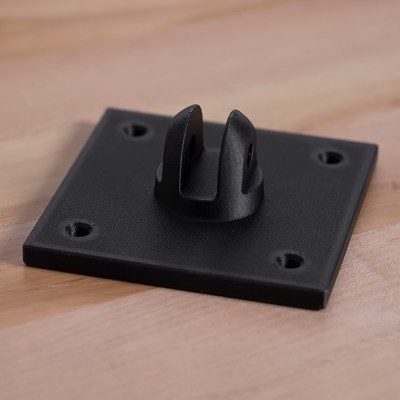
This part can be easily printed as a single piece, but it can be made nearly twice as strong when printed as two, and combined.

The idea is this: filament-based 3D printers generally create parts that are strongest along their X-Y axis (relative to their manufacture) and weakest in the Z direction. [Peter] proposes splitting a part into pieces with this in mind. Not because the part is inconveniently large or has tricky geometry, but so the individual pieces can be printed in orientations that provide the best mechanical strength.

This is demonstrated with the simple part shown here. The usual way to print this part would be flat on a print bed, but by splitting the parts into two and printing each in their optimal orientation, the combined part withstands nearly twice as much force before failing.

[Peter]’s examples use Markforged’s own filaments, but gives advice on more common polymers as well and the same principles apply. This idea is one worth keeping in mind the next time one is seeking to optimize strength. because of how simple it is.

We’ve seen a variety of methods to toughen up or ruggedize prints in the past, but they’re usually more complex (or at least messier.) Examples include embedding braided steel cable, embedding fiberglass mesh, applying electroplating to a printed structure, and plain old embedding some bolts and washers to buffer load-bearing areas.

Continue reading “Splitting 3D Prints Into Parts Can Add Strength”

Color Can Triple QR Code Capacity

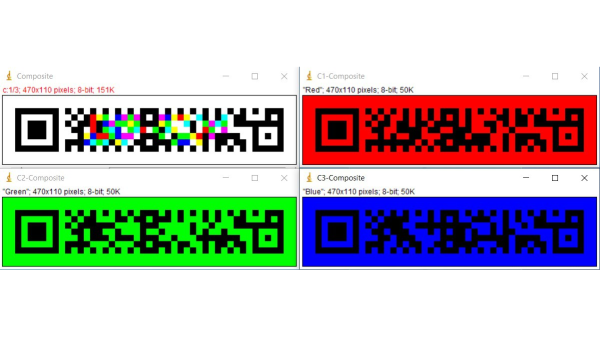
Recently [mit41301] wondered about increasing the data capacity of QR codes, and was able to successfully triple the number of bits using color. He chose the new rectangular micro QR code (rMQR) standard which was adopted last year as ISO/IEC 23941:2022. This rectangular-shaped QR code is designed to be used on narrow spaces, with an aspect ratio similar to that of a traditional 1D bar code. There are quite a few variations of rMQR, but the largest can hold 361 bytes. The basic idea is to generate three different rMQR codes, coloring them as red, green, blue, and merging the result. Decoding is performed by separating the color image into its RGB components and then decoding the resulting three images.

To do these experiments, [mit41301] took advantage of readily available tools. Generating rMQR codes can be done with this Python module by [Takahiro Tomita], who also makes the generator available online. Or if you’re more comfortable with Go, check out this repository by [Ichinose Shogo]. As a proof-of-concept, [mit41301] takes the first 449 digits of pi, plus the decimal point, and splits them into three each 150 byte chunks. Then he uses the image manipulation program ImageJ, an open-source Java program developed at the National Institutes of Health, to implement the combination and deconstruction processes.

The first 449 digits of pi expressed as a colorful rMQR code

There might be a few pitfalls if you want to do this outside the laboratory, however. First of all, this standard is reasonably new, and after a brief search this author couldn’t find any decoder that would recognize rMQR codes, nor any software modules or libraries. Research into colorization of QR codes, known as HCC2D (High Capacity Colored 2-Dimensional) codes has been ongoing. One issue is that correcting for arbitrary chromatic abnormalities in a scanner’s lens requires a baseline color palette in the code, which eats up some of the newly-gained data capacity.

Nonetheless, we really do like this concept. Do you have any applications of QR codes in your projects where coloring could be helpful? Is anyone using (monochrome) rMQR codes and if so, how are you scanning them? Check out our overview of barcodes, their history, and their future, in this recent article.

Would We Recognize Extraterrestrial Technology If We Saw It?

There’s a common critique in science fiction series like Star Trek about the extraterrestrial species not looking ‘alien’ enough, as well as about their technology being strangely similar to our own, not to mention compatible to the point where their widgets can be integrated into terrestrial systems by any plucky engineer. Is this critique justified, or perhaps more succinctly put: if we came across real extraterrestrial life with real extraterrestrial technology, would we even notice? Would an alien widget borrowed of an alien spacecraft even work with our own terrestrial spacecraft’s system?

Within the domain of exobiology there are still plenty of discussions on the possible formation and evolutionary paths conceivable within the Universe, but the overarching consensus seems to be that it’s hard to escape the herding effect of fundamental physics. For lifeforms, carbon-based chemistry is the only reasonable option, and when it comes to technology, it’s hard to not end up at technology using the same physical principles which we presume to exist across the Universe, which would practically guarantee some level of interoperability.

What’s notable here is that over the past years, a number of people have claimed to have observed potential alien technology in our Solar System, in particular the ʻOumuamua asteroid in 2017 and a more recent claim by astrophysicist Abraham Loeb regarding an interstellar meteor that impacted Earth in 2019, which he says could be proof of ‘alien technology’. This raises the question of whether we are literally being pummeled by extraterrestrial spacecraft these days.

Continue reading “Would We Recognize Extraterrestrial Technology If We Saw It?”

Hackaday Podcast 229: DIY VR, Gutting Voice Assistants, And ChatGPT Failing Its Summer Internship

This week, Editor-in-Chief Elliot Williams and Kristina Panos braved the slight cold and the high heat respectively to bring you the best hacks of the previous seven days. In the news this week: you’ve got a second and final chance to get your Supercon talk proposals in!  So get on that, because we need YOU to help make Supercon awesome.

We can chalk up a win for Kristina on What’s That Sound this week (finally!). Will you get it right? Will you get it exactly right? Time and Elliot’s fancy dice will tell.

Then it’s on to the hacks, where we check out a cool RFID emulator e-paper badge, discuss whether a certain type of record player is better off as a cyberdeck, and look through the eye of a Gameboy-style camera for the Playdate console.

From there we take a look at gutting and rooting voice assistants, a solenoid keyboard, and a beautifully rebuilt VR headset that now does AR as well. Finally we talk autonomous solar boats, lambast ChatGPT as the worst summer intern ever, and ponder what makes a thing count as Linux or not.

Check out the links below if you want to follow along, and as always, tell us what you think about this episode in the comments!

Download and savor at your leisure.

Continue reading “Hackaday Podcast 229: DIY VR, Gutting Voice Assistants, And ChatGPT Failing Its Summer Internship”