Randomly Move Marionette With Steel Balls And Geneva Drives

The ball driven Geneva drives that move the marrionette. (Credit: Karakuri channel, YouTube)

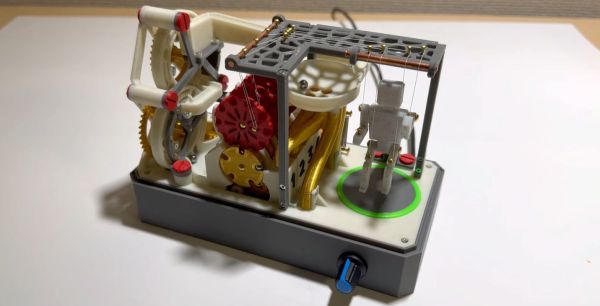
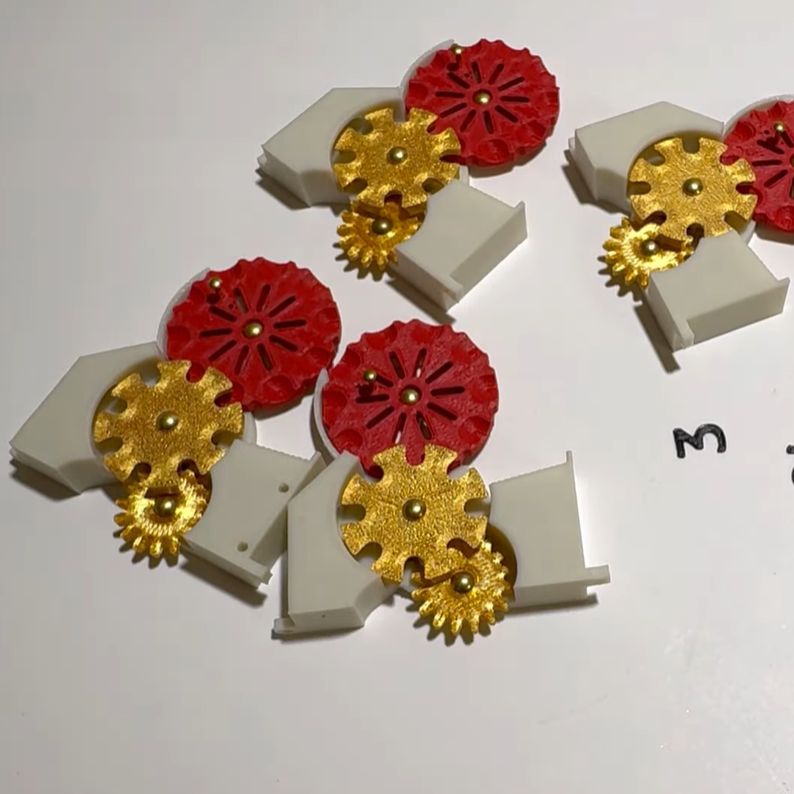
Over the years we have seen many marble machines, but this one on the [Karakuri channel] (hit CC for subtitles) on YouTube is somewhat special, as it uses Geneva drives to turn the motion of the steel balls going around the circuit into random movement of a marionette. The Geneva drive type of gear mechanism normally converts a constant rotary motion into intermittent rotary motion by having a singular pin on the first wheel drive the second wheel. In the demonstrated mechanism, however, the pin is replaced by the steel balls, which are only intermittently and randomly present because of how each steel ball picks one of four paths, one towards each Geneva drive.

As a result of this, the motion of the marionette’s appendages – attached to the red wheel – is random. The only powered element of the (mostly 3D printed) system is the drive mechanism that carries the steel balls up again and keeps the primary wheels on the Geneva drives rotating. We have to give the creator pops for what is both an interesting art piece and a demonstration of how to creatively use this somewhat unusual gear mechanism to introduce randomness without a lot of complexity.

Thanks to [MrTrick] for the tip.

Continue reading “Randomly Move Marionette With Steel Balls And Geneva Drives”

An Optical Computer Architecture

We always hear that future computers will use optical technology. But what will that look like for a general-purpose computer? German researchers explain it in a recent scientific paper. Although the DOC-II used optical processing, it did use some conventional electronics. The question is, how can you construct a general computer that uses only optical technology?

The paper outlines “Miller’s criteria” for practical optical logic gates. In particular, any optical scheme must provide outputs suitable for introduction to another gate’s inputs and also support fan out of one output to multiple inputs. It is also desirable that each stage does not propagate signal degradation and isolate its outputs from its inputs. The final two criteria note that practical systems don’t depend on loss for information representation since this isn’t reliable across paths, and, similarly, the gates should require high-precision adjustment to work correctly.

The paper also identifies many misconceptions about new computing devices. For example, they assert that while general-purpose desktop-class CPUs today contain billions of devices, use a minimum of 32-bits of data path, and contain RAM, this isn’t necessarily true for CPUs that use different technology. If that seems hard to believe, they make their case throughout the paper. We can’t remember the last scientific paper we read that literally posed the question, “Will it run Doom?” But this paper does actually propose this as a canonical question.

Continue reading “An Optical Computer Architecture”

A Kyria split keyboard and wrist rests on a stand made of LEGO.

LEGO Keyboard Stand Fits Just Right

Split keyboards are great for many reasons, but mostly because you can place the halves as far apart as you want and really give your arms and shoulders the room they need. [Jason Cox] hit the nail on the head, though: add in a couple of palm rests, and you now have four things that will potentially shift and drift out of place on your desk or keyboard tray. It was such a problem that [Jason] hardly ever used his Kyria. That is, until he built a stand out of LEGO to hold everything.

[Jason] was using a pair of Manfrotto pocket tripods to tent the keyboard, and those held their position surprisingly well, even though he tweaked them here and there over time. Ultimately, [Jason] knew he wanted the answer to be something customizable. And what’s more customizable than LEGO?

About $60 worth of new white bricks and plates later, [Jason] got to work, spending an evening building the thing. He ended up using a few bricks to hold the keyboard in place on the plate, and it worked perfectly.

Of course, he didn’t get the whole contraption exactly how he wanted it the first time, but tweaking builds is half the fun, right? After a while, [Jason] figured out he could rebuild the part that connects the two keyboard halves to go around a plastic piece at the back of the keyboard tray, which holds the whole thing in place. The end result? Wonderful. The Kyria stays in place, and now [Jason] is using it way more than before.

You know LEGO is versatile, but did you know you can use it to build a hydroelectric dam?

Via reddit

Playing Audio On The Pi Pico With No DAC To Speak Of

Normally, if you want to play music or other audio on a microcontroller, you need to get yourself a DAC. Or at least, that’s the easiest way to go about it and the one most likely to get you good, intelligible audio. You don’t have to go that way, though, as [antirez] demonstrates.

[antirez] decided to do this with a Pi Pico, but it’s applicable to other microcontrollers too. It’s all done with a single pin and a PWM output. The PWM output is set to a very high frequency beyond human hearing. In this case, it was 100 KHz. Then, the duty cycle of the PWM is changed to essentially output various average voltage levels at the pin. Vary the output voltage as per your desired sound file by using each sample to vary the duty cycle of the PWM. Voila! You can output whatever sound you want on that pin! [antirez] steps through the basics of doing this, including processing simple WAV files into a raw format that can be dumped into MicroPython code.

There’s no sound sample on the project page, and we’d have to assume it sounds pretty crunchy when hooked up to a speaker. And yet, it could prove a useful technique if you’re designing your own audio greeting cards or something, so keep that in mind!

LED Choker Is A Diamond In The Junk Pile

Isn’t it great when you find a use for something that didn’t work out for the project it was supposed to? That’s the story behind the LED strips in this lovely blinkenlights choker by [Ted].

The choker itself is a 15 mm wide leather strap with holes punched in it. According to [Ted], the hole punching sounds like the absolute worst and hardest part to do, because the spacing of the holes must be greater than that of the LEDs to account for flex in the strap. [Ted] tested several distances and found that there is little margin for error.

Controlling those blinkenlights is a Seeed Xiao S3, which fits nicely behind the neck in what looks like a heat shrink tube cocoon. [Ted] chose this because there was one lying around, and it happens to be a good fit with its LiPo charge controller.

The choker runs on four 300 mAh LiPo batteries, which makes for more bulk than [Ted] would like, but again, sometimes it’s about what you have lying around. Even so, the batteries last around two hours.

Sometimes it’s about more than just blinkenlights. Here’s an LED necklace that reports on local air quality.

PCB Design Review: DPI-LVDS Sony Vaio LCD Devboard

Ordering a PCB with mistakes sucks. We should help each other avoid such mistakes – especially newcomers. One of the best ways to avoid these mistakes, especially if it’s your first one, is to get a few other people to look at it. You deserve to get a PCB that is as functional and as helpful as humanly possible, so that you can be happy with your project, and feel ever so slightly more confident in yourself in whatever you shall set out to do next.

At the end of last year, I put out a call for design review submissions, and we’ve received enough projects to make me feel overwhelmed for a bit. A design review has always felt like a personal thing, and here we are doing them in public. But in that sense, we hope that everyone can learn from them, and we hope to push forward a healthy review culture.

What’s more, these articles won’t just be design review. Every project I’m highlighting is worthy of a Hackaday feature just on its own, so tune in and learn more about them!

Today’s Contestant

For this example, I will be walking through a review I’ve already given someone with a pretty cool board, for a pretty cool project I’ve already shown you. Remember the Sony Vaio remake project? A fair bit of people have reached out to me afterwards, and one of them, [Exentio] also had the same Sony Vaio rebuild idea in mind. We started chatting, and he decided to tackle one of the project’s milestones, and perhaps the most crucial one – adapting the LCD.

Continue reading “PCB Design Review: DPI-LVDS Sony Vaio LCD Devboard”

This Piano Does Not Exist

A couple of decades ago one of *the* smartphone accessories to have was a Bluetooth keyboard which projected the keymap onto a table surface where letters could be typed in a virtual space. If we’re honest, we remember them as not being very good. But that hasn’t stopped the idea from resurfacing from time to time.

We’re reminded of it by [Mayuresh1611]’s paper piano, in which a virtual piano keyboard is watched over by a webcam to detect the player’s fingers such that the correct note from a range of MP3 files is delivered.

The README is frustratingly light on details other than setup, but a dive into the requirements reveals OpenCV as expected, and TensorFlow. It seems there’s a training step before a would-be virtual virtuoso can tinkle on the non-existent ivories, but the demo shows that there’s something playable in there. We like the idea, and wonder whether it could also be applied to other instruments such as percussion. A table as a drum kit would surely be just as much fun.

This certainly isn’t the first touch piano we’ve featured, but we think it may be the only one using OpenCV. A previous one used more conventional capacitive sensors.