A Little Optical Magic Makes This Floating Display Pop

If there’s a reason that fancy holographic displays that respond to gestures are a science fiction staple, it’s probably because our current display technology is terrible. Oh sure, Retina displays and big curved gaming monitors are things of wonder, but they’re also things that occupy space even when they’re off — hence the yearning for a display that can appear and disappear at need.

Now, we’re not sure if [Maker Mac70]’s floating display is the answer to your sci-fi dreams, but it’s still pretty cool. And, as with the best of tricks, it’s all done with mirrors. The idea is to use a combination of a partially reflective mirror, a sheet of retroreflective material, and a bright LCD panel. These are set up in an equilateral triangle arrangement, with the partially reflective mirror at the top. Part of the light from the LCD bounces off the bottom surface of the mirror onto a retroreflector — [Mac] used a sheet of material similar to what’s used on traffic signs. True to its name, the retroreflector bounces the light directly back at the semi-transparent mirror, passing through it to focus on a point in space above the whole contraption. To make the display interactive, [Mac] used a trio of cheap time-of-flight (TOF) sensors to watch for fingers poking into the space into which the display is projected. It seemed to work well enough after some tweaking; you can check it out in the video below, which also has some great tips on greebling, if that’s your thing.

We suspect that the thumbnail for the video is a composite, but that’s understandable since the conditions for viewing such a display have to be just right in terms of ambient light level and the viewer’s position relative to the display. [Mac] even mentions the narrow acceptance angle of the display, touting it as a potential benefit for use cases where privacy is a concern. In any case, it’s very different from his last sci-fi-inspired volumetric display, which was pretty cool too.

Continue reading “A Little Optical Magic Makes This Floating Display Pop”

A mini Cyclone game consisting of an Arduino, an LED ring, and button, plus a scoreboard on a 16x2 LCD.

2024 Tiny Games Contest: Mini Cyclone Tests Reaction Time

Round and round goes the red LED, and if you can push the button when it overlaps the green LED, then you win. Cyclone is almost too simple of a game, and that’s probably part of why it’s so addictive.

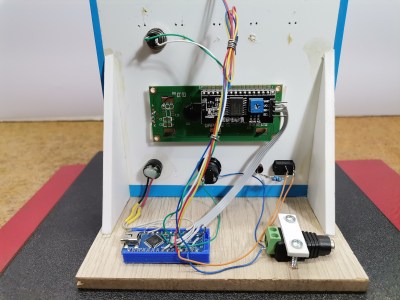
The back side of the mini Cyclone game, showing the guts.Want to make one for your desk? All it takes is an Arduino Nano R3 or comparable microcontroller, an RGB LED ring with 12 LEDs, a 16×2 LCD, a buzzer, and a momentary push button switch.

Interestingly, there aren’t successive levels with increasing speed, but each round begins with a randomized speed value. Of course, this can all be easily changed in the code, which is modified from [Joern Weise]’s original.

This is a tinier version of [mircemk]’s original project, which uses a 60-LED ring and does contain levels. As usual with [mircemk]’s builds, this project is mounted on their trademark 3 mm PVC board and covered with peel-and-stick wallpaper. Be sure to check out the demo and build video after the break.

Don’t forget! You have until Tuesday, September 10th to enter the 2024 Tiny Games Contest, so get crackin’!

Continue reading “2024 Tiny Games Contest: Mini Cyclone Tests Reaction Time”

A tricked-out kids' Jeep in black and silver.

Driven To Over-Engineer A Kids’ Car

You know, it feels as though it’s getting more and more difficult to compete for Father of the Year around here. And [Jon Petter Skagmo] just laid down a new gauntlet — the incredibly overly-engineered kids car.

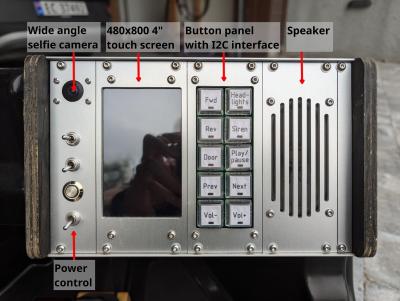
Close-up of the dash panel of an overly-engineered kids' car.While the original plan was to build the entire car from scratch, [Jon] eventually opted to use an off-the-shelf car that had a dead battery.

While the original architecture was quite simple, the new hardware has just about everything a kid could want in a tricked-out ride, most of which is accessible through the really cool dashboard.

We’re talking headlights, a music player, a siren, a selfie video cam that doubles as two-way communication with the driver, and even a garage door opener that uses an MQTT connection.

Under the cute little hood is where you’ll find most of the electronics. The car’s brain is a Raspberry Pi 3B, and there’s a custom daughter board that includes GPS/GNSS. This was originally meant to geofence [Baby Girl Skagmo] in, but Dad quickly realized that kids are gonna kid and disabled it pretty soon after.

This isn’t the first high-tech rebuild of a kiddie car that we’ve seen here at Hackaday. Makes us wish we were quite a bit smaller…

Continue reading “Driven To Over-Engineer A Kids’ Car”

The blind maze -- a box with three buttons and three light-up panels that indicate walls.

2024 Tiny Games Contest: Blind Maze Is Fun For All

If you think about it, even difficult mazes on paper are pretty easy. You can see all the places you can and can’t go, and if you use a pencil instead of a pen, well, that’s almost like cheating.

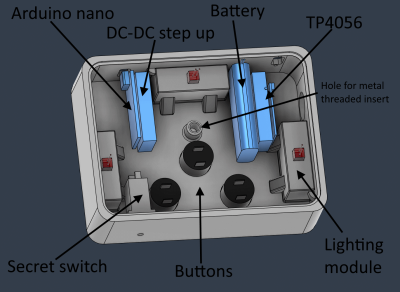
The innards of the blind maze.However, using a pencil is pretty much a necessity to play [penumbriel]’s Blind Maze. In this game, you can’t even see the maze, or where you are. Well, that’s not exactly true — you can “touch” the wall (or lack thereof) in front of you and to the sides, but that’s it. So you’re going to need that pencil to draw out a map as you go along.

This game runs on an Arduino Nano and a 18650 cell. There are three LEDs deep within the enclosure, which is meant to give the depth of walls. But, even the vision-impaired can play the Blind Maze, because there’s haptic feedback thanks to a small vibration motor.

If you want to play in hard mode, there’s a hidden paperclip-accessible switch that turns off the LEDs. This way, you have to rely on hitting the walls with your head. Be sure to check out the video below.

Continue reading “2024 Tiny Games Contest: Blind Maze Is Fun For All”

Walking The Plank: Add-Ons For The Bus Pirate

The Bus Pirate multi-tool has held a place of honor in many a hardware hacker’s toolbox for years, and the latest generation of the gadget powered by the Raspberry Pi RP2040/RP2350 offers significantly enhanced capabilities over the original PIC versions. We took a look at the new Bus Pirate when it started shipping back in February, and while the firmware was still in the early stages back then, it was already clear that creator [Ian Lesnet] and his team had put together a compelling product.

Over the last several months, the Bus Pirate software has improved dramatically. New features have started showing off the hardware’s capabilities, and the user experience is far improved over where it was at release. Following the firmware development is a roller coaster ride, with [Ian] sometimes pushing out several updates a day. Luckily, like the Pi Pico itself, updating the new Bus Pirate only takes a second.

But as impressive and important as those software updates have been, that’s not what we’re talking about today. In this post, we’ll take a look at one of the most exciting aspects of the new Bus Pirate — the ability to easily develop add-on modules for it.

Continue reading “Walking The Plank: Add-Ons For The Bus Pirate”

Art of 3D printer in the middle of printing a Hackaday Jolly Wrencher logo

3D Printering: Klipper, The Free 3D Printer Upgrade

I have several 3D printers, and I’ve always been satisfied with using either Repetier or Marlin on all of them. There are a few other firmware versions that could run on my hardware, but those two have been all I’ve needed. Sure, it was painful for a while having to juggle features to fit the firmware image onto the smaller microcontroller boards. Now that Marlin supports big 32-bit boards however, that hasn’t been a problem. But recently, I’ve been on a program to switch everything to Klipper.

In this post, I’ll tell you why I did it and give you some data about why you might consider it, too.

The Landscape

Marlin is written in C and burned into a 3D printer’s flash memory. It does a lot. It receives G-code commands, interprets them, and translates them to meaningful actions on the hardware. Modern versions handle automatic transformations to account for lumpy beds, input shaping to reduce shaking, and linear advance to produce better prints.

It might seem simple to control a 3D printer, but there are lots of little details to take into account. For example, if you are moving the head between two XY coordinates and you expect a certain flow rate, then you have to figure out how fast to turn the steppers to get the right amount of plastic out over that time. You also may have to retract before you start a move, make sure temperatures are stable, and transform the actual coordinates based on bed leveling data. There’s a lot going on.

Klipper does the exact same job, but it does it differently. On the 3D printer board is a tiny piece of software that does very little. It’s a bit like a device driver for the printer. All by itself, it does nothing. But it can handle very basic commands that describe how to move the machine.

All the rest of the processing you expect to happen now runs on some Linux computer. That is very often a Raspberry Pi, but it could be a spare laptop, your desktop computer, or anything that will run a reasonable Linux install. Several vendors even sell single-board computers with touchscreens made specifically for running this part of Klipper.

However, even though a screen is nice, you don’t really need it. I’ll talk about that more later.

Continue reading “3D Printering: Klipper, The Free 3D Printer Upgrade”

Reconfigurable Tracked Robot Has Some Neat Flexible Abilities

When you think of tracked robots, you might think of bomb disposal robots or others used in military applications. You probably haven’t seen anything quite like this, however—it’s a “reconfigurable continuous track robot” from researchers [Tal Kislasi] and [David Zarrouk (via IEEE Spectrum).

Neat party trick!

The robot looks simple, like some kind of tracked worm. As its motors turn, the track moves along as you would expect, propelling the robot along the ground. Its special feature, though, is that the track can bend itself up and down, just like a snake might as it rises up to survey a given area.

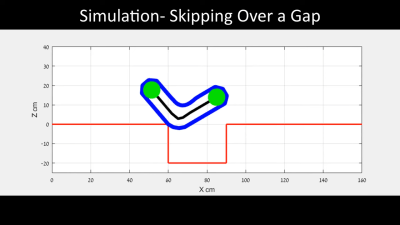
The little tracked robot can thus tilt itself up to climb steps, and even bend itself over small obstacles. It can even try and hold itself up high as it inches along to try and bridge its way over a gap.

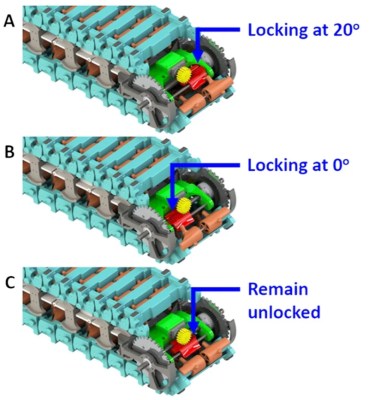
The robot can selectively lock each link (or not) as it passes by.

How does it achieve this? Well, the robot is able to selectively lock the individual links of its outer track in various orientations. As the links pass over the front of the robot, a small actuator is used to lock each link in a 20-degree orientation, or a straight orientation, or leave them loose.

The ability to lock multiple links into a continuous rigid structure allows the robot to rise up from the ground, form itself into a stiff beam, or conform to the ground as desired. A mechanism at the back of the robot unlatches the links as they pass by so the robot retains flexibility as it moves along.

It’s a nifty design, and one we’d like to see implemented on a more advanced tracked robot. We’ve explained the benefits of tracked drivetrains before, too.

Continue reading “Reconfigurable Tracked Robot Has Some Neat Flexible Abilities”