Most of us first spot them as children—the white lines in the blue sky that are the telltale sign of a flight overhead. Contrails are an instant visual reminder of air travel, and a source of much controversy in recent decades. Put aside the overblown conspiracies, though, and there are some genuine scientific concerns to explore.
See, those white streaks planes leave in the sky aren’t just eye-catching. It seems they may also be having a notable impact on our climate. Recent research shows their warming effect is comparable to the impact of aviation’s CO2 emissions. The question is then simple—how do we stop these icy lines from heating our precious Earth?
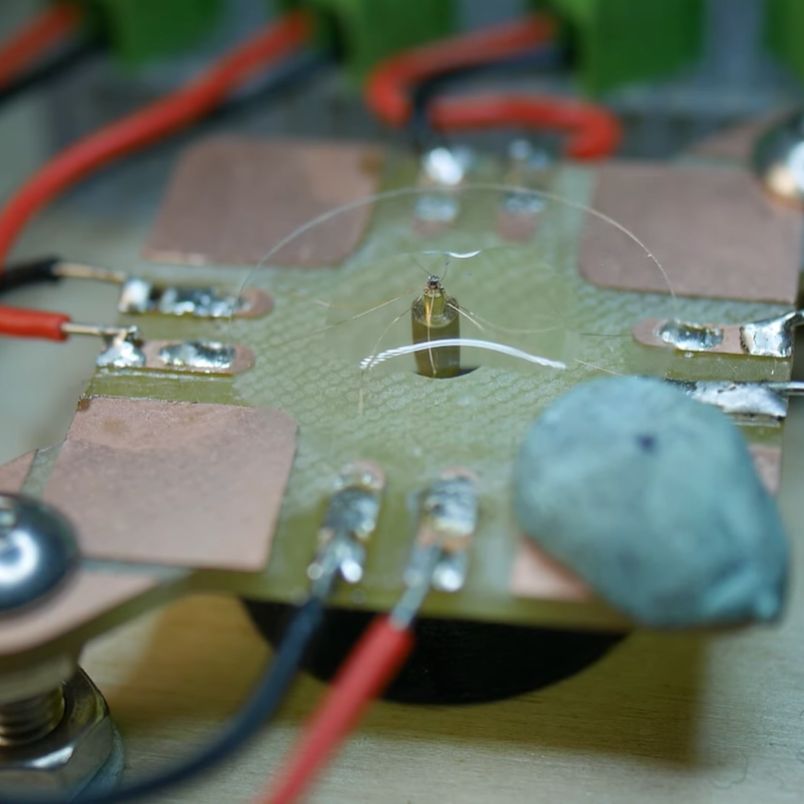
The first attempt at replicating William McLellan’s miniature motor. (Credit: Chronova Engineering, YouTube)
How small can an electric motor be without resorting to manufacturing methods like lithography? In a recent video, [Chronova Engineering] on YouTube tries to replicate the 1960 McLellan motor that fulfilled [Richard Feynman]’s challenge requirements. This challenge was part of [Feynman]’s 1959 lecture titled There’s Plenty of Room at the Bottom, on the possibilities of miniaturization. A $1,000 reward was offered for anyone who could build an electric motor that was no larger than 1/64th inch cubed (~0.0625 mm3), with the expectation that new manufacturing methods would be required to manufacture a motor this small.
As reported in the December 1960 issue of The Month at Caltech, [William McLellan] walked into [Feynman]’s lab with this tiny marvel that took him 2.5 months of lunch hour breaks to build. Weighing in at 250 micrograms and consisting out of 13 parts, it was constructed using a microscope, a watchmaker’s lathe and a toothpick. Surely replicating this feat would be easy today, right?
The main challenge is that everything is incredibly small. The rotor shaft is 90 micrometers in diameter, and the four coils require winding incredibly thin wire at scales where typical manufacturing methods do not apply. Suffice it to say that it takes massive amounts of patience, creativity and the best (stereo) microscope you can get, yet even with modern optics and materials this first attempt mostly failed.
At the end we’re left with SEM shots of this replication attempt and an immense amount of respect for the skills of [William McLellan] who made a working version in 1960 using much more basic tools during his lunch breaks.
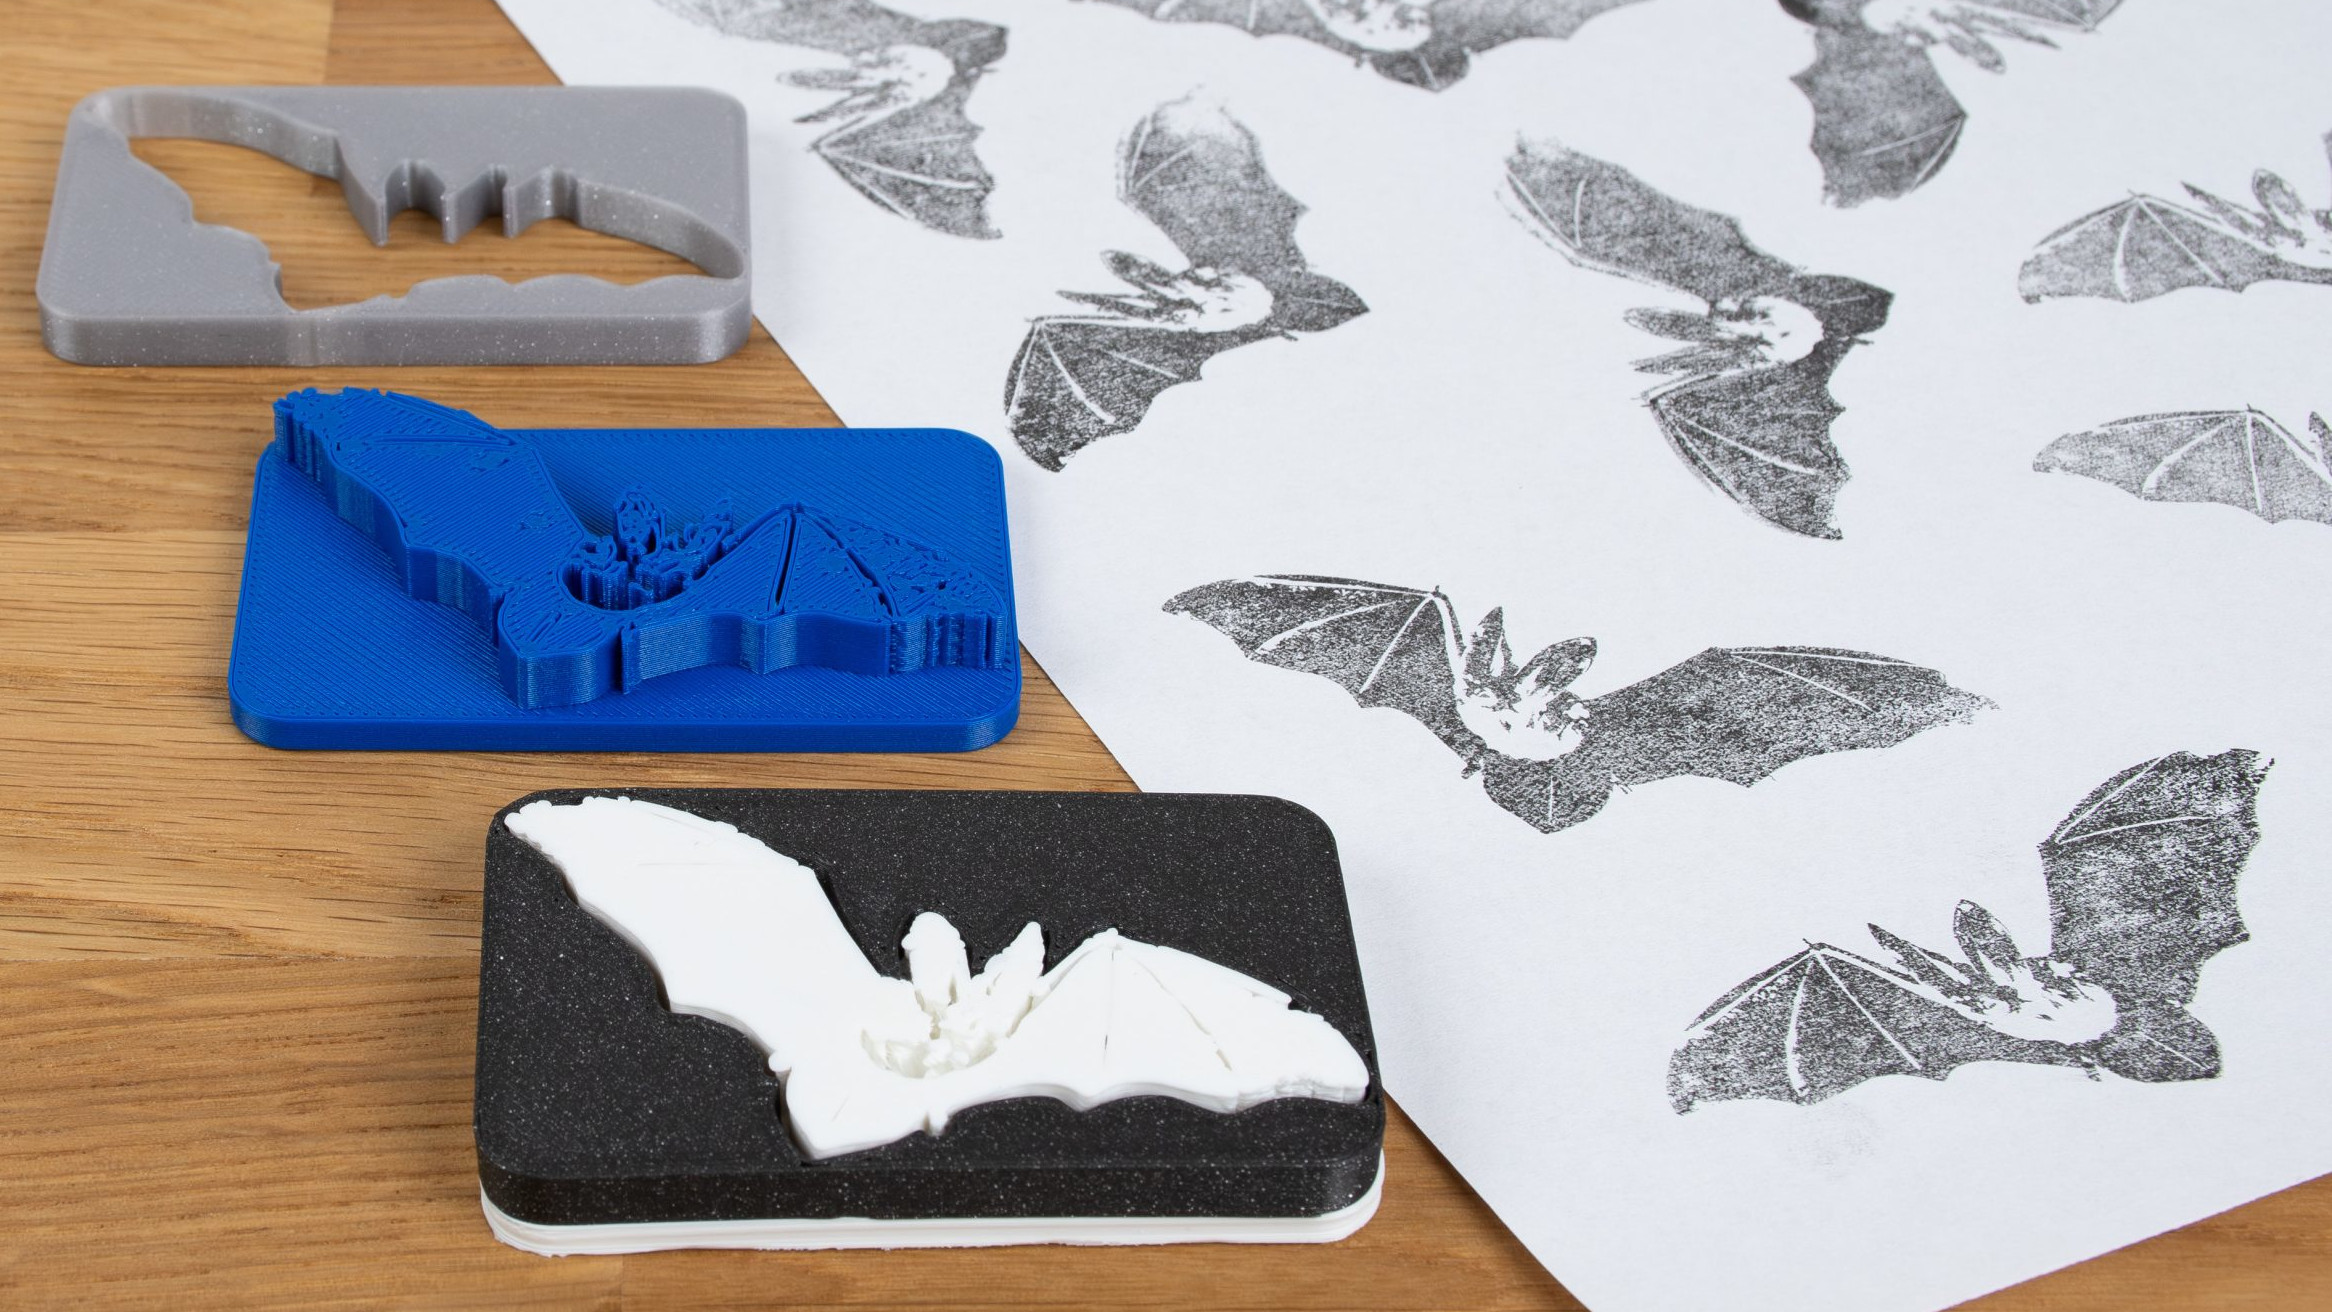
Ink stamps can be fun to make and use, and 3D printers are uniquely positioned to create quality stamps of all kinds with just a little care. As with most things, the devil is in the details and the best results will require some extra work. Luckily, [Prusa] has a blog post that goes through how to 3D print the best stamps and includes concrete recommendations and tips to get the most out of the process.
Resin printers can create stamps too, just ensure a flexible material is used.
What makes a good 3D-printed stamp? It should be easy to use, transfer an image cleanly, and retain ink reasonably well. To hit these bases, printing the stamp face out of a flexible material is probably the most important, but a flat and smooth stamp surface is equally crucial. Satin-finish build plates will give a weathered look to the stamp, but textured build plates in general are no good.
As for the design, turning an image into a 3D object can be a bit challenging for novices, but there are tools that make that much easier now than it used to be. Some slicers allow importing .svg files (scalable vector graphics) with which to emboss or deboss objects, and online tools as well as free software like Inkscape will let folks covert images into .svg format.
Flexible filaments tend to be stringy so they should be dried before use, especially if the stamp design has a lot of separate elements that invite stringing. Any flex filament should do the job, but of course some specific filament brands perform better than others. Check out the full blog post for specific recommendations.
Pausing a print and inserting a pre-printed support piece (removed after the print completes) helps form big overhangs.
The remaining tricky element is that flexible filaments also tend to be poor at bridging, and if one is printing a stamp face-down on the build plate (to get that important, ultra-flat face) then the upper inside of the stamp may need some support for it to come out right. As [Prusa] suggests, this is a good place to use a manual, drop-in pre-printed support piece. Or if one has the ability to print in multiple materials, perhaps print the support structure in PLA since it is just about the only material that won’t completely weld itself to flex filaments. Of course, if one is designing the stamp entirely in CAD, then the best option would be to chamfer the stamp elements so supports aren’t necessary in the first place. Finally, don’t overlook the value of a physical design that makes handling easy and attractive.
The chances are that many of you will have made an FM “bug” style transmitter, a simple one-transistor oscillator usually driven by a small electret microphone. It’s also relatively straightforward to do the same for AM, and if you take a look through AliExpress you’ll find some modules which do just that. [Doz Television Workshop] has one, and he’s treated us to a thorough run-down of its design before addressing some of its shortcomings.
An AM transmitter is simple enough, in this case an oscillator and buffer driving a class C power amplifier. The modulation is applied by a transistor in series with the power amp, driven from an audio amplifier. Some attention has gone into the design of this one, with a proper output filter and plenty of room for tweaking to achieve proper levels and modulation density. There are some problems though — The modulator transistor is mounted upside down for the heatsink, and the frequency stability leaves something to be desired. [Doz] fixes the heatsink mounting and incorporates a DDS frequency synthesizer with an Arduino for control.
Disappointing news this week for those longing for same-hour Amazon delivery as the retail giant tapped the brakes on its Prime Air drone deliveries. The pause is partially blamed on a December incident at the company’s Pendleton, Oregon test facility, where two MK30 delivery drones collided in midair during light rain conditions. A Bloomberg report states that the crash, which resulted in one of the drones catching fire on the ground, was due to a software error related to the weather. As a result, they decided to ground their entire fleet, which provides 60-minute delivery to test markets in Arizona and Texas, until a software update can be issued.
The ESP32 series of microcontrollers have been with us for quite a few years now, providing a powerful processor and wireless connectivity for not a huge outlay. We’ve seen a bunch of versions over the years with both Tensilica and RISC-V cores, but so far the ones with radios have all only serviced 2.4 GHz WiFi. That’s about to change to include 5GHz with the new C5 variant though, and [Andreas Spiess] has been lucky enough to get his hands on a prototype dev kit
It’s very similar to the C6, which we’re already used to beyond the dual-band 2.4GHz and 5GHz radio from a software point of view. The C5 is so new that the company has yet to incorporate the new chip into the Arduino IDE. He shows it working and detecting both networks though, and speculates a little about its eventual marketing.
Interesting to us is the dual-band antenna, with branches for both frequencies on the same PCB. We’d be interested to see the real-world performance of this, and also whether they produce a version with separate outputs for each band. The full video is below the break. In the meantime, watch out for this chip appearing on the market.
Photographic accessories are often plagued by high prices, as photography is considered a rich man’s game. It doesn’t have to be that way though, and [Snappiness] is here to get you started on the route to cheaper kit with a waist-level viewfinder project.
If you’ve used a twin-lens reflex camera then you should be familiar with a waist level viewfinder, it’s a lens and mirror arrangement allowing the photographer to frame the shot looking down from above. Modern cameras often have no viewfinder, so this is aimed at digital compacts without flip-up screens.
It has three components, all available for relatively low prices, and mounted in a 3D printed case. There’s a prime lens, a mirror, and a Fresnel lens forming the part the photographer looks through. It’s a simple device, but still one which would cost a lot more off the shelf. The video is below the break.