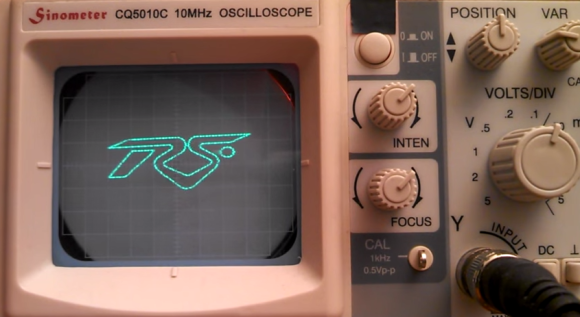
The Basics Of Frequency Modulation

fm-modulation

[brmarcum] takes us back to analog building block basics with his Frequency Modulation and Demodulation tutorial. Frequency Modulation (FM) sounds simple at first, but understanding the electronics behind modulation and  demodulation of an FM signal can be confusing. We’ve covered the basics before, but FM is so tightly associated with broadcast radio that searches often become muddled with references to RF, stereo, antennas, and transmitters.

[brmarcum] hopes to fill that gap with a simple circuit that modulates an audio signal to FM, then demodulates and amplifies it to be played on a small speaker. He used a Digilent Analog Discovery kit in his experiments, but an oscilloscope (an older analog scope would be perfect here) would work for output. Signal generation duties could easily be handled by a 555 circuit at the low end, and a computer sound card at the higher end.

[brmarcum] obviously put some time into his tutorial, but it’s not a tome of FM modulation. He’s broken down the modulation and demodulation circuits into their basic op-amp stages with examples of what the signal should look like on a scope after each stage. That’s the beauty here. By building and testing each section, anyone new to analog can learn how things work. In places where the theory behind what’s going on gets too in-depth for an Instructable, [brmarcum] gives links to Wikipedia.

Here Come The RGB LED Clones

ws2812 and clones timing

It seems like every third project on Hackaday uses WS2812 RGB LEDs in some way. We all love our blinkenlights, and bright, cheap, serial controlled RGB LEDs are the bees knees.

As with all products these days, competing manufacturers have discovered the huge market for these things, and clones are now available. [Tim] recently took a look at the PD9823, as well as three versions of the WS2812. [Tim] is considered something of a WS2812 guru here at Hackaday. You might remember him from his WS2812 driver optimization article, which should be required reading for any WS2812 hacker.

As many of us know, the timing characteristics for these LEDs can be a pain to work with. The values also differ between the WS2812S and WS2812B. [Tim] discovered that the new through hole WS2812D parts are different yet again, though rather close to the B parts. The PD9823’s designers must have studied the WS2812’s closely, as their 190ns time base falls directly between WS2812S 166ns time and the 208ns time of the WS2812B. The PD9823 also requires a slightly longer reset pulse.

The takeaway is that well written drivers such as [Tim’s] should have no problem with the new parts, but compatibility is something to keep in mind as more clones hit the market.

Drones And Robots Come Out To Play At Sparkfun’s 6th Annual Autonomous Vehicle Competition

Sparkfun AVC 2014

Sparkfun Electronics held their 6th annual Autonomous Vehicle Competition last weekend, and this year was bigger than ever before. The action was at Boulder Reservoir in Colorado, but anyone could follow along (with a few technical difficulties) on the YouTube LiveStream. (Part 1), and (Part 2).

The story of the day was Team SHARC’s Troubled Child, which won the ground vehicle doping class. Rather than mess around with miniature cars, Team SHARC built their ‘bot out of a freaking Jeep, a 1986 Jeep Grand Wagoneer to be exact. Troubled Child had no problem getting around the course. One could say it carried the entire team. Literally – the rest of Team SHARC’s robots are riding along on top of Troubled Child in the picture up there.

There was also plenty of action in the aerial competition. Sir Crash-a-Lot was the first drone to find a watery doom at Boulder Reservoir. The last we saw of it on the stream, the team was looking for some divers.

Aircraft can not be hand launched at the AVC. Not a problem for rotary-winged vehicles, but this rule has led to some interesting solutions for fixed wing aircraft. The disguised “Team Falcon” showed up with an incredible compressed air launcher, which used a gallon water jug to fire their delta-winged plane to a clean run.  Team Karma550 wasn’t quite as lucky, with their helicopter crashing hard, and throwing up quite a bit of smoke.

We’re still waiting for more detailed results, but if you want the full scores, they are available on Sparkfun’s AVC scoreboard page.

The 200 LED Ring Clock

There are LED clocks, and then there are LED clocks that can blind you from 30 paces. [Stiggalicious’s] LED ring clock is of the latter variety. 200 WS2812B/Neopixel RGB LEDs drive the ring clock to pupil searing levels. The clock runs on ATMega1284P, with timekeeping handled by an NXP PCF8563 real-time clock chip. Code is written in Arduino’s wiring language using Adafruit’s Neopixel library.

Building the clock with a single Printed Circuit Board (PCB) would be both expensive and wasteful. [Stiggalicious] cleverly designed his clock to be built with 8 copies of the same PCB. Each board makes up a 45° pie slice of the ring. All 8 PCBs have footprints for the CPU, clock chip, and other various discrete parts, but only the “master” section has these parts populated. 7 “slave” sections simply pass clock, data, power and ground through each LED. He used Seeedstudio’s board service to get 10 copies of his PCB made, just in case there were any mistakes.

[Stiggalicious] rolled the dice by buying exactly the 200 LEDs he needed. Either he got really lucky, or the WS2812 quality testing has improved, because only one LED had a dead blue LED.

If you’d like to find out more, [Stiggalicious] gives plenty of details in his Reddit thread. He doesn’t have a webpage setup for the clock but he’s uploaded his source code (pastebin link) and Altium schematic/PCB files (mega.nz link). We may be a bit biased, but hackaday.io would be a perfect spot for this or any other project!

DUO Decimal – A Minimalist Single Board Computer

duodecimal

If you’ve ever struggled to fit your program into the RAM and ROM of a small micro, you’ll appreciate [Jack’s] creation, the DUO Decimal. DUO Decimal is a small single board computer running on an Atmel ATtiny84. The ’84 has 8KB flash memory, 512 bytes of SRAM, and 512 bytes of EEPROM. Not as bad as a the old days, but still tight by today’s standards.

User input to the DUO Decimal is through two buttons. Output is via a 7 segment numeric LED display. Not the easiest for typing in long programs, but on par with the switches and blinkenlights of the past. 3 bits of GPIO are available for connections to your own circuits.

[Jack] didn’t just design a board, he designed an entire language. DUO Decimal is programmed in an interpreted language called DUO Decimal Numeric Code (DDNC). There are 47 DDNC commands, covering everything from basic math to list manipulation. Programs can be entered through the buttons, or save your fingertips by downloading them through the AVR isp interface. The entire C code for the DUO Decimal, including the DDNC interpreter is available on [Jack’s] website.

[Jack] created several example DDNC programs, including a 6 function calculator with trigonometry, a Mandelbrot set tester, and an implementation of the rock paper scissors game. There’s even a platformer action game, though graphics on a single 7 segment display are simplistic to say the least.

Continue reading “DUO Decimal – A Minimalist Single Board Computer”

Goliath: One Drone To Rule Them All

We see quadcopter projects all the time here on Hackaday, so it takes something special to get our attention. [Peter McCloud] has done just that with Goliath, a gas powered quadcopter he’s entered in The Hackaday Prize. By gas, we don’t mean a little glow fuel buzzer, We’re talking about a 30 horsepower V-twin lawnmower engine running good old-fashioned gasoline.

Multicopters powered by a single power source present a unique set of problems. Quadcopter propellers need to rotate in opposite directions to avoid the entire craft spinning due to torque action. With individual electric motors that’s as easy as swapping a couple of wires. Not so with a single rotating engine. [Peter] has accomplished this feat with a clever arrangement of single and double-sided belts.

Control is another issue. Generally, central powered multicopters use collective pitch, similar to a helicopter control system. [Peter] has decided to go with high-efficiency fixed pitch blades and a vane system for directional control. Much like hovercraft use vanes to steer, Goliath will use vanes to affect its attitude and yaw.

goliathProp
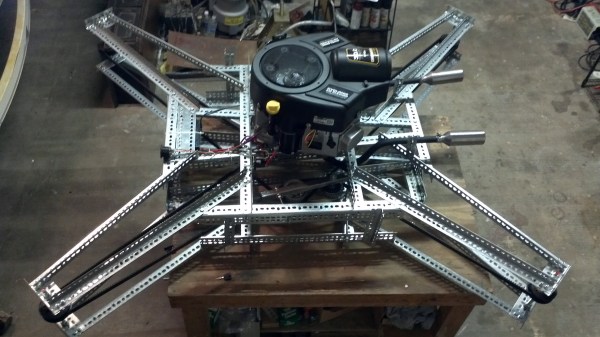
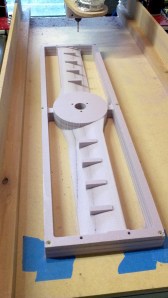
The propellers are works of art in their own right. [Peter] modeled the propellers in CAD using the principles of blade element theory, then used a Shopbot style CNC to carve them out of pink insulation foam. Styrofoam alone won’t withstand the 60 lbs each propeller will be supporting, so [Peter] plans to laminate the props in composite cloth. This is the similar to the way many full-scale helicopter rotor blades are assembled.

Goliath’s frame is constructed of Dexion style slotted steel angles, and we have to admit, at 240 lbs with engine, it seems like it’s going to be a heavy beast. Big enough to ride at least. Who knows… if the judges like it [Peter] may ride Goliath all the way to space!


SpaceWrencherThe project featured in this post is an entry in The Hackaday Prize. Build something awesome and win a trip to space or hundreds of other prizes.

Thumbnail that say The Hacklet

Hacklet #4 — PCB Tools And Wristwatches

4

The Hackaday Prize is heating up! When we set up the prize, we expected to see some incredible entries, and you guys haven’t let us down. Projects like SatNOGS, which aims to create a global network of satellite ground stations, or OpenMV, a low-cost Python powered vision module, are seriously blowing us away.

We’re starting to give away some prizes through community voting and there’s still plenty of time for you to enter. Check out The Hackaday Prize page for the full details.

Low Cost Printed Circuit Board Tools

Pick and Place

We’ve seen mills, lathes, CNC machines and 3D printers, but if there is any device that gets a hardware hacker’s attention, it’s a pick and place machine. In the PCB industry these machines pick up thousands of parts every hour, perfectly placing them on printed circuit boards. The downside is they’re incredibly expensive. The cheapest Chinese machines without vision start in the $4000 USD price range.

[Neil] aims to break down those price barriers with a $300 Pick and Place Machine that doubles as a 3D printer. He’s using delta 3D printer hardware to do it, and he’s throwing in everything! OpenCV based vision, multiple tool heads, reel and tray pick up, [Neil] has covered all the major points. He can’t do it alone though, so he’s looking for help. Check it out, and give him a hand (or a skull)!
pcbMill

A low-cost pick and place machine will need printed circuit boards to work on. Not to worry, [shlonkin] has you covered with his PCB mill for under $10. Built from recycled printers, an Arduino, and host software written in processing, [shlonkin] has already posted impressive photos of boards his machine has milled. The main problem [shlonkin] has run into is longevity with plastic parts. In his most recent update, he’s looking for ideas. Can you help him?

Digital Watches

Anyone will tell you that digital watches are a pretty neat idea. With the era of smartwatches upon us, more than one hacker has delved into building their own timepiece. We’re happy to report that most of them even tell time.

walltech[Walltech] has gone all out to create the ultimate watch. His OLED Smart Watch 6.0 is the culmination of years of work. The watch features a 1.5” OLED display, an SD card slot, and a vibrator motor. It has Bluetooth 4.0 to connect to the world, and an Atmel ATmega32u4 as its brain. A 500mAh battery will power the watch for 18-24 hours per charge.

[Walltech] plans to make it do everything from SMS and email notifications to music streaming. Don’t see a feature you want? Add it! Smart Watch 6.0 Is completely open source, so you can hop into the code and hack away!

tilttouchtime2On the other side of the spectrum is [askoog89’s] Tilt Touch Time, which utilizes  those awesome bubble LED displays some of us remember from the 70’s. The retro look is only 3D printed skin deep though, as [askoog89] is using an ATtiny2313 processor. Atmel’s Qtouch is providing the capacitive touch sensing, while a tilt sensor helps Tilt Touch Time live up to its name. [Askoog89] has submitted his watch to The Hackaday Prize, so he’s trying to figure out a way to use the touch sensor to sync time with a PC. If that doesn’t work out, we bet those bubble LEDs would make great light sensors for some monitor-blink-sync action.

Fallout fans have seen plenty of PIP boys here on Hackaday, but have you seen [jara’s] PIP Watch? This Personal Information Panel is going big on size but low on power with a 3 inch e-ink display. [Jara] is using an STM32F101 ARM Cortex-M3 CPU, so he’s got plenty of processing power at his disposal. He’s connecting to the world through a Bluetooth serial link. All he needs is a Geiger counter, and he’s good to go!

pipWatch

That’s it for this week’s Hacklet, stay tuned for next week when we bring you more of what’s happening at Hackaday.io!