Comprinter Hides A Laptop Inside A Printer

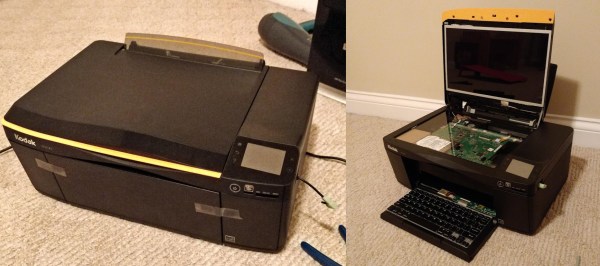
Sometimes we find projects that border on the absurd but are too cool to pass up. The Comprinter is exactly that. [Mason Stooksbury] had a dream. An all-in-one scanner printer that was also a computer. What would turn heads more than walking into a hackerspace with a printer, plugging your headphones in, then opening up the top to reveal a monitor?

[Mason’s] dream became possible when friends gave him some old laptops and a dead Kodak printer. After going through the laptops, he picked a Dell Inspiron 1440 to be the donor machine. The printer and laptop were both carefully stripped down. [Mason’s] goal for the project was to build a “beautiful” printer/computer. No bodges allowed. He spent most of his time planning out how to mount the motherboard and display inside the scanner section of the chassis.

The actual assembly was quite fiddly. Working with only an inch or so of clearance, [Mason] installed standoffs for the motherboard and display. He to do all this without breaking the wires for the display and WiFi antennas.

Once the main parts of the laptop were assembled, [Mason] completed the build with a nine-port USB hub, some internally mounted speakers and a USB keyboard mounted in the paper tray. The twelve-hour operation was a complete success. What looks to be a cheap inkjet actually hides a complete laptop running Xubuntu. The only downside is that the printer doesn’t actually print, but [Mason] is quick to note that if the printer hadn’t been broken in the first place, it would work fine — all the modifications are in the scanner section.

We’ve seen some wild casemods over the years, including a Nintendo in a toaster, a modern PC stuffed into an original Xbox, and Raspberry Pi’s stuffed into just about everything.

Barn Door Tracker Needs No Special Tools

If you want to take a long exposure photograph, you need a tripod to hold your camera steady. But a tripod won’t help when the ground it’s standing on is moving. That’s exactly the problem [Emvilza] ran into when he wanted to take minutes or hours long photographs of the night sky. His solution was to build a barn door tracker, which he carefully documented in both English and Spanish.

Barn door trackers, also known as scotch mounts have been used by photographers for many years to cancel out the rotation of the earth. This causes stars to appear frozen in the sky and allows for photographs of very dim celestial objects. These trackers range from simple hand-cranked affairs to complex mechanical creations. [Emvilza] decided to have a go at designing and building his own tracker, using only basic tools, as he didn’t have access to a CNC or 3D printer.

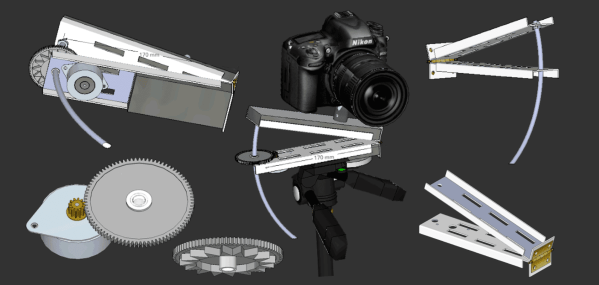
The tracker itself is built from wood, with metal hardware. [Emvilza] spent a ton of time designing the tracker using SketchUp. The carefully drawn plans ensured everything would fit together and operate correctly.

One of the toughest parts was accurately bending a threaded rod enough to make it work with the tracker, but not bind the drive system. The mount’s motion comes from a threaded rod. The rod is driven by a stepper motor.  Control and sensing is handled by an ATmega328 programmed using the Arduino toolchain. [Emvilza] learned Eagle and designed a PCB. Rather than etch a board, he simply built the circuit on perfboard, following his layout and traces.

The end result is a tracker that looks and performs great — just check out the images on [Emvilza’s] site to see some examples. Not only that, [Emvilza’s] well written documentation will help anyone looking to build a tracker in the future!

9 Planes Combine To Make One Giant Flexible Flier

[Ran D. St. Clair] has created a unique flying machine in the Flex 9. It’s not every day that you see a completely new and unusual aircraft, but the Flex 9 definitely fits the bill. [Ran] took 9 radio controlled planes, connected them together, and made one giant plane — and with an 18-foot wingspan, giant isn’t a misnomer.

The planes that make up the Flex 9 are simple aircraft – foamboard wings, a boom, and a basic tail. The individual planes only have elevator control – no rudder, no ailerons. Power comes from a standard LiPo battery, ESC and brushless outrunner motor. The control system is interesting – every plane has a KK board flight controller running OpenAeroVTOL firmware. The center plane has a radio receiver and communicates to the other KK boards over standard servo wires. Rudder (yaw) and aileron (bank) control are achieved through mixing handled by flight controllers.

Even the couplings between the planes were carefully designed. [Ran] used an EPP foam core as a rubbery dampener, with plywood to strengthen the joint. Each joint is mounted at a 20-degree angle. As the planes bank relative to each other, the angle forces the airframe to twist, which should help the whole system stay level.

Check out the videos below for an explanation and a flight test. The Flex 9 launch isn’t exactly stable – there’s some crazy sinusoidal wobbling going on. But the mechanical and electronic dampeners quickly spring into action smoothing the flight out.

If you’d like to know more about the KK board, you can read about right here.

Continue reading “9 Planes Combine To Make One Giant Flexible Flier”

Welding Robot Takes On A Hot, Dirty, Dangerous Job

They used to say that robots would take over the jobs too dirty or dangerous for humans. That is exactly what [Joel Sullivan] had in mind when he created this welding robot. [Joel] designed the robot for the OSB industry. No, that’s not a new operating system, it’s short for Oriented Strand Board. An engineered lumber, OSB is made of strands (or chips) of wood. It’s similar to plywood but doesn’t require large thin sheets of lumber. To make a panel of OSB, a 5-inch thick matt of wood chips is mixed with glue and compressed down to 5/16″ at 7500 PSI and 400° F.

The presses used to make OSB are a massively parallel operation. 20 or more boards can be pressed at once. Thy press is also a prime area for damage. A nut or bolt hidden in the wood will dig into the press, causing a dent which will show up on every sheet which passes through that section. The only way to fix the press is to shut it down, partially dismantle it, and fill the void in with a welder. [Joel’s] robot eliminates most of the downtime by performing the welding on a still hot, still assembled press.

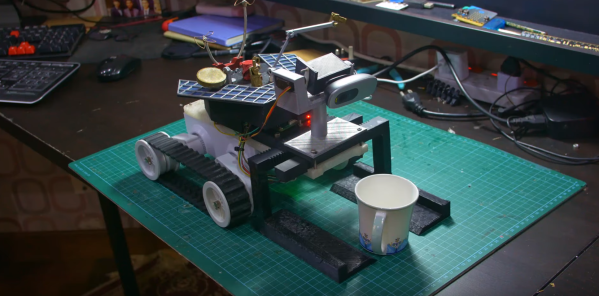
The robot looks like it was inspired by BattleBots, which is fitting as the environment it works in is more like a battleground. It’s a low, wide machine. In the front are two articulated arms, one with a welder, and one with a die grinder. The welder fills any voids in the press platen, and the die grinder grinds the fresh welds flat.  An intel NUC controls things, with plenty of motor drives, power supplies, and relays on board.

[Joel’s] bot is tethered, with umbilicals for argon, electricity and compressed air. Air travels through channels throughout the chassis and keeps the robot cool on the hot press. Everything is designed for high temperatures, even the wheels. [Joel] tried several types of rubber, but eventually settled on solid aluminum wheels. The ‘bot doesn’t move very fast, so there is plenty of traction. Some tiny stepper motors drive the wheels. When it’s time to weld, pneumatic outriggers lock the robot in place inside the narrow press.

Cameras with digital crosshairs allow the operator to control everything through a web interface. Once all the parameters are set up, the operator clicks go and sparks fly as the robot begins welding.

If you’re into seriously strong robots, check out trackbot, or this remote-controlled snow blower!

Continue reading “Welding Robot Takes On A Hot, Dirty, Dangerous Job”

The Modern Analog Soldering Station

There is a certain sense of accomplishment one gets when building their own tools. This is what [Alejandro Velazquez] was going for when he built his own soldering station. Sure you can get a decent station for a pittance on Amazon, or eBay. You can even build your own microprocessor controlled station. [Alejandro] is currently interested in analog electronics, so he went that route to build his own closed-loop station.

The handle is a 50 watt, 24-volt affair with a thermocouple. You can find this handle on many Hakko 907 clone soldering stations, often referred to as the 907A. The station itself is completely analog. A triac switches the current going to the heater. The triac is controlled by a PWM signal. The PWM itself is generated and regulated by an LM324 quad op-amp, which is the heart of the station. The op-amp compares the setpoint with the current temperature read from the soldering handle’s thermocouple, then adjusts the duty cycle of the PWM signal to raise, or lower the temperature.

It’s a classic control system, and the schematic is definitely worth checking out if you want to understand how op-amps can be used to create complex operations.

You can find plenty more information on analog electronics right here on Hackaday — we’ve covered thermocouple amplifiers, as well as instrumentation amps. If you’re more of a digital man, check out this Arduino controlled soldering station!

Life Imitates Art: 3D Printed Banksy Frame “Shreds” Oeuvre, Prints Money

[Dave Buchanan] is giving the world his own take on the now famous shredding Banksy frame. This version has a few extra features though – like reverse shredding and printing money! Like many of us, [David] was impressed with the Banksy art auction shredding last week. We’re still not sure how he pulled it off, and the jury is still out if it was real, or all some sort of stunt involving the auction house.

[David] took his inspiration straight to CAD software, and designed a miniature version of the frame. A quick trip to the 3D printer and he had the actual frame in hand.  He even hand-painted his own copy of Girl with Balloon on canvas. Assembly didn’t quite go as planned, a few parts had to be adjusted — i.e. cut off and hot-glued together. But in the end, the hack worked – the frame would shred and un-shred the painting whenever someone cranked the handle.

If you haven’t guessed yet, [David’s] frame is a version of the classic money printing trick. What looks like two rollers is actually a simple belt drive. The mechanism pulls in one piece of paper while pushing out a hidden piece. It creates the illusion of printing money – or of shredding art. Given Banksy’s sense of humor, we can’t help but wonder if his frame worked the same way.

[David] is working on a re-design of his piece which will be easier to build — so keep an eye on his Reddit thread if you’d like to print your own.

Continue reading “Life Imitates Art: 3D Printed Banksy Frame “Shreds” Oeuvre, Prints Money”

Atlas Is Back With Some New Moves

Atlas is back, and this time he’s got some sweet parkour moves to show off. Every few months, Boston Dynamics gives us a tantalizing glimpse into their robotics development labs. They must be doing something right, as these videos never fail both to amaze and scare us. This time Atlas, Boston Dynamics humanoid bipedal robot, is doing a bit of light parkour — jumping over a log and from box to box. The Atlas we’re seeing here is the evolution of the same robot we saw at the DARPA Robotics Challenge back in 2013.

The video caption mentions that Atlas is using machine vision to analyze the position of markers on the obstacles. It can then plot the most efficient path over the obstructions. The onboard control system then takes over and uses Atlas’ limbs and torso for balance and momentum as the robot jumps up and over everything in its path.

It’s interesting to see how smoothly Atlas jumps the offset staircase, leaping left to right from step to step. The jumping is extremely smooth and fluid — it seems almost human.  You can even see Atlas’ let foot just barely clear the box on the second jump. We have to wonder how many times Atlas fell while the software was being perfected.

One thing is for sure, logs and boxes may slow down zombies, but they won’t help anymore when the robot uprising starts.

Continue reading “Atlas Is Back With Some New Moves”