Open Sesame, From A Galaxy Far, Far Away.

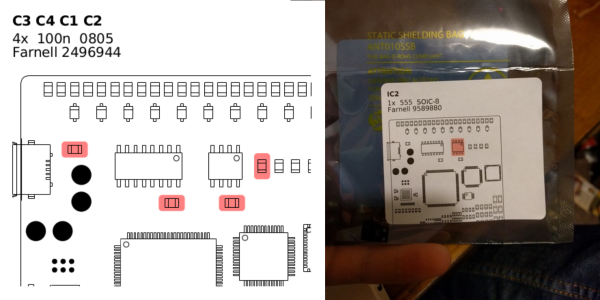
[TVMiller]’s description of his project is epic enough to deserve a literal copy-paste (something our readers often praise us about). In his own words,  “Having discovered several spare Midichlorians in my liquor cabinet, I trained and applied them to opening a large cumbersome gate. The FORCE motion travels through my inner what-nots and is translated by the Pebble Classic accelerometer toggling a command sent to the (Particle) Cloud (City) which returns to the Particle Photon triggering a TIP120 to fire a button on an existing RF transceiver. May the ridiculous hand gestures be with you, always.” Thus was born the Gate Jedi , and you’ll need exactly 47 Midichlorians, and some other trivial parts, to build one.

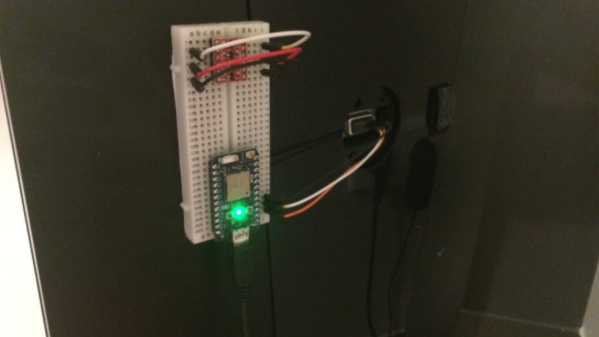
The Pebble watch hooks up to his android smart phone. A Pebble (android) app sends the accelerometer data to the Particle (previously called Spark) cloud service. From there, the data is pushed to the Photon IoT board which runs a few lines of code. Output from the Photon turns on a TIP120 power transistor, which in turn triggers the existing RF trans receiver that opens the Gate.

This looks way cooler than the Light Sabre hacks. Check out the video of him summoning the Force. And if you’d like to do more, try integrating gesture controls with this Pebble Watch hack that turns it into a home automation controller.

Continue reading “Open Sesame, From A Galaxy Far, Far Away.”

Brushed DC Servo Drive

Brushless DC motors, and their associated drive electronics, tend to be expensive and complicated. [Ottoragam] was looking for a cheaper alternative and built this Brushed DC motor servo controller and the results look pretty promising. Check out the video after the break.

He needed a low cost, closed loop drive for his home-brew CNC. The servo drive is able to supply a brushed DC motor with up to 7 A continuous current at up to 36 V which works out to about 250 W or 1/3 HP. It does closed loop control with feedback from a quadrature encoder. The drive accepts simple STEP and DIRECTION signals making it easy to interface with micro controllers and use it as a replacement for stepper motors in positioning applications. All of the control is handled by an ATmega328P. It takes the input signals and encoder data, does PID control, and drives the motor via the DRV8701 full bridge MOSFET driver. There’s also some error detection for motor over-current and driver under-voltage. Four IRFH7545 MOSFETs in H-bridge configuration form the output power stage.

This is still work in progress, and [Ottoragam] has a few features pending in his wish list. The important ones include adding a serial interface to make it easy to adjust the PID parameters and creating a GUI to make the adjustment easier. The project is Open Source and all source files available at his Github repository. The board is mostly surface mount, but the passives are all 0805, so it ought to be easy to assemble. The QFN footprint for the micro controller could be the only tricky one. [Ottoragam] would love to have some beta testers for his boards, and maybe some helpful comments to improve his design.

Continue reading “Brushed DC Servo Drive”

Frickin’ Amazing Clock

Wwood_clock_05
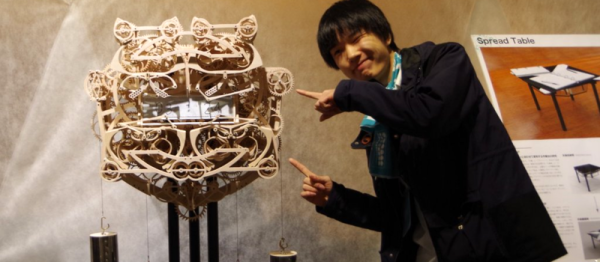
e’ve featured a lot of clock builds, but this one, as the title suggests, is frickin’ amazing. Talented art student [Kango Suzuki] built this Wooden Mechanical Clock (Google translation from Japanese) as a project while on his way to major in product design. There’s a better translation at this link. And be sure to check out the video of it in motion below the break.

[Kango]’s design brief was to do something that is “easy for humans to do, but difficult for machines”. Writing longhand fits the bill, although building the machine wasn’t easy for a human either — he needed six months just to plan the project.

The clock writes time in hours and minutes on a magnetic board. After each minute, the escapement mechanism sets in motion almost 400 wooden cogs, gears and cams. The board is tilted first to erase the old numbers, and then the new numbers are written using four stylii.

The clock doesn’t have any micro controllers, Arduinos, servos or any other electronics. The whole mechanism is powered via gravity using a set of four weights. [Kango] says his biggest challenge was getting the mechanism to write the numbers simultaneously. While he managed the geometry right, the cumulative distortion and flex in the hundreds of wooden parts caused the numbers to be distorted until he tuned around the error.

Continue reading “Frickin’ Amazing Clock”

StickerBOM For KiCad

When boards were larger and components mostly through hole, designers could put a lot of information on the silk legend – reference designator, values, additional text and so on. But with surface mount components becoming smaller and board real estate at a premium, modern boards do not have a lot of information marked on the silk layer. If you are building and distributing a short run of kits, perhaps for a round of beta testing, then [Adam Greig]’s StickerBOM python script for KiCad can be really handy. StickerBOM is a KiCad BOM exporter designed for people stuffing boards by hand. It generates a PDF for printable sticky labels, where each label reflects one BOM line from a supplier. You then stick these labels on the bags from your supplier, and they show you where the parts go.

The labels get printed with the reference designator, quantity, component value, package, vendor and part number. It also adds a drawing of the PCB with the relevant parts highlighted for easy location identification. To use it, schematic symbols must have the supplier field and part number added. The script can be run from the command line, or from the BOM manager in eeschema. The script is set up for Avery L7164 labels, but this setting can be changed. It’s still work in progress so there’s a couple of bugs to be aware of. It cannot process the bottom layer of the board, and the result is only as good as the data you provide. And if you have a large board with components spread all over, the resultant graphic printed on the label may not be ideal.

We are hoping this, and other scripts such as the Part generator and Cost spreadsheets or the script for mechanical CAD export, get added to future releases of KiCad. The KiCad version 5 Developer’s road map document already has some really nice feature additions in the works.

This File Will Self-Destruct In 24 Hours

[menkveldj] built a service that encrypts files which self destruct in 24 hours. The download link can only be used once. If the wrong people were to get the link and download the file, they’d need many years on a pretty powerful computer to crack the 256AES encryption.

The sender shares a file that is encrypted client side using a password generated Pbkdf2 key to encrypt the data before uploading it to the s3 storage service. The sender is then provided the one-time-use link to share with the recipient. After the first download, or 24 hours, the link and the encrypted file are both deleted. The receiver must enter the same password to decrypt and recover the file. No one but the sharer and receiver know what the actual file is.

It’s still work in progress, so chime in with your comments and suggestions. To dig into the code, check out his repository on Github, which also has instructions to build and run it if you’d like to do your own version.

Oh, and you’ll like this. If want to thumb your nose at the powers that be, the site has a redirect for the whimsical domain: NSAfu.com.

Hacking A Coffee Machine

The folks at Q42 write code, lots of it, and this implies the copious consumption of coffee. In more primitive times, an actual human person would measure how many cups were consumed and update a counter on their website once a day. That had to be fixed, obviously, so they hacked their coffee machine so it publishes the amount of coffee being consumed by itself. Their Jura coffee machine makes good coffee, but it wasn’t hacker friendly at all. No API, no documentation, non-standard serial port and encrypted EEPROM contents. It seems the manufacturer tried every trick to keep the hackers away — challenge accepted.

The folks at Q42 found details of the Jura encryption protocol from the internet, and then hooked up a Raspberry-Pi via serial UART to the Jura. Encryption consisted of taking each byte and breaking it up in to 4 bytes, with the data being loaded in bit positions 2 and 5 of each of the 4 bytes, which got OR’ed into 0x5B. To figure out where the counter data was stored by the machine in the EEPROM, they took a data dump of the contents, poured a shot of coffee, took another memory dump, and then compared the two.

Once they had this all figured out, the Raspberry-Pi was no longer required, and was replaced with the more appropriate Particle Photon. The Photon is put on a bread board and stuck with Velcro to the back of the coffee machine, with three wires connected to the serial port on the machine.

If you’d like to dig in to their code, checkout their GitHub repository. Seems the guys at Q42 love playing games too – check out 0h h1 and 0h n0.

Thanks [Max] for letting us know about this.

Augmented Reality Ultrasound

Think of Virtual Reality and it’s mostly fun and games that come to mind. But there’s a lot of useful, real world applications that will soon open up exciting possibilities in areas such as medicine, for example. [Victor] from the Shackspace hacker space in Stuttgart built an Augmented Reality Ultrasound scanning application to demonstrate such possibilities.

But first off, we cannot get over how it’s possible to go dumpster diving and return with a functional ultrasound machine! That’s what member [Alf] turned up with one day. After some initial excitement at its novelty, it was relegated to a corner gathering dust. When [Victor] spotted it, he asked to borrow it for a project. Shackspace were happy to donate it to him and free up some space. Some time later, [Victor] showed off what he did with the ultrasound machine.

As soon as the ultrasound scanner registers with the VR app, possibly using the image taped to the scan sensor, the scanner data is projected virtually under the echo sensor. There isn’t much detail of how he did it, but it was done using Vuforia SDK which helps build applications for mobile devices and digital eye wear in conjunction with the Unity 5 cross-platform game engine. Check out the video to see it in action.

Thanks to [hadez] for sending in this link.

Continue reading “Augmented Reality Ultrasound”