Large Seven-Segment Clock Build Takes Time To Perfect

[Kevin Rye] built a discrete TTL based seven-segment clock, and he wasn’t too happy with the ugly insides compared to the nice enclosure he built for it. He embarked on creating another large seven-segment clock to put inside that enclosure.

Clocks, and specifically seven-segment based ones, aren’t anything new to write about. This particular project, which is still work in progress, is interesting. [Kevin] is an experienced hacker, but the problems he encountered and resolved along the way could prove useful to a fellow hacker someday.

To start with, he tried rectifying his old build. But in his own words “You can polish a turd, but it’s still a turd.” Five years later, he’d had enough. He’s built a lot of other clocks, but rather than repurposing them, he decided to start from scratch. He quickly breadboarded an Arduino, some displays and drove them using the Multiplex7seg library. That library supports only four characters, so he was back to the drawing board. With a fresh start, his design is now moving along nicely. For now, he’s designed three boards for the display, two boards for the colons between digits, the main Arduino-clone controller board and a 3D printed front frame to hold the displays. It will be nice to finally see that enclosure receive some fitting occupants and bring this build to closure.

Fixing A Product Design Flaw In A Misting System

[Xerxes3rd] works at a place where they raise reptiles in terrariums. Such enclosures require controlled lighting, temperature and humidity. Humidity is maintained using “misting” devices. These are usually water containers with a pump whose outlet ends in a series of very fine spray nozzles which create the mist. A timer controls the pump’s on and off cycles.

[Xerxes3rd] purchased an Exo Terra Monsoon RS400 misting system – a low-cost misting device and soon discovered that it had a serious design flaw. The built-in timer malfunctions, and it mists a hundred times more than it should! A lot of folks who buy a product and discover it has an inherent design flaw will return it back for a refund. Instead,  [Xerxes3rd] decided to break in and fix it instead –  “warranty void if tampered” be damned.

To start with, he needed to figure out what the problem was. He went about it in clinical fashion, eventually creating a slick document (PDF) outlining his observations and diagnosis. The timer controller board has a PIC micro, some buttons, potentiometers, LED’s and an IR receiver. The misting cycles are set using the two potentiometers – Off time and On time for the pump. His analysis and resolution makes for interesting reading.

What he found was that the PIC micro was reading inconsistent values from the potentiometers. More specifically, the software isn’t doing any smoothing on the analog values it reads from the potentiometers. Since the PIC that controls the system wasn’t easily re-programmable, he opted to replace it with an Arduino Nano. At the same time, he got rid of the potentiometers that were used to set the misting frequency and duration, and added a 16×2 LCD. Time setting is now done using the three on board buttons. He removed the PIC micro and replaced it with two female header sockets, onto which he plugged a small board containing an Arduino Nano and a few components. He also cut the original PCB in half, removing the potentiometers and crystal oscillator in order to make room for the 16×2 character LCD.

The lizards are now probably thanking him for their perfectly timed doses of moisture. Having done this, he could probably add in more features such as a temperature-humidity sensor, a water level sensor or maybe even throw in an ESP8266 module and have the Lizards tweet when they need to be hydrated. Because that’s another thing hackers love – feature creep.

Super Simple Cat Feeder

Sometimes, along comes a hack that is just that. A kludged collection of parts thrown together quickly to solve some problem. [mightysinetheta]’s Upcycled Cat Feeder is just that – no pretensions.

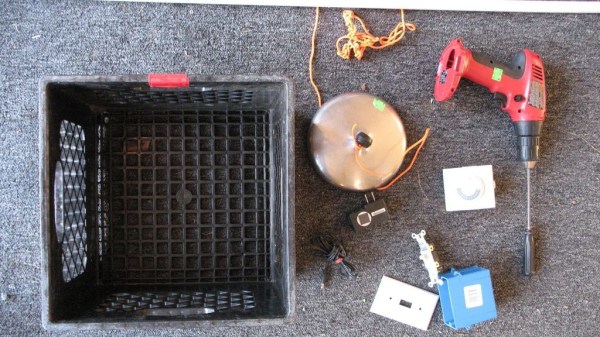
It’s a cat feeder built out of a drill, wall switch and mechanical clock timer for under $10. Pretty much the simplest electric cat feeder you can make. Survives power outages just fine, is single serving, but due to the noise and motion it makes, it is a perfect Pavlovian trainer for the cat. The best way to describe it is as a Rube Goldberg machine.

Set the timer for the planned feed time (up to 12 hours in advance). At the appointed time, the timer triggers, the drill rotates, the old, broken screwdriver chucked in the drill turns. The cord tied to the screwdriver winds up like a winch. This pulls up the lid covering the cat’s dinner plate. The noisy drill announces it’s dinner time. When fully raised, the lid pushes up a short piece of PCV pipe. This flips a switch, that shuts off the drill. If you need build instructions, fear not. [mightysinetheta] has detailed build instructions although the pictures are probably all you’ll need.

Check the video after the break.

Continue reading “Super Simple Cat Feeder”

Hacking Amazing Soldering Features Into The Already Great Weller WMRP

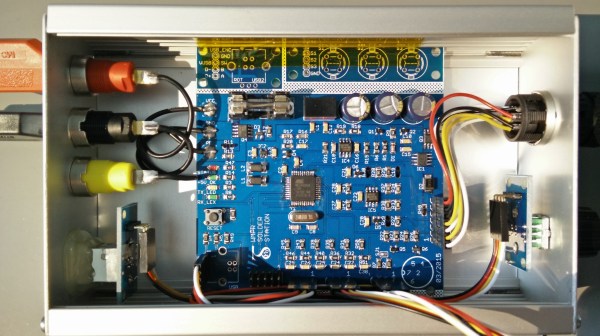
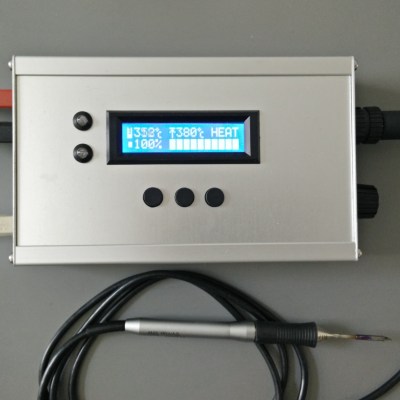
Weller, the German soldering tools manufacturer, has a nice range of micro soldering irons (pencils) designated as the WMRP series. These are 12V, 40 W or 55W units with a 3 second heat up time, and allow quick tip exchange without needing any tools. [FlyGlas] built a neat soldering station / controller for the WMRP series based around an ATMega microcontroller running Arduino.

It’s packed with most of the features you see in a professional rig.

  • low offset op amp for soldering tip temperature measurement with type c thermocouple
  • cold junction compensation using the PTC (KTY82-210) included in the WMRP soldering pencil
  • input voltage measurement
  • soldering pencil current measurement
  • recognizing if the soldering pencil rests in the stand (–> standby)
  • 3 buttons to save and recall temperature values
  • rotary encoder to set soldering temperature
  • illuminated 16×2 character LCD module
  • USB for debugging and firmware update
  • 4mm safety socket for +12V power input and a protective earth socket for connection to ESD protection

WMRP_controller_02A PWM signal from the microcontroller controls the load current using a MOSFET. Load current is measured using a Hall Effect-Based Linear Current Sensor – ACS712. The corresponding linear output voltage is buffered and slightly amplified using AD8552 zero drift, single supply, RRIO Dual Op Amp before being sent to the microcontroller ADC input. To ensure ADC measurements are accurate and stable, a low noise precision voltage reference – ADR392 is used. Another precision resistive voltage divider allows input voltage measurement. The supply input has over-current and reverse voltage protection. A set of buttons and a rotary encoder are connected to the microcontroller to allow settings and adjustments. An analog section measures the thermocouple voltage from the soldering pencil as well as the stand-by switch status. The handle has an embedded reed switch that is activated by a magnet in the support stand which puts it into stand-by mode. Another analog section performs cold junction compensation using the PTC sensor within the soldering pencil.
The Git repo contains the initial Arduino code which is still a work in progress. While the hardware source files are not available, the repo does have the pdf’s, gerbers and BOM list, if you want to take a shot at building it. Check a demo video after the break. Thanks [Martin] for sending in the tip.

Continue reading “Hacking Amazing Soldering Features Into The Already Great Weller WMRP”

Hackaday Prize Entry : Impact – A Head Concussion Monitor

A lot of young athletes who get concussions each year go undiagnosed, leading to brain injury. [Hunter Scott] is working on a device called Impact to help detect these events early. According to this article which discusses the issue of concussion recognition and evaluation, “Early identification on the sports sideline of suspected concussion is critical because, in most cases, athletes who are immediately removed from contact or collision sports after suffering a concussion or other traumatic brain injury will recover without incident fairly quickly. If an athlete is allowed to keep playing, however, their recovery is likely to take longer, and they are at increased risk of long-term problems”

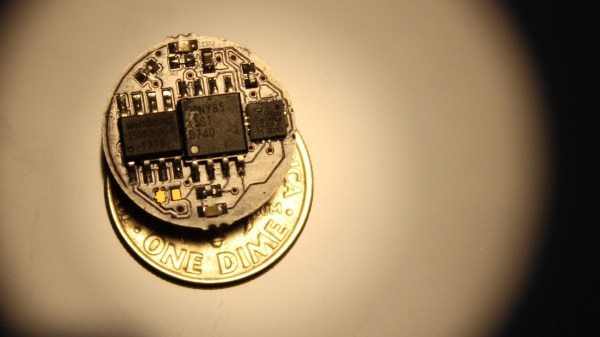
The device is a dime sized disk, which has an ATTiny85 microcontroller, memory to hold data, an accelerometer and a LED which gets activated when the preset impact threshold is breached, all driven by a coin cell. This small size allows it to be easily embedded in sports equipment such as helmets. At the end of a game, if the LED is blinking, the player is then screened for a concussion. For additional analysis, data stored on the on-board memory can be downloaded. This can be done by a pogo-pin based docking station, which is what [Hunter Scott] is still working on.

He’s having a functional problem that needs fixing. The ATTiny85 cannot be programmed with the accelerometer populated. He first needs to populate the ATTiny85, program it, and then populate the accelerometer. He’s working in fixing that, but if you have any suggestions, chime in on the comments below. We’d like to add that [Hunter] is a prolific hacker. His project, the Ultra-wideband radio module was a Hackaday Prize semi-finalist last year.


The 2015 Hackaday Prize is sponsored by:

Raspberry Preserve – A BitTorrent Sync Client In A Mason Jar

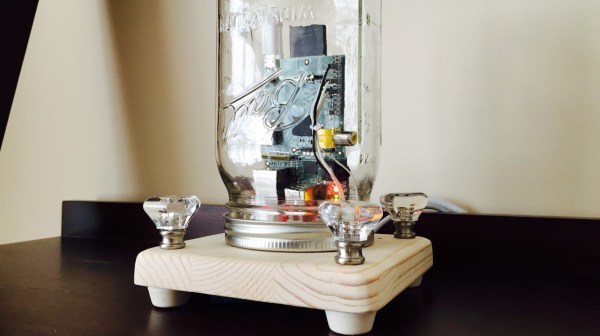
[Matt Reed] used a few off-the-shelf parts and built a Raspberry-Pi based BitTorrent Sync client to help backup files. What makes it stand out is the idea of using a Mason Jar as the enclosure and the nice build finish. Mason Jars have long been used to preserve food. [Matt] wanted to use the Mason Jar to help preserve family memories.

Basically, he just stuffed a Raspberry Pi inside a jar with some LED’s and put BitTorrent Sync on it. He started off with a nice, square piece of wood and mounted the lid on it. Holes were drilled to fix the four LED’s and faux crystal drawer pull knobs. The Pi was connected to power and Ethernet and the LED’s wired up. The software is quite straightforward – just install BitTorrent Sync on the Raspberry Pi. He wrote a Node.js script to constantly check if BitTorrent Sync is transferring any data, and if it is, blink the LED’s so it looks cool. If no data is being transferred, the LED’s just glow solid red. Once it is plugged into power and connected to the internet, any photo or video (or any file for that matter) that is put inside a special folder called “Preserve” on any of his devices, gets sync’ed and copied to the “Raspberry Preserve” – preserved for posterity.

Printed Tentacles For PCB Probing

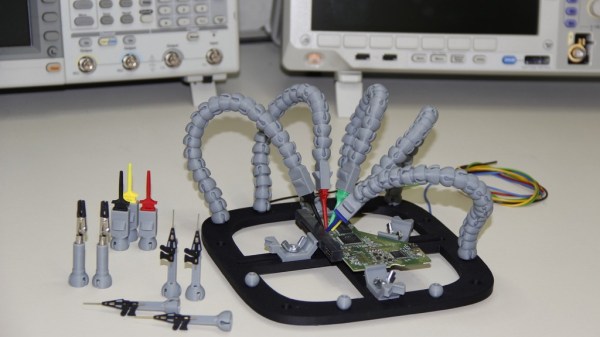
Every hacker workbench has one or more of those “helping hand” devices to aid in soldering and assembly. When it comes to testing and debugging though, it could get tricky if you have to start handling test probes while looking at the meter display or fiddling with knobs on the oscilloscope. Sometimes one has to test a board that has just pads for test points. Or maybe you need to directly probe pins on an IC. Checking multiple signals on I2C, SPI, Serial or USB is not too easy with just two hands. [Giuseppe Finizia] is an electronic engineer at the Scientific Investigations Department of the Carabinieri in Italy. He works as a senior analyst in the Electronic Forensics Unit and deal’s with technical investigations on seized electronic devices. To help him in his investigative work, he designed and built a 3D printed PCB workstation with octopus-like tentacles that provides all the additional fingers needed.

The tool is basically a base with adjustable clamps where the test PCB can be fixed. Around the base, up to twelve articulated “tentacles” can be fixed. Various test accessories are attached to the ends of these tentacles – Alligator Clips for holding electronic parts, IC Hook Clip Grabbers, Micro SMD Grabber Test Clips and some others that he is still working on. [Giuseppe] used  MOI 3D modeling software to design his device, and the files are available on Thingiverse for download. He does warn that printing all the parts, specially the tentacle units, can be quite tricky on a regular 3D printer. He used a ZORTRAX M200 printer in high resolution mode and Z-HIPS filament. However, it may be easier to just use machine shop flexible coolant pipe for the tentacles. This may require some sort of modification to the base mounts and the business end of the tentacles though.

Thanks to [CFTechno] for sending in this tip.