Rheoscopic Holiday Ornaments

We had to look it up on Wikipedia – “Rheoscopic fluid means ‘current showing’ fluid. Such fluids are effective in visualizing dynamic currents in fluids, such as convection and laminar flow. They have microscopic crystalline platelets such as mica, metallic flakes, or fish scales, in suspension in a fluid such as water or glycol stearate.” And so it seems [Will Donaldson] has figured out a great way to Animate Christmas Ornaments using Rheoscopic Fluid, just in time for the holiday season.

Making the fluid is pretty simple, and uses just a few readily available materials – distilled water, rheoscopic fluid concentrate and your choice of food colouring. The hardware is dead simple too – clear, spherical baubles with lids and core-less DC motors such as used in mini and nano drones, to agitate the fluid. You can use cell phone vibration motors too, but [Will]’s experimentation suggests that the level of agitation is not a lot.

To make a bauble, you fill it with the fluid, hot glue the motor to the lid, close the lid such that the motor and its agitator are dunked in the fluid, and dab a generous amount of hot melt glue to seal it all shut. Then, hook it up to a suitable power supply and get enchanted by the mesmerising movements of the rheoscopic fluid in the bauble. The agitator is just a plain ol’ drone propeller forced in to a shape that is narrow enough to be pushed through the neck of the bauble. It’s a seasonal ornament, so don’t expect the motors to last long being submerged in the rheoscopic fluid. [Will]’s contraptions have not yet failed after a couple of days, and it may be safe to estimate that the motors may last about a week or two at most. Of course, YMMV depending on if you used distilled water or plain tap water and other factors.

As [Will] suggests, if you prefer slower swirls, or random agitation, then it’s best to hook up a micro-controller and motor driver for fancy effects. At this point, it may be tempting to think of embedding LED’s inside the baubles, but doing so reduces the rheoscopic effect since it relies on reflecting light shining on it from the outside. The video embedded after the break has all the build details.

It’s a great way to teach some science to the kids during the holidays and maybe even get them to help with the project. And don’t assume this is just a cheap Christmas trick. Artist Paul Matisse has invented an art device/technique based on rheoscopic fluids which he calls “Kalliroscope©”. He patented it in 1968, and has sold Kalliroscope artworks throughout the world since then. From his website “A Kalliroscope is a device for viewing fluid currents. Kalliroscopes are both works of art and intuitively educational displays of the scientific principles of fluid dynamics. They are glass and steel constructions containing a current-visualizing fluid.” We’re not sure how priceless those works of art are, but it’s safe to assume you need deep pockets to buy one. So go ahead, turn your Christmas Tree in to a work of Art !

Continue reading “Rheoscopic Holiday Ornaments”

A Tracker For Radio Sondes

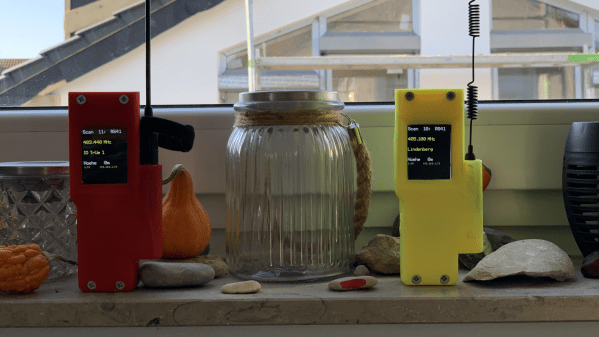
Radiosondes – the telemetry packages carried aloft by sounding balloons for atmospheric weather data measurements – are regularly used by weather bureaus around the world to collect data, and there are quite a number of launches daily. Most of them are in Europe, but they also happen at many locations in North and South America, Japan, and Australia. The balloons burst when they reach a high enough altitude, the radiosonde falls back, and most often there is no effort made to recover them since they are deemed “expendable”. So it’s Finders Keepers, and rich pickings for any hacker who is fortunate enough to grab the fallen radiosondes. For successful recovery, you need to first be able to track those radiosondes, and that’s why leet guy [Robert Stefanowicz aka p1337] built his Weather ballon tracker (sic) project.

The hardware is all off-the-shelf, packaged in a pretty cool 3D printed package designed to make it look like the hand held radio that it is. At its heart is the ESP32 based TTGO T-BEAM V1.0 which has almost everything needed for this project. Add an OLED display, 18650 Li-Po cells, antenna and connectors and you can put it all together in an evening over your favourite beverage.

[DL9RDZ] wrote the software which runs on the T-Beam, available at the RDZ-Sonde repo on Github, that allows hunting these balloons. Setup is straightforward, and you need to fiddle with just a couple of well-explained config parameters. Once connected to your WiFi, config and settings can be accessed via convenient web URL’s and the single user action button on the TTGO offers quick access to different functional modes. At the moment, the software is written to decode signals from the widely used Vaisala RS41, Graw DFM06 and Graw DFM09 radiosondes. This LINK provides details for some of the popular radiosonde models.

Once you’re done building this piece of hunting gear, you’ll need some additional help finding out when and where the launches are taking place. If you’re in Europe, you luck out – there is a live radiosonde tracker map, thanks to the great work done by [Michał Lewiński – SQ6KXY]. If you live else where and know of similar resources, let us know in the comments. As a side note, Wikipedia tells us there are about 1300 launch sites worldwide and twice a day missions, so there’s quite a number of fallen pieces of hardware lying around just waiting to be picked up. At the very least, each will have a GPS module and temperature and humidity sensors that you can recover.

So, what do you do with the recovered radiosondes ? Here’s a tip on a “Fallen Radiosonde reborn as active L-band antenna“. And If you’d like to get the skinny on radiosondes, check out “Radiosondes: getting data from upstairs

Thanks for the tip, [Alex aka MD23F3].

KiCad Action Plugins

The last two years has been a particularly exciting time for KiCad, for users, casual contributors, and for the core developers too. Even so, there are many cool new features that are still in process. One bottleneck with open-source development of complex tools like KiCad is the limited amount of time that developers can devote for the project. Action plugins stand to both reduce developer load and increase the pace of development by making it easier to add your own functionality to the already extensible tool.

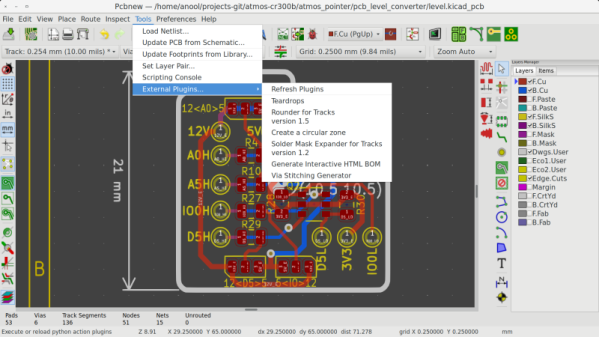
Sometime around version 4.0.7 (correct us if we’re wrong), it was decided to introduce “action plugins” for KiCad, with the intention that the larger community of contributors can add features that were not on the immediate road map or the core developers were not working on. The plugin system is a framework for extending the capabilities of KiCad using shared libraries. If you’re interested in creating action plugins, check out documentation at KiCad Plugin System and Python Plugin Development for Pcbnew. Then head over to this forum post for a roundup of Tutorials on python scripting in pcbnew, and figure out how to Register a python plugin inside pcbnew Tools menu. Continue reading “KiCad Action Plugins”

Sensing, Connected, Utility Transport Taxi For Level Environments

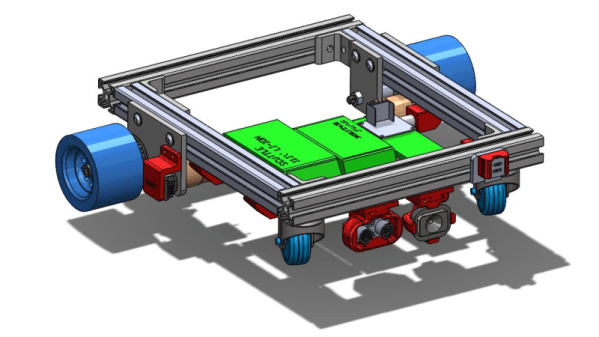
If that sounds like a mouthful, just call it SCUTTLE – the open-source mobile robot designed at Texas A&M University. SCUTTLE is a low cost (under $350) robot designed for teaching Aggies at the Multidisciplinary Engineering Technology (MXET) program, where it is used for in-lab lessons and semester projects for the MXET 300 – Mobile Robotics undergraduate course. Since it is designed for academic purposes, the robot is very well documented, making it easy to replicate when you follow the instructions. In fact, the team is looking for others to build SCUTTLE’s and give them feedback in order to improve its design.

Available on the SCUTTLE website are a large collection of videos to walk you through fabrication, electronics setup, robot assembly, programming, and robot operation. They are designed to help students build and operate the mobile robot within one semester. Most of the mechanical and electronics parts needed for the robot are off-the-shelf and easy to procure and the rest of the custom parts can be easily 3D printed. Its modular design allows you the freedom to try different options, features and upgrades. SCUTTLE is powerful enough to carry a payload up to 9 kg (20 pounds) allowing additional hardware to be added. To keep cost low and construction easy, the robot uses a simple, two wheel drive system, using a pair of geared motors. This forces the robot to literally scuttle in a “non-holonomic” fashion to move from origin to destination in a sequence of left / right turns and forward moves, so motion planning is interestingly tricky.

The SCUTTLE robot is programmed using Python3 running under Linux and has been tested working on either a BeagleBone Blue or a Raspberry Pi. The SCUTTLE software guide is a good place to get acquainted with the system architecture.

The standard configuration uses ultrasonic sensors for collision avoidance, a standard USB camera for vision, and encoders coupled to the wheel drive pulleys for determining position with respect to the starting origin. An optional USB LiDAR can be added for area mapping. The additional payload capability allows adding on extra sensors, actuators or battery packs.

To complement information on the website, additional resources are posted on GitHub, GrabCAD and YouTube. Building a SCUTTLE robot ought to be a great group project at maker spaces wanting to get hackers started with Robotics. We have covered many Educational Robot projects in the past, but the SCUTTLE really shines with its ability to carry a pretty decent payload at a low cost.

Continue reading “Sensing, Connected, Utility Transport Taxi For Level Environments”

Faux Cow Munches Faux Grass On A Faux Roomba

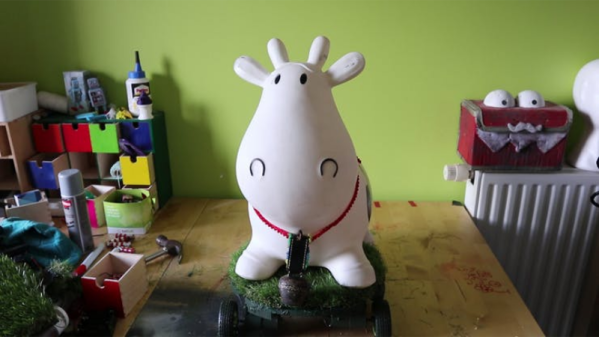
Out in the countryside, having a cow or to two wouldn’t be a big deal. You can have a cattle shed full of them, and no one will bat an eyelid. But what if you’re living in the big city and have no need of pet dogs or cats, but a pet cow. It wouldn’t be easy getting it to ride in the elevator, and you’d have a high chance of being very, very unpopular in the neighbourhood. [Dane & Nicole], aka [8 Bits and a Byte] were undaunted though, and built the Moomba – the Cow Roomba to keep them company in their small city apartment.

The main platform is built from a few pieces of lumber and since it needs to look like a Roomba, cut in a circular shape. Locomotion comes from two DC geared motors, and a third swivel free wheel, all attached directly to the wooden frame. The motors get their 12V juice from eight “AA” batteries. The free range bovine also needs some smarts to allow it to roam at will. For this, it uses a Raspberry Pi powered by a power bank. The Pi drives a 2-channel relay board which controls the voltage applied to the two motors. Unfortunately, this prevents the Moomba from backing out if it gets stuck at a dead end. For anyone else trying to build this it should be easy enough to fix with an electronic speed controller or even by adding a second 2-channel relay board which can reverse the voltage applied to the motors. The Moomba needs to “Moo” when it feels like, so the Raspberry Pi streams a prerecorded mp3 audio clip to a pair of USB speakers.

If you see the video after the break, you’ll notice that making the Moomba sentient is a simple matter of doing “ctrl+C” and “ctrl+V” and you’re good to go. The python code is straight forward, doing one of four actions – move forward, turn left, turn right or play audio. The code picks a random number from 0 to 3, and then performs the action associated with that number. Finally, as an added bonus, the Moomba gets a lush carpet of artificial green grass and it’s free to roam the range.

At first sight, many may quip “where’s the hack” ? But simple, easy to execute projects like these are ideal for getting younglings started down the path to hacking, with adult supervision. The final result may appear frivolous, but it’ll excite young minds as they learn from watching.

Continue reading “Faux Cow Munches Faux Grass On A Faux Roomba”

Robot Allows Remote Colleagues To Enjoy Office Shenanigans

[Esther Rietmann] and colleagues built a Telepresence Robot to allow work at home teammates to have a virtual, but physical presence in the office. A telepresence robot is like a tablet mounted on a Roomba, providing motion capability in addition to an audio/video connection. Built during a 48 hour hackathon, it is a bit crude under the hood and misses out on some features, such as a bidirectional video feed. But overall, it pretty much does what is expected from such a device.

The main structure is build from cheap aluminium profiles and sheets. A Raspberry Pi is at the heart of the electronics hardware, with a servo mounted Pi-camera and speaker-microphone pair taking care of video and audio. The two DC motors are driven by H-bridges controlled from the Pi and an idle swivel caster is attached as the third wheel. The whole thing is powered by a power bank. The one important thing missing is an HDMI display which can show a video feed from the remote laptop camera. That may have been due to time constraints, but this feature should not be too difficult to add as a future upgrade. It’s important for both sides to be able to see each other.

The software is built around WebRTC protocol, with the WebRTC Extension from UV4L doing most of the heavy lifting. The UV4L Streaming Server not only provides its own built-in set of web applications and services, but also embeds a general-purpose web server on another port, allowing the user to run and deploy their own custom web apps. This allowed [Esther Rietmann]’s team to build a basic but functional front-end to transmit data from the remote interface for controlling the robot. The remote computer runs a Python control script, running as a system service, to control the drive motors and camera servo.

The team also played with adding basic object, gesture and action recognition features. This was done using PoseNet – a machine learning model, which allows for real-time human pose estimation in the browser using TensorFlowJS – allowing them to demonstrate some pose detection capability. This could be useful as a “follow me” feature for the robot.

Another missing feature, which most other commercial telepresence robots have, is a sensor suite for collusion avoidance, object detection and awareness such as micro switches, IR / ultrasonic detectors, time of flight cameras or LiDAR’s. It would be relatively easy to add one or several sensors to the robot.

If you’d like to build one for yourself, check out their code repository on Github and the videos below.

Continue reading “Robot Allows Remote Colleagues To Enjoy Office Shenanigans”

DIY Video Microscopy

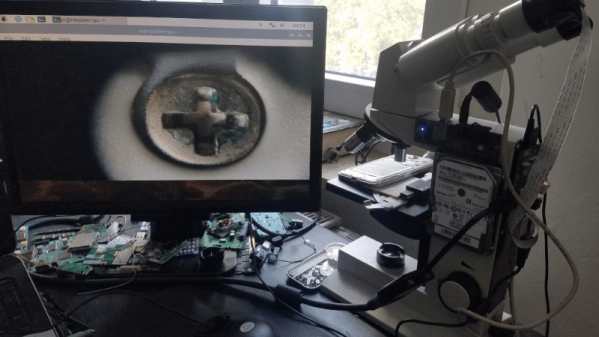
Owning a Microscope is great fun as a hobby in general, but for hackers, it is a particularly useful instrument for assembly and inspection, now that we are building hardware with “grain of sand” sized components in our basements and garages. [voidnill] was given an Eduval 4 microscope by a well-meaning friend during a holiday trip. This model is pretty old, but it’s a Carl Zeiss after all, made in Jena in the erstwhile GDR. Since an optical microscope was of limited use for him, [voidnill] set about digitizing it.

He settled on the Raspberry-Pi route. The Pi and a hard disk were attached directly to the frame of the microscope, and a VGA display connected via a converter. Finally, the Pi camera was jury-rigged to one of the eyepieces using some foam. It’s a quick and dirty hack, and not the best solution, but it works well for [voidnill] since he wanted to keep the original microscope intact.

The standard Pi camera has a wide angle lens. It is designed to capture a large image and converge it on to the small sensor area. Converting it to macro mode is possible, but requires a hack. The lens is removed and ‘flipped over’, and fixed at a distance away from the sensor – usually with the help of an extension tube. This allows the lens to image a very small area and focus it on the (relatively) large sensor. This hack is used in the “OpenFlexure” microscope project, which you can read about in the post we wrote earlier this year or at this updated link. If you want even higher magnification and image quality, OpenFlexure provides a design to mate the camera sensor directly to an RMS threaded microscope objective. Since earlier this year, this open source microscope project has made a lot of progress, and many folks around the world have successfully built their own versions. It offers a lot of customisation options such as basic or high-resolution optics and manual or motorised stages, which makes it a great project to try out.

If the OpenFlexure project proves to be an intimidating build, you can try something easier. Head over to the PublicLab where [partsandcrafts] shows you how to “Build a Basic Microscope with Raspberry Pi”. It borrows from other open source projects but keeps things simpler making it much easier to build.

In the video embed below, [voidnill] gives a brief overview (in German) of his quick hack. If you’ve got some microscope hacks, or have built one of your own, let us know in the comments section.

Continue reading “DIY Video Microscopy”