Raspberry Pi 3 Gets USB, Ethernet Boot

The Raspberry Pi is a great computer, even if it doesn’t have SATA. For those of us who have lost a few SD cards to the inevitable corruption that comes from not shutting a Pi down properly, here’s something for you: USB Mass Storage Booting for the Raspberry Pi 3.

For the Raspberry Pi 1, 2, Compute Module, and Zero, there are two boot modes – SD boot, and USB Device boot, with USB Device boot only found on the Compute Module. [Gordon] over at the Raspberry Pi foundation spent a lot of time working on the Broadcom 2837 used in the Raspberry Pi 3, and found enough space in 32 kB to include SD boot, eMMC boot, SPI boot, NAND flash, FAT filesystem, GUID and MBR partitions, USB device, USB host, Ethernet device, and mass storage device support. You can now boot the Raspberry Pi 3 from just about anything.

The documentation for these new boot modes goes over the process of how to put an image on a USB thumb drive. It’s not too terribly different from the process of putting an image on an SD card, and the process will be streamlined somewhat in the next release of rpi-update. Some USB thumb drives do not work, but as long as you stick with a Sandisk or Samsung, you should be okay.

More interesting than USB booting is the ability for the Pi 3 to boot over the network. Booting over a network is nothing new – the Apple II could do it uphill both ways in the snow, but the most common use for the Pi is a dumb media player that connects to all your movies on network storage. With network booting, you can easily throw a Pi on a second TV and play all that media in a second room. Check out the network booting tutorial here.

Hackaday Prize Entry: Low Cost, DIY Thermal Imaging

A few years ago, thermal imaging sensors – cameras that could see heat – became very cheap. FLIR was going all-in with their Lepton module, and there were a number of clip-on cellphone accessories that gave the computer in your pocket the ability to see infrared.

Fast forward a few years, and you can still buy a thermal imaging sensor for your cellphone, and it still costs about the same as it did in 2013. For his Hackaday Prize project, [Josh] is building a more modern lower cost thermal imaging camera. It won’t have the resolution of the fancy $1000 FLIR unit, but it will be very inexpensive with a BOM cost of about $50.

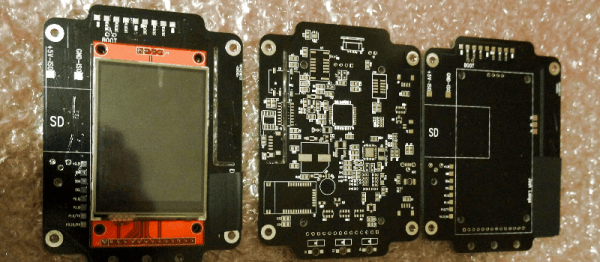
[Josh] is building his low-cost thermal camera around Panasonic’s Grid-EYE module. This thermopile array contains 64 individual infrared sensors, giving this ‘camera’ a resolution of 8×8 pixels. That’s nothing compared to the thousands of pixels found in devices using the FLIR Lepton, but the Grid-EYE is very cheap.

Right now, [Josh]’s build is using an ARM Cortex M0+ and a cheap touch screen LCD he picked up from AliExpress. There’s an optional component to this build in the form of a visible light camera, giving [Josh] the ability to overlay thermal sensor data over a visible light image, just like the fancier, more expensive units.

With a total BOM cost of $44.50, [Josh]’s build is easy on the pocketbook, but still good enough to get some useful information. It’s a great build, and a great entry for The Hackaday Prize.

FCC Reaches Agreement With Router Manufacturers

Last year, the Federal Communications Commission proposed a rule governing the certification of RF equipment, specifically wireless routers. This proposed rule required router manufacturers to implement security on the radio module inside these routers. Although this rule is fairly limited in scope – the regulation only covers the 5GHz U-NII bands, and only applies to the radio subsystem of a router, the law of unintended consequences reared its ugly head. The simplest way to lock down a radio module is to lock down the entire router, and this is exactly what a few large router manufacturers did. Under this rule, open source, third-party firmwares such as OpenWRT are impossible.

Now, router manufacturer TP-Link has reached an agreement with the FCC to allow third-party firmware. Under the agreement, TP-Link will pay a $200,000 fine for shipping routers that could be configured to run above the permitted power limits.

This agreement is in stark contrast to TP-Link’s earlier policy of shipping routers with signed, locked firmware, in keeping with the FCC’s rule.

This is a huge success for the entire open source movement. Instead of doing the easy thing – locking down a router’s firmware and sending it out the door – TP-Link has chosen to take a hit to their pocketbook. That’s great news for any of the dozens of projects experimenting with mesh networking, amateur radio, or any other wireless networking protocol, and imparts a massive amount of goodwill onto TP-Link.

Thanks [Maave] for the tip.

Hackaday Prize Entry: A Visible Spectrophotometer

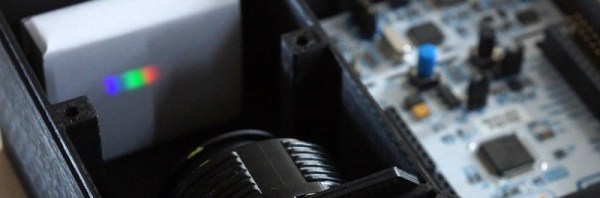
Spectroscopy is one of the most useful tools in all of science, and for The Hackaday Prize’s Citizen Science effort [esben] is putting spectroscopy in the hands of every high school student. He’s built a super cheap, but very good spectrophotometer.

The idea of a spectrophotometer is simple enough – shine light through a sample, send that light through a diffraction grating, focus it, and shine the light onto a CCD. Implementing this simple system is all about the details, but with the right low-cost lenses and a 3D printed enclosure, [esben] has this more or less put together.

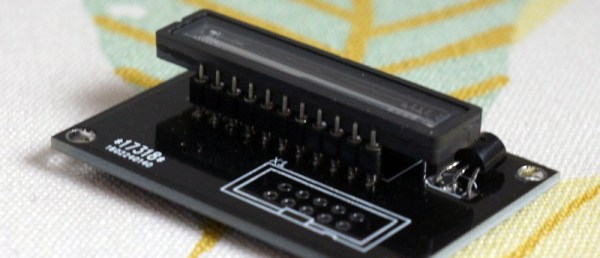
Of course, lenses and diffraction gratings are relatively simple. You need real data, and for this we can turn to another one of [esben]’s projects in the Hackaday Prize. It’s a breakout board for a linear CCD module, able to capture the spectrum coming off a sample with incredible precision. This is how real spectrophotometers are put together, but because of the difficulties in driving a CCD, not many people have put one of these together.

Both of these projects are finalists for in the Citizen Science portion of The Hackaday Prize. That’s an awesome result for what is a complete system for learning about spectroscopy with a device that’s also able to produce some high-quality data, too.

Sniffing Bluetooth Devices With A Raspberry Pi

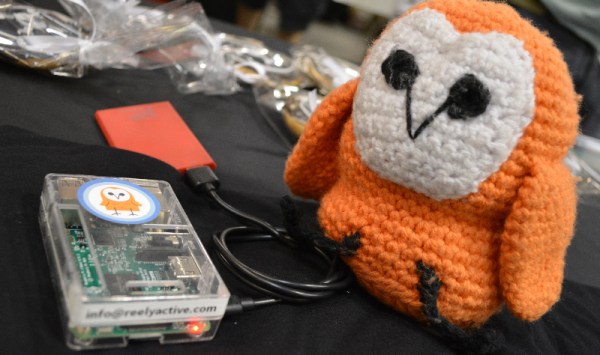
Hackaday was at HOPE last weekend, and that means we got the goods from what is possibly the best security conference on the east coast. Some of us, however, were trapped in the vendor area being accosted by people wearing an improbable amount of Mr. Robot merch asking, ‘so what is Hackaday?’. We’ve all seen The Merchants Of Cool, but that doesn’t mean everyone was a vapid expression of modern marketing. Some people even brought some of their projects to show off. [Jeff] of reelyActive stopped by the booth and showed off what his team has been working on. It’s a software platform that turns all your wireless mice, Fitbits, and phones into a smart sensor platform using off the shelf hardware and a connection to the Internet.

[Jeff]’s demo unit (shown above) is simply a Raspberry Pi 3 with WiFi and Bluetooth, and an SD card loaded up with reelyActive’s software. Connect the Pi to the Internet, and you have a smart space that listens for local Bluetooth devices and relays the identity and MAC address of all Bluetooth devices in range up to the Internet.

The ability to set up a hub and detect Bluetooth devices solves the problem Bluetooth beacons solves — identifying when people enter a space, leave a space, and with a little bit of logic where people are located in a space — simply by using what they’re already wearing. Judging from what [Jeff] showed with his portable reelyActive hub (a Pi and a battery pack) a lot of people at HOPE are wearing Fitbits, wireless headphones, and leaving the Bluetooth on the phone on all the time. That’s a great way to tell where people are, providing a bridge between the physical world and the digital.

Hackaday Prize Entry: A Linear CCD Breakout

Linear CCDs are an exceptionally cool component. They can be used for DIY spectrometers, and if you’re feeling very adventurous, a homemade version of those crappy handheld scanners of the early 90s. Linear CCDs don’t see much use around these parts, though, which makes [esben]’s Hackaday Prize entry very cool. He’s building a breakout to make using these linear CCDs easier.

A linear CCD module looks like an overgrown DIP chip with a glass window right on top of a few thousand pixels laid out in a straight line. The data from these pixels isn’t output as a series of ones and zeros, though: its old school, and the data this CCD produces is analog. This means reading light from one of these modules requires a fast microcontroller with a good ADC.

For this project, [esben] is using a Nucleo F401RE, a development board built around an STM32F4 microcontroller. This processor is fast enough to read the data off its 12 bit ADC, and store all three thousand pixels. Now the problem is getting this data off the microcontroller and onto some storage. With a UART limited to 230kB/s, each ‘frame’ of the CCD takes 300ms to transfer to a computer. [esben] really wishes that could be done a little faster, so he’s trying to hack the DMA controller to do his bidding. It looks like [esben] is on track to make a fast interface for a very common linear CCD, which means more cool tools and toys for all of us.

Hackaday Links: July 31, 2016

Going to DEF CON this week? Getting into Vegas early? We’re having a meetup on Wednesday, in the middle of the day, in the desert. It’s all going down at the grave of James T. Kirk. Rumor has it, the Metrons will abduct a few of us and make us fight to the death on a planet with impossible geology.

The Hara Arena is closing down. The Hara Arena in Dayton, Ohio is the home of Hamvention, the largest gathering of amateur radio enthusiasts in the US. I was there last May, and I can assure you, the Hara Arena has fallen into a state of disrepair. The ARRL reports hamvention will be at a new venue next year. The last scheduled event, after which there will be an auction for venue equipment and furniture, will be on August 27th. It’ll be a comic book and toy show.

Hackaday.io has a log of projects. Some might say it has too many projects. The search is great, but sometimes you just want to look at a random project. That’s the problem [Greg] solved with his Hackaday.io randomizer. It returns a random Hackaday.io project, allowing you to gawk at all the boards and resistors found within.

Primitive Technology is a YouTube channel you should watch. It’s a guy (who doesn’t talk), building everything starting with pre-stone age technology. He built a house with a heated floor, somewhat decent pottery, and this week he entered the iron age. The latest video shows him building a squirrel cage fan out of clay and bark to smelt iron. The ore was actually iron-bearing bacteria, mixed with charcoal and wood ash, and placed into a crude but accurate smelting furnace. The end result is a few bb-sized grains of iron and a lot of melted flux. That’s not much, and is certainly not an accurate portrayal of what was being done 5,000 years ago, but it does mean the Internet’s favorite guy in the woods has entered the iron age while completely skipping over bronze.

Freeside Atlanta says they’re the largest hackerspace on the east coast, and to show off all the cool goings on, they made a walk through video.

Hackaday has a retro edition. It’s a wide selection of Hackaday posts presented in a format without JavaScript, CSS, ads, or any other Web 2.0 cruft. There’s an open challenge for anyone to load the retro site with a 4004 CPU. I know it can be done, but no one has presented evidence of doing it. [Lukas] just sent in his retro submission with a Z80 single board computer displaying some of the page on seven-segment displays. It’s basically a terminal emulator connected to a laptop that does most of the work, but this is the most minimal retro submission we’ve ever received.