Proposed NASA Budget Signals Changes To Space Launch System

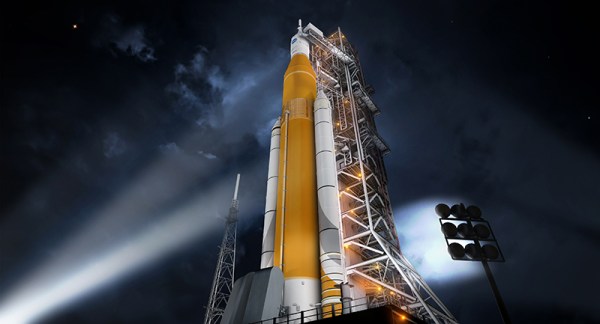
The White House’s proposed budget for 2020 is out, and with it comes cuts to NASA. The most important item of note in the proposed budget is a delay of the Space Launch System, the SLS, a super-heavy lifting launch vehicle designed for single use. The proposed delay would defer work on the enhanced version of the SLS, the Block 1B with the Exploration Upper Stage.

The current plans for the Space Launch System include a flight using NASA’s Orion spacecraft in June 2020 for a flight around the moon. This uncrewed flight, Exploration Mission 1, or EM-1, would use the SLS Block 1 Crew rocket. A later flight, EM-2, would fly a crewed Orion capsule around the moon in 2022. A third proposed flight in 2023 would send the Europa Clipper to Jupiter. The proposed 2020 budget puts these flights in jeopardy.

Continue reading “Proposed NASA Budget Signals Changes To Space Launch System”

Hackers Turn Hard Drive Into Microphone That Can Listen In On Your Computer’s Fan Whine

As reported by The Register, hackers can now listen in on conversations happening around your computer by turning a hard drive into a microphone. There are caveats: the hack only works if these conversations are twice as loud as a blender, or about as loud as a lawn mower. In short, no one talks that loud, move along, nothing to see here.

The attack is to be presented at the 2019 IEEE Symposium on Security and Privacy, and describes the attack as a modification of the firmware on a disk drive to read the Position Error Signal that keeps read/write heads in the optimal position. This PES is affected by air pressure, and if something is affected by air pressure, you’ve got a microphone. In this case, it’s a terrible microphone that’s mechanically coupled to a machine that has a lot of vibrations including the spinning platter and a bunch of fans inside the computer. This is an academic exercise, and not a real attack, and either way to exfiltrate this data you need to root the computer the hard drive is attached to. It’s attacks all the way down.

The limiting factor in this attack is that it requires a very loud conversation to be held near a hard drive. To record speech, the researchers had to pump up the volume to 85 dBA, or about the same volume as a blender crushing some ice. Recording music through this microphone so that Shazam could identify the track meant playing the track back at 90 dBA, or about the same volume as a lawnmower. Basically, this isn’t happening.

The interesting bit of this hack isn’t using a hard drive as a microphone. It’s modifying the firmware on a hard drive to do something. We’ve seen some hacks like this before, but the latest public literature on hard drive firmware hacking is years old. If you’ve got a tip on how to hack hard drives, even if it’s to do something that’s horribly impractical, we’d love to see it.

Panelizing Boards In KiCad

Panelization of printed circuit boards is a very helpful trick for any PCB design tool to have. By panelizing boards, you can get them ready for automated assembly. You can put testing rigs right on the panel. You can combine different boards to reduce your PCB production cost. But Eagle, Fritzing, and KiCad don’t have proper panelization tools, only hacks and third-party tools to get something close to proper panelization. [Flemming] just created a new utility for KiCad that makes multiple copies of a board connected via mouse bites. It’s not complete panelization functionality, but for a lot of us, it’ll be good enough.

The video demo for this utility (try not to click on that because we’re going to blow some bandwidth with this link) starts off by importing a board into Pcbnew, making several copies of the board, arranging these boards to have 3-4mm spacing, and drawing ‘hint lines’ for the script, telling it where the mouse bites should go. The script runs, and boom, mouse bites and a panel.

This is a KiCad specific tool, and we’ve seen other tools for KiCad that make multiple copies of a board. We’ve also seen tools that take raw Gerbers of multiple designs and turn them into a panel. [Flemming]’s efforts are the closest we’ve seen to having all the features you want out of a panelization utility bild exclusively for KiCad.

While this tool will give you a set of Gerbers with multiple copies of a board connected with mouse bites, this is not in any way a complete solution to panelizing PCBs. If you’re panelizing PCBs, you’ll want to add fiducials in the corners of the full panel, which this tool does not allow you to do. You might want to have one complete ‘frame’ as a panel — effectively a rectangular piece of fiberglass that holds all your PCBs — which this tool does not allow you to do. Since you don’t get a frame, it’s impossible to run programming or testing signals to the frame that would be needed for assembly, but not necessary in production. That said, unless you’re going to spend thousand on Altium or use Open tools that have critical flaws such as GerberPanelizer, this is the best option you’ve got.

Finally, An Open Source Calculator

Microsoft has released the code for the Calculator app. This move is the latest in Microsoft’s efforts to capitalize on the Open Source community. Previous efforts have been the Open Sourcing of an extremely old version of DOS, and shoehorning Linux into Windows somehow in a way that’s marginally more user-friendly than spinning up a VM or popping over to your Linux partition. Oh yeah, Microsoft bought Github. Can’t forget that.

The release of the code for the Calculator app means now you too can truly verify all your calculations are correct. To build the Calculator app, you’ll need a Windows 10 computer and Visual Studio. You might think that this is the same code that’s been shipping for 30 years — it’s a simple calculator, right? Not so: the Calculator for Windows 8 had a strange and odd bug where the square root of 4, minus two, did not equal zero. Floating point is hard, kids.

Of special interest to the community, it’s now possible to disable telemetry sent from the Calculator app to Microsoft servers. Yes, the Calculator app knows you forgot how to divide, and wow man, six times nine, you needed help with that?  Fortunately, telemetry can be disabled in developer’s builds by disabling the SEND_TELEMETRY build flag. Now Microsoft won’t know you don’t do math so good.

At the time of this writing, we could not be bothered to contact Microsoft to find out when the pinball game or Ski Free will be updated and Open Sourced.

Twelve Channels Of LEDs Give RRRRGGGGBBBB Light

If you’ve ever searched Mouser or Digikey for LEDs parametrically, you won’t find just one red in your LEDs. You won’t find one green. There is quite literally an entire rainbow of colors of LEDs, and this rainbow goes into infrared and ultraviolet. You can search LEDs by frequency, and an RGEB LED is right at your fingertips. The ‘E’ stands for Emerald, and it’s better than a Bayer filter.

[ayjaym] over on Instructables realized anyone could buy a dozen frequencies of high-power LEDs, and the obvious application for this is to turn it into a tunable light source. The Angstrom is twelve LEDs, all different colors, and all controlled by PWM and piped down a single optical fiber. It’s an RRRRGGGGBBBB LED, ideal for microscopy, forensics, colorimetry, and seeing octoreen.

The heart of this device are twelve 3W star LEDs, with the following wavelengths: 390, 410, 440, 460, 500, 520, 560, 580, 590, 630, 660, and 780 nm. That’s deep red to almost ultra violet, and everything inbetween. These are powered by a 5 V, 60 W power supply, and controlled via a Raspberry Pi with 12 PWM channels in a circuit that’s basically just a bunch of MOSFETs. Proper heatsinking is required.

The impressive part of this build is the optics. A 3D printed mount holds and connects optical fibers and sends them into an optical combiner that is basically just a square acrylic rod. This is output to another optical fiber that will shine on just about anything. A webpage running on a Raspberry Pi sets the PWM channels of all the LEDs, and the resulting output shows up at the end of an optical fiber. It’s great if you want to look at something in a specific frequency of light. It also looks really cool, so that’s a bonus.

This Raspberry Pi Is NASty

A piratebox is a small computer, WiFi adapter, and a hard drive. The idea behind the piratebox is to simply put some storage on a network, accessible to all. It’s great if you’re in a group, need an easy way to share files at the hackerspace, or just want to put a modern twist on a LAN party. [Nick] and [Josiah] came up with their own twist on a piratebox, and this one uses a Raspberry Pi Zero W, making it one of the cheapest pirateboxes around.

The Raspberry Pi Zero W, with its network adapter, has all the hardware required to turn into a capable piratebox, so the hardware for this build is pretty simple. It’s just a USB A plug in the form of a USB Stem and nothing else. The software is available on GitHub and broadcasts a WiFi network named SUBZero. Browsing to 192.168.1.1 on this network allows for uploading and downloading files, all without an Internet connection. It’s a cloud that will fit in your pocket, which we’re calling a ‘fog’ or a ‘mist’ this week. Since this is called the ‘SUBZero’, perhaps ‘pogonip’ is the preferred nomenclature.

Of course no Raspberry Pi project is complete without a 3D printed case, and the SUBZero is no exception. There’s a 3D printed case for this Pi Zero, complete with a sliding door for access to all the ports. You can see a video of that below.

Continue reading “This Raspberry Pi Is NASty”

Engine Turning Aluminum The Easy Way

Engine turning, or jeweling, or guilloché, or a whole host of other names, is the art of polishing a pattern of circles on a piece of metal. You see it on fine watches, and you’ll see it on art-deco metal enclosures. [Ariel] decided to explore this technique and ended up getting good results with a pencil eraser and toothpaste.

The process begins with a piece of aluminum, in this case an aluminum Open Source Hardware logo. The only other required components are a number 2 pencil, some toothpaste, and any sort of rotary tool, in this case a drill press. Toothpaste is spread over the piece to be turned, and a pencil is put in the chuck. It’s just a matter of putting circles on the aluminum after that.

This is, incidentally, exactly how engine turning and jeweling are done in the real world. Yes, the tools are a bit more expensive, but you’re still looking at a somewhat soft tool scraping a fine abrasive into a piece of metal. The trick to engine turning comes in getting a consistent pattern on the piece, something that could easily be done with a CNC machine. If anyone out there feels like putting a pencil in the collet of a CNC router, we’d love to see the results.

Continue reading “Engine Turning Aluminum The Easy Way”