Proposing With A Contra ROM Hack

contra

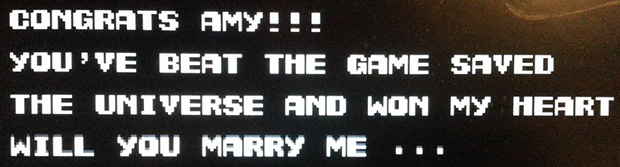
We’ve seen marriage proposals via modified Nintendo games before, but most of these put the proposal just after the first level. It’s one thing to have the old man in Zelda present your SO with a ring, but it’s another thing entirely to beat the game before getting on one knee. That’s what [Quinn] forced [Amy] to do when he proposed by modifying the ROM for Contra to display a proposal right before the end credits.

By tearing open a few cartridges, [Quinn] found himself with a bunch of EPROMs and NES cartridge PCBs. After grabbing the Contra ROM off the Internet, [Quinn] edited the game’s end screen to his proposal. This was then burned onto a 1 Megabit EPROM, soldered onto a cartridge, and put into the NES for his now-fiance to play. Once [Amy] and [Quinn] finished the game (without cheating, by the way), [Amy] saw her proposal and [Quinn] pulled out the ring.

A Variable Capacitor Made From Junk

cap

[Jezan] decided to introduce his son to electronics by building a small crystal radio. These crystal sets have been around for a long time, and make for a great beginner electronics project, but some of the required parts are a little hard to come by. The most difficult to source part for these radios is a variable capacitor, and not finding one in his parts bin, [Jezan] decided to make his own.

This variable capacitor comes directly from a piece of 1.5 mm thick aluminum sheet. Instead of fancy CNC machines, power tools, or even a pair of tin snips, [Jezan] cut the rotors and stators for his variable capacitors with a pair of scissors. The center hole was punched out with a piece of sharpened pipe, and all the pieces were filed down and sanded for a perfect finish.

Considering the variable caps you can get your hands on are either rare or very old, this looks like a great afternoon project for the budding electronics wizard or radio enthusiast. [Jezan]’s craftsmanship is incredible as well and the finished part looks like it came off an assembly line.

Building A Bike For 100 Miles Per Hour

bike


As a kid, [Tom] followed all the automotive land speed record attempts on the Bonneville Salt Flats. The cars used in these attempts were all built by guys in their garages, and as a bicycle frame builder, [Tom] is keenly aware of the land speed record for bikes. One thought leads to another, and [Tom] decided he would see how fast one of his frames could go.

Aside from a gigantic gear for his custom bike, [Tom] also needed a little help from a friend. The current land speed record on a bicycle was done by drafting behind a drag racer. [Tom] doesn’t have a drag racer, or a wide expanse of flat open ground in his native England, so he did the next best thing: drafting behind a Ford Zephyr on an abandoned WWII airstrip.

On the runway, [Tom] was able to get his bike up to 80 miles an hour. Wanting to see how fast he could go in ideal conditions, the bike was taken to the garage, put on a pair of rollers, and measured as it was brought up to speed. With a lot of effort, [Tom] was able to get up to 102 miles per hour, incredibly fast for something powered by human muscle.

Using 30 Year Old Microcontrollers

chips

Like a lot of electronic tinkerers, [Andrew] has a lot of ancient components floating around his parts bin. His latest rediscovery in his cornucopia of components are a few Intel MCS-48 microcontrollers, dating back to 1977. Along with a few old EPROMs, [Andrew] decided it was worth getting these chips running again, if only for a historical curiosity.

[Andrew]’s had a few Intel 8035L microcontrollers on his hands, but this particular model of MCS-48 micros lacks any way to store code. This is where the EPROMs come in. With a modern EPROM programmer, [Andrew] was able to write some code to the extremely common for their vintage 27256 EPROMs. Erasing them, though, does require a UV lamp.

With the ROM programmed and the chips connected, [Andrew] was able to make a simple blinking LED circuit. Sure, it’s the simplest thing you can do with a microcontroller, but [Andrew]’s off to a great start in his explorations of older hardware.

A Keygen For The Rigol 2000-series Scopes

A few weeks ago it came to our attention that Rigol’s DS2000-series oscilloscopes were easily unlocked with a few USB commands. We had expected a small microcontroller device would be developed to send these bits to a scope automatically, and we never imagined the final version of this tool hack would be so elegant. Now it’s possible to unlock a DS2072 o’scope using just a serial number and a great encryption hack.

The engineers over a Rigol (bless their hearts) used the same hardware for the $800, 70MHz DS2072 and the $1600, 200MHz DS2202. The only difference between the two are a few bits in the scope’s memory that are easily unlocked if you have the right key. A few folks over on the EEV Blog forum figured out the private key for the scope’s encryption and the user [cybernet] wrote a keygen.

The upgrade process is extremely simple: get the serial number of your DS2072, put it in the keygen, and enter the resulting key into the scope. Reboot, and you have a $1600 scope you bought for half price.

A Video Game With Custom LCD Characters

LCD

[Nakul] wanted to build a video game, and with a few projects worth of Arduino experience decided he could finally attain his goal. He used a character LCD display to make his game, and instead of a text-based adventure, he went with a graphical side scroller.

The display for this space-based side scroller isn’t a graphical display like a CRT or a graphic LCD. Instead, [Nakul] is using the ubiquitous Hitachi HD44780 character LCD display. Normally these are used to display text, but they all have the ability to display custom 5 by 8 pixel characters. The code puts these custom characters – a spaceship, missile, and barrier – into the display’s memory and uses them as the sprites for the video game.

You can grab [Nakul]’s code over on his git or check out the action videos below.

Continue reading “A Video Game With Custom LCD Characters”

Beating The Heat With Geothermal Cooling

geo

A while back, [Erich]’s oil heating system was due for a few repairs. Given the increasing price of fuel oil, and a few incentives from his Swiss government, he decided to go with a more green heating solution – geothermal heating. The system works well in the winter, but it’s basically useless in the summer. [Erich] decided to put his 180 meter investment to work for the summer heat, and made his geothermal heating system into a cooling system with a fairly low investment and minimal cost.

The stock system works by pumping cold liquid from [Erich]’s under floor heating into the Earth. In winter, the surface is always colder than the ground, thus heating [Erich]’s home. In the summer, the situation is reversed, with the cool earth insulated by the baked surface. All that was required to reverse the heating system was a few slight modifications to the heating controller.

Stock, [Erich]’s heat pump controller doesn’t have the capability to run the system in reverse, so he turned to a Freescale board to turn the compressor off and the pump on. With the additions, [Erich] is using 50 Watts to pump 1.5 kW of heat directly into the Earth below, a fairly efficient cooling system that’s basically free if you already have a geothermal setup.