Wireless Light Bulbs With A Slayer Exciter

slayer rocksWhile playing chiptunes, creating lightning, and illuminating fluorescent tubes with a homebrew Tesla coil is awesome, they’re not exactly the safest electrical devices around, and certainly aren’t easy or cheap to build. There’s another option open if you’d like to play with strong electromagnetic fields; it’s called the Slayer exciter and is simple enough to light a few fluorescent bulbs wirelessly off a pair of 9 Volt batteries.

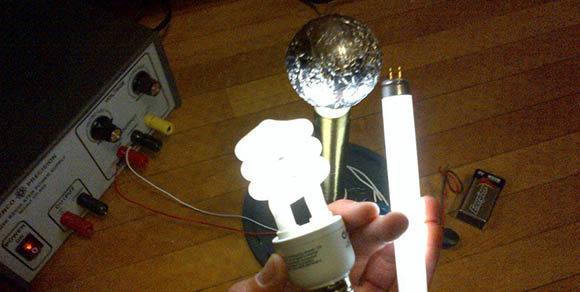
The circuit for the Slayer exciter is extremely simple – just a single power transistor, a few diodes, and a couple of resistors. The real power for this build comes from the custom-wound transformer made from more than 100 feet of magnet wire. After plugging the driver circuit into the transformer’s primary winding and connecting a metal ball (in this case a wooden ball covered in aluminum foil), it’s possible to light up a four Watt fluorescent tube with a pair of 9 Volts.

You can check out a video of the Slayer exciter after the break.

Continue reading “Wireless Light Bulbs With A Slayer Exciter”

Roomba Becomes Data Center Robot

robot

Running a data center takes a lot of work, and even making sure the ambient temperature for hundreds of boxes is in the proper range is an arduous task. When faced with the prospect of installing hundreds of temperature sensors in an EMC data center, [Vivek] had a better idea: put just a few sensors on a robot and drive around the racks. With the right software, it’s a breeze to automate the process and build a near real-time temperature monitoring solution for a huge data center.

The data center robot is based on a iRobot Create, basically a Roomba without a vacuum. Attached to the robot is a netbook, Arduino, and a PVC mast housing three temperature sensors and a USB webcam.

Using the floor of the data center for navigation, the robot canvasses the racks sending temperature data back to a server via WiFi. From there, the temperatures can be graphed to make sure the racks aren’t too hot or too cold.

You can check out a video of the robot in action after the break.

Continue reading “Roomba Becomes Data Center Robot”

A Table Saw To Cut Solar Panels

saw

Steampunker extraordinaire [Jake von Slatt] loves the idea of solar-powered garden lights soaking up the sun’s rays during the day and powering a LED in the evening. Commercially available solar lanterns, as [Jake], you, me, and everyone else on the planet have discovered, are universally terrible and either don’t have solar panels large enough to charge a battery, or only last a year or so. [Jake]’s solution was to make his own solar lanterns and in the process he came up with a great way of cutting his own solar panels.

[Jake] turned to ebay to source 100 3″ x 6″ solar panels for about $30. These are broken panels, factory rejects, but still are able to produce the 0.5 Volts they should. Since these are rather large panels for a solar lantern, [Jake] needed a way to cut these panels into manageable sizes.

To cut the panels, [Jake] made a box to fit a Dremel with a right angle attachment and a port for a vacuum cleaner. There’s a sled for the panels with markings at 40, 80, 75, and 150 mm so the panels can be quickly cut to size with a diamond cutting wheel.

After the boards are cut, [Jake] checks them out with a multimeter to be sure they’re producing the half volt they should. After that, it’s a simple matter of soldering them together and adding them to his solar lanterns.

DIY Forklift For The Home Shop

lift

[Robert] does a fair bit of metal casting, and of course that means carrying around hundreds of pounds of sand, scrap, and other materials. He came up with a great solution to the inevitable back pain: a small, workshop-sized forklift able to carry around a half ton pallet.

In the actual build thread for this forklift, [Robert] goes over the design. The lift is designed to fit inside a 30″ x 7′ door frame, but is more than capable of hoisting hundreds of pounds over the operator’s head. It’s driven by two electric wheelchair motors with power provided by two car batteries. There’s also a clever bit of engineering that went into tipping the forks: instead of a hinge on the mast, [Robert] used a linear actuator on the rear wheels to put the forks at an angle.

It’s a great build, and since [Robert] does metal casting, there’s a whole bunch of custom metalwork that really adds to the build. After the break you can see a video of [Robert]’s forklift transferring a pallet weighed down with 5 gallon buckets from one really high shelf to another. The job doesn’t take long and doesn’t require any lifting, so we’ve got to hand it to [Robert] for this build.

Continue reading “DIY Forklift For The Home Shop”

Build An Eye Tracking Headset For $90

per_white_lines_faint_800

Eye tracking is a really cool technology used in dozens of fields ranging from linguistics, human-computer interaction, and marketing. With a proper eye tracking setup, it’s possible for a web developer to see if their changes to the layout are effective, to measure how fast someone reads a page of text, and even diagnose medical disorders. Eye tracking setups haven’t been cheap, though, at least until now. Pupil is a serious, research-quality eye tracking headset designed by [Moritz] and [William] for their thesis at MIT.

The basic idea behind Pupil is to put one digital camera facing the user’s eye while another camera looks out on the world. After calibrating the included software, the headset looks at the user’s pupil to determine where they’re actually looking.

The hardware isn’t specialized at all – just a pair of $20 USB webcams, a LED, an infrared filter made from exposed 35mm film negatives, and a 3D printed headset conveniently for sale at Shapeways.

The software for Pupil is based on OpenCV and OpenGL and is available for Mac and Linux. Calibration is easy, as seen in the videos after the break, and the results are amazing for an eye tracking headset thrown together for under $100.

Continue reading “Build An Eye Tracking Headset For $90”

Automatic, Custom Eagle Schematics

sch

It’s a simple fact that for every circuit you design, someone else has done it before. If you’re working on a high altitude balloon project, there’s already a project out there with a microcontroller, barometric pressure sensor, and an SD card somewhere out there in a corner of the Internet. Google will only help so much if you want to copy these previous builds, which led [Ben] to come up with a better solution. He took dozens of building blocks for basic digital projects and put them all into one really great interface called HackEDA.

The premise is simple: most electronic projects are just electronic Lego. You connect your microcontroller to a sensor, add in a battery, throw in a few caps and resistors for good measure, and hopefully everything will work. HackEDA takes all those basic building blocks – microcontrollers, power sources, and sensors – and creates a custom Eagle schematic with all the parts your project needs

HackEDA is still very much in beta, so there aren’t a whole lot of building blocks to choose from. That said, being able to generate an Eagle schematic with all the parts necessary for your next project is a boon. With this, all you need for a final circuit board is to create a new board file, hit the autorouter, and spend a half hour fixing whatever mess the autorouter made.

LED Tells You When Your Server Has Melted

LED

One of the benefits of writing for Hackaday is the ability to command at will a legion of readers to descend on unsuspecting web servers. Most of the time a server can handle the load of thousands of connections. On the rare occasion, though, a server is turned into a pile of slag and dross to the satisfaction of us here at Hackaday and to the ire of admins everywhere.

Checking to see if your server is still running or not isn’t terribly interesting, though. [Eric] thought it would be cool to have a proper physical visualization of how busy his server is, and ended up using a blink(1) USB-controllable LED to display his current server load.

The blink(1) is a small, USB controlled RGB LED that can be used as a universal indicator light. [Eric] had the idea of plugging it in to one of his servers and having the brightness of the LED change in response to the load on the server. He did this with a Python script that queries the Google Analytics API and returns a value from 0 to 255 in response to how popular his server was in the last 10 minutes.

Of course, there’s always a chance Hackaday could Slashdot his server. In that case, the blink(1) glows a steady red, alerting [Eric] to his popularity.