Tesla Gun Will Probably Kill Something, Sometime

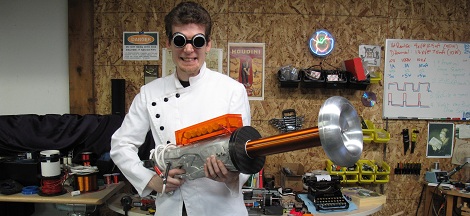
After reading The Five Fists of Science, a retelling of ‘war of the currents’ between [Tesla] and [Edison], [Rob] knew he needed a Tesla gun, the sidearm of the story’s protagonist. Since nothing as stupidly awesome and dangerous as a portable Tesla coil has ever been made, [Rob] needed to make his own.

[Rob] started his build as any good weird weapon build begins: taking apart a Nerf gun. A new Aluminum sand cast body replaced the wimpy plastic body of the Nerf gun and after a few days on a mill, [Rob] had an aluminum Nerf gun perfect for holding the guts of a Tesla coil. The high voltage switch is made of porcelain, and the power supply is an 18 V cordless drill battery and a flyback transformer potted with silicone in a PVC pipe end cap.

[Rob] really has a remarkable build on his hands here, and certainly something no one else has ever tried before. While he hasn’t fired his gun yet, we’re sure we’ll hear about it on the nightly news when he does.

Digital Magic 8 Ball

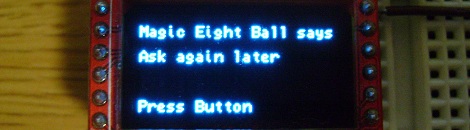
[sjm4306] had a small Magic 8-Ball key chain as a kid. The fluid in this key chain eventually dried up, and if [sjm] is anything like us the 20-sided die is now lost to the sands of time or at the very least hidden in a box in the basement. After remembering the old Magic 8-Ball one day, [sjm] decided to build a digital version of everyone’s favorite bewitched billiard ball.

The digital magic 8-ball uses a PIC16f886; more than enough to hold the twenty possible replies from a real magic 8-ball. The display is a tin 3 cm OLED which surprisingly emulates the ‘icosahedron with raised letters floating in purple liquid’ aesthetic very well.

Right now, this is just a breadboard prototype – there isn’t an accelerometer or tilt switch in the build yet, so shaking the project does absolutely nothing. [sjm] may add that functionality later by turning his project into a watch, key chain, or installing it in a real Magic 8-Ball case.

Reverse Engineering An RGB LED Remote

In the quest to add some mood lighting in his basement, [Mohonri] found an infrared wireless remote that is able to control several RGB LED strips. The only problem with this remote is the inability to control it via a wall-mount panel or even a computer. Obviously this would not stand for such a swank basement, so [Mohonri] did the reasonable thing and reverse engineered one of these remotes.

The build started with ripping the remote apart and figuring out how it ticks. [Mohonri] found the small IR LED transmitter and hooked up an oscilloscope to capture some data. After a bunch of trial and error and a big help from relevant documentation he had the entire button matrix – and thus the functions available to the LED strip – available to output via wall panel or computer.

[Mohonri] hasn’t completed his build yet; this was just the reverse engineering and documentation stage. Now, though, it shouldn’t be hard to control the RGB LED strips through an Arduino, a computer, or even an Android/iOS device with a small IR LED plugged into the headphone jack.

Your Guide To Building A Homebrew 6502 Computer

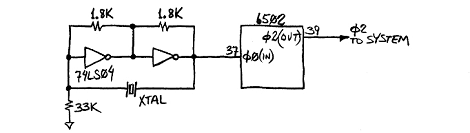
If you’ve ever thought about getting down to bare metal and building a homebrew computer from scratch [Garth Wilson] put up a great primer to the 6502, the same CPU found in Apple ][ computers, BBC Micros, Vic-20s, and the venerable Commodore 64 (a 6510 in the C64, but it’s close enough).

In his guide to building a 6502 computer, [Garth] goes over all the basics – what you want the computer to do, how to decode addresses, and other important technical requirements for getting a homebrew project running.

If that’s not enough, [Garth] directs his readers to the fabulous 6502.org forums  where just about every topic is discussed. The guys on the forum have a standardized I2C pinout for the 6502, allowing noobs to easily connect pre-designed keyboards, displays, and storage devices to their projects. There are a ton of tutorials on the 6502.org site, more than enough to get a homebrew project off the ground.

If you’d like to see what you can do with a homebrew 6502, check out the homebrew projects page featuring a 6502 Nixie clock and CLPD-based 65816 single board computer. There’s a treasure trove of information here, just waiting to be pulled from the vine.

Going From Idea To Schematic To Printed PCB

Building a circuit on a bread board makes life much easier, but eventually you’re going to want a PCB for one of your circuits. Luckily, [Will] from Revolt Lab put up a trio of posts that will take you idea and turn it into a schematic and PCB.

First up is an awesome tutorial on the circuit design program Fritzing. While you won’t find Fritzing on the computer of anyone making a living doing circuit design work – those people usually go for Eagle or KiCad – Fritzing is very easy to use but still has a ton of features. Using Fritzing isn’t very hard, either. [Will]’s tutorial goes over copying your breadboarded circuit into Fritzing, creating a schematic from the bread board layout, and finally converting that to PCB artwork.

Once you have board artwork for your circuit, you’re probably going to want a real-life PCB. [Will]’s board etching tutorial goes over the toner transfer method of PCB creation. Basically, print your circuit onto glossy photo paper with a laser printer, put it face down on a copper board, then take a clothes iron to it. If you’re lucky, the laser printer toner will have transferred to the copper making a nice etch resist. To get rid of all that superfluous copper, [Will] used ferric chloride but a Hydrochloric Acid/Hydrogen Peroxide mix will work just as well.

Before you etch your boards, you might want to thing about building an etch tank that keeps all your slightly dangerous chemicals in one container. [Will]’s etch tank uses a large water container and a few pieces of LEGO to suspend the board in the etch solution. It etches boards a lot faster than laying them face down in a tray, allowing you to go from idea to finished piece a lot quicker.

And So The Deluge Of Resin-based 3D Printers Begins

It looks like 2012 is shaping up to be the year of the resin-based 3D printer. The latest comes from [Michael Joyce] and is called the B9Creator.  Like other resin printers, [Michael] used a DLP projector to cure the print one layer at a time. The layer height is on the order of 100 microns – crazy for a kit-based printer.

There is a  Kickstarter for the B9Creator where kits are available for $2400 USD. Everything is included in this kit, including the DLP projector and a kilogram of resin. $2400 is much more expensive than even the fanciest melted-plastic 3D printer such as a Makerbot or RepRap, but that’s the price you pay for high-quality prints.

Of course this project comes a month after an earlier, similar, and shadier project called the Veloso 3D printer. The B9Creator promises to be open source once all the Kickstarter machines are shipped out, and [Michael] is very open about his designs and his resin formula – an admirable quality in a maker.

You can check out a load of videos of the B9Creater we found after the break.

Continue reading “And So The Deluge Of Resin-based 3D Printers Begins”

3D Sphere Display And Controller

[Nirav] has been working on a spherical display for about a year now, and he just came up with a great way of interacting with this screen: an adjacent reality tracker that rotates the display to match the current orientation of the controller.

Earlier, [Nirav] built an 8-inch sphere display using a few 3D printed parts and a Showwx laser pico projector. The display looked great, but [Nirav] had no way to interact with it. To solve that problem, he put an inertial measurement unit inside a 3d printed model of the globe. The IMU communicates with a computer to read the rotation and orientation of [Nirav]’s controller and adjust the spherical display accordingly.

It’s a very nice build that gets very close to futuristic sci-fi displays. At least now, [Nirav] can interact with the awesome satellite tracking app and continental drift simulation he created.

There’s a bunch of videos [Nirav] put up demoing what his display can do. You can check those out after the break.

via MAKE

Continue reading “3D Sphere Display And Controller”