Oh Boy Do We Want To Ride A Giant Inflatable Robot

We’ve seen videos of people attaching chairs to gigantic welding robots and riding them around the shop, and while that would be fun for a little bit, the joy would be fleeting. Flight simulators built on a Stewart Platform are becoming old hat. Now there’s a new robot we want to ride.

[Saul Griffith] from Otherlab has been working on pneumatic robots for some time now, and he just wrapped up his Ant-Roach build seen above. It’s a 15-foot-long cross between an anteater and a cockroach that’s completely inflatable and can actually walk with the help of an air compressor.

The ‘muscles’ of the ant-roach are fabric actuators that contract when inflated. Of course this makes the mechanics look like something out a biology book, but the robot is still a neat piece of engineering. The ant-roach weighs in at 70 pounds but could probably support a half-ton of riders.

From the videos after the break, we can see that the ant-roach looks a little clumsy when walking. [Travis Deyle] sent in his contribution that details an amazing inflatable robotic arm that can beat any human in an arm wrestling match. Now we can’t wait for a giant anthropomorphized bouncy castle to start lumbering to a children’s carnival.

Continue reading “Oh Boy Do We Want To Ride A Giant Inflatable Robot”

Musical Greeting Card With Minimal Parts

We’re all familiar with those musical greeting cards. Give the Hallmark store $10, and you have a card with a microcontroller inside that plays one of several songs available. [Jarv] was playing around with translating MIDI tracks to square wave songs with an Arduino earlier, so he decided to see how cheaply he could reproduce these musical cards. The resulting build allows him to put any song he wants in his card and costs less than the Hallmark offering.

The circuit is extremely minimal – just an ATtiny 85, a battery holder, and two piezo speakers for two-voice harmony. After soldering up the battery and speakers, [Jarv] needed a way to get music on his chip. For this, he used MuseScore, a music notation program that allows [Jarv] to merge multiple voices together.

Once the sheet music was cleaned up, [Jarv] used his XML2H Python script that takes MIDI data and spits out frequencies and delays. In the end, [Jarv] spent less than $5 on his greeting card – almost cheap enough to start thinking about musical throwies to complement the batteries, LEDs and magnets on our window flashing.

Check out the video after the break to hear [Jarv]’s circuit play the theme from Toy Story.

Continue reading “Musical Greeting Card With Minimal Parts”

Tracking Satellites With An Arduino

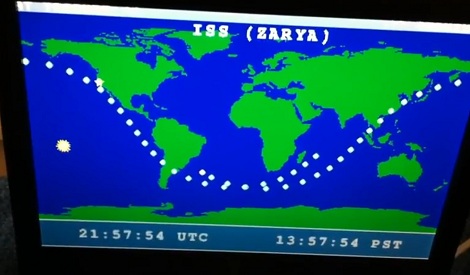
The guys over at brainwagon just finished up ANGST, the Arduino n’ Gameduinio Satellite Tracker, a build that displays 160 different satellites in Earth orbit on any SVGA monitor.

The build is of course based off an Arduino and Gameduino shield. A real-time clock is always needed for a satellite tracker, so a DS1307 RTC is thrown into the mix. The satellite data is stored on a 128KB EEPROM that is big enough to hold 750 different satellites and orbits.

The software side of things is a bit trickier. The guys at brainwagon used [James Miller]’s very popular and very old-school PLAN-13 sat tracking software. This orbit calculation program was published in 1983 and has since been ported from BBC Basic to just about every system imaginable.

Once the ANGST is hooked up and powered on, it reads the real-time clock and calculates the position of a satellite. This is done in real-time and updated every three minutes. On the screen, the last orbit (and a little more) is displayed along with the sun and the location of the ANGST. You might not find something like ANGST at the Space Command at NORAD, but we can’t think of a better way to keep track of the cubesats and spy sats above our heads.

Continue reading “Tracking Satellites With An Arduino”

A Real, Laser-based 3D Display

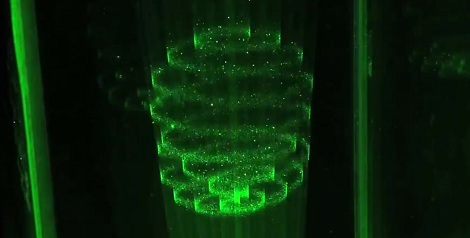
3D display technology is fairly limited. Most 3D displays out there rely on either prisms refracting light from a normal flat-panel display, or shooting lasers into some sort of space-filling device. A few researchers in Japan went with a more unconventional method of making a 3D display that actually lives up to the promises of the displays seen in Star Wars.

From the coverage of this display we’ve found, the green laser demonstration is a scaled-down version that uses water as the display medium. There’s a short clip that shows a red, green, and blue laser projecting a few white voxels into mid-air. The video of both these demonstrations is a bit jumpy, but that’s probably because of the difference in frame rate between the display and camera.

We’re not really sure how the “plasma excitations of air molecules with focused beams” actually work, or even how to control 50,000 of these dots at 15 frames per second. If you’ve got any idea how to build one of these guys, leave a note in the comments.

Continue reading “A Real, Laser-based 3D Display”

Syneseizure Makes Objects Feel Loud

Synesthesia is a mix-up in the wiring of the brain where sensory inputs are perceived differently than what ‘normal people’ usually experience. People with synesthesia can have visual input mapped to aural perception in the mind, or driving along a highway where there’s a recent skunk roadkill can smell ‘loud.’ It’s an interesting way of perceiving the world that’s usually inaccessible to most of the population, but the Syneseizure tries to replicate this way of viewing the world.

There’s a bunch of types of synesthesia (Led Zeppelin feels purple, or apples smelling further away than grapes), but [Greg] and his team needed to choose one subtype to reduce the complexity of their project. They chose mapping visual input to touch sensation. This was accomplished by attaching a dozen speakers to the test subject’s face. A webcam recorded where the subject was looking at and with a Processing sketch, the webcam was reduced to a grayscale 4×3 pixel grid. The intensity of the each pixel corresponded to the strength of buzzing in each speaker. All that was left to do is put a mask over the subject and have them walk around.

The Syneseizure was built for Science Hack Day San Francisco and ended up winning the people’s choice award. There’s a bunch of pics and a great write-up on the project website, so be sure to check that out.

The Cheapest And Easiest 3D Printer We’ve Seen So Far

3D printers are awesome, but boy are they frustrating. If you’ve built a RepRap Mendel, Prusa or Huxely, you know there’s nothing quite like trying to get a washer off of a threaded rod without disassembling the entire machine. This frustration in part sourcing, assembling and correctly aligning a printer is where printers like the Makerbot find their niche. There’s a new printer on the block that promises a 45 minute assembly time and less than 2 hours from starting the build to first print. It will do all this for under $500, electronics and motors included.

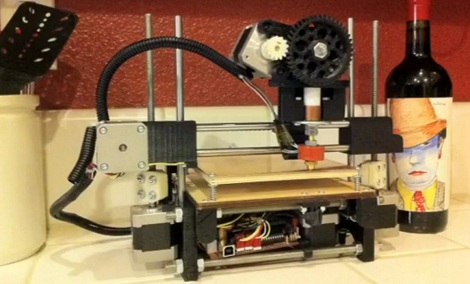
From the Flickr photoset, we can see that the Printrbot has 2 motors for the z-axis, uses sanguinololu electronics, and uses a derivative of Wade’s extruder – all proven design choices. Unlike the RepRaps, most of the frame is actually printed, and not built out of threaded rods. This drastically reduces the assembly and calibration time.

The inventor of the Printrbot, [Brook Drumm], has a Kickstarter up where he’s selling complete kits (electronics, motors and vitamins) for $499. This beats the very inexpensive SUMPOD in affordability. We haven’t been able to find the 3D design files for the Printrbot (although you can buy these printed parts for $75), and there’s no word on the build volume of the stock printer. That being said, the printrbot does have pretty good resolution. Check out the video of a Printrbot in action after the break.

Continue reading “The Cheapest And Easiest 3D Printer We’ve Seen So Far”

Polar Pen Plotter Draws Huge Images Very Slowly

[Euphy] just posted an Instructable of his Polargraph drawing machine that’s able to draw huge images slower than molasses in November. The plotter only uses two stepper motors to control the position of the pen and can be made nearly entirely from salvaged parts – [Euphy] built his for just about £150.

The Polargraph uses two stepper motor on the top corners of a large, flat surface. A weighted pen carriage is attached to both motors with beaded cord that’s often seen in window blinds. By controlling the distance from the carriage to each motor, the position of the pen can be precisely controlled. It’s not a very fast way of drawing an image (check out the real-time video), but it sure is interesting to watch.

There have been a few other rope-and-chain plotters, like Der Kritzler and Hektor. [Euphy]’s work is the is one of the best documented builds we’ve seen, and he’s also put up the code and a website.

We really could have used [Euphy]’s plotter when we wanted to draw some whiteboard art. While we’re out dumpster diving for some small stepper motors, check out the time-lapse video of the Polargraph after the break.

Continue reading “Polar Pen Plotter Draws Huge Images Very Slowly”