22 Miles Straight Up In 90 Seconds

Those little Estes rockets you built as a kid just got blown out of the water.

In response to the Carmack Prize to launch an amateur rocket above 100,000 feet, [Derek Deville] and the rest of the Qu8k team launched a 320 pound, 14-foot-long rocket through 99% of the Earth’s atmosphere.

Unlike our little toy rockets from years ago, more than half of the entire rocket is fuel. This isn’t a plastic or salami-powered hybrid rocket, though. It’s an entirely solid fuel rocket. The fuel grain is specially made for this rocket in a cylinder-with-fins shape that ensures an even burn through the entire flight.

The payload included 2 timers, an accelerometer, a cosmic ray detector (check out the Geiger tube) and 4 GPS units required of the Carmack Prize. The video from the on-board camera shows a fantastic flight, only partially obscured by the plastic aeroshroud that melted when the rocket was going about Mach 3.

Videos of the entire flight and a ‘highlights’ reel are available after the break.
Continue reading “22 Miles Straight Up In 90 Seconds”

Linear Motor Can Be Built From Trash

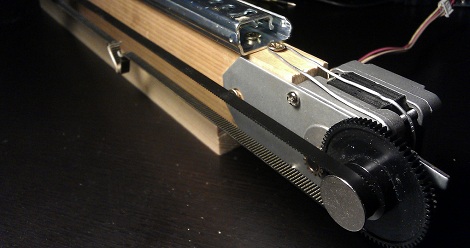
[Raul] built a cheap linear actuator out of a drawer slide and a surplus flatbed scanner.

A few builds we’ve seen, like the PCB drill press or the horribly inefficient thermostat, used linear actuators as key components of their builds. These linear actuators are fairly expensive compared to other parts we usually have lying around so going the homebrew route to reduce costs is always a welcome idea.

The first step of [Raul]’s build is to mount a drawer slide to a piece of wood. A stepper motor is attached to one end of the actuator and a timing belt is strung along the length of the assemblage. After a bracket is connected the drawer slide and the belt, you’ve got a very inexpensive linear motor.

In our days of dumpster diving, we can’t count the number of times we’ve passed up on drawer slides in unwanted furniture. Stepper motors, gear trains and timing belts from old ScanJets can be found for pocket change any day of the week. For cheap and accurate linear motion, we couldn’t come up with a build that does better than [Raul]’s.

Improving A Cheap Espresso Machine

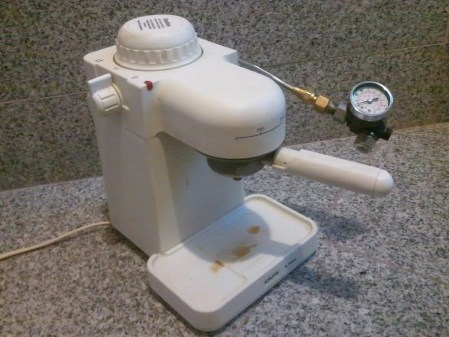
For those of us that would like a good cup of coffee but don’t want to put up with the ‘burnt butt’ taste of Starbucks and don’t have a decent coffee shop nearby, we’ve had very few options. Most of us have been made to suffer with an el-cheapo espresso machine. [Joe] sent in a great build that improves these el-cheapo models and brings them up to the quality we would expect from their more expensive brethren.

For the best pull from an espresso machine, the great [Alton Brown] says 200° F water must be forced through the grind at around 10 PSI atm. [Joe]’s espresso machine can’t build up pressure because the heating element is only active when the lever is in the ‘brew’ or ‘froth’ position. To build up pressure in the water reservoir, [Joe] simply added a pressure gauge to the frothing attachment. When the gauge reads the necessary 10 atmospheres, just move the lever over to the ‘brew’ position and enjoy a nice cup of espresso.

[Joe] has already tested the pressure relief valve of his espresso machine. With the gauge in the way, [Joe] can’t make use of his frother, but a secondary valve could easily remedy that. [Joe] hasn’t published his espresso hack anywhere, but he did email us some pics of his build. We’ve embedded them as a slideshow after the break. Check out the pressure gauge on the frothing attachment and the pressure relief valve below.

Continue reading “Improving A Cheap Espresso Machine”

Structured Light 3d Scanner

After futzing around with a cheap pico projector, a webcam and a little bit of software, [Jas Strong] built herself a 3d scanner.

In spite of the dozens of Kinect-based scanner projects, we’ve seen structured light 3d scanners before. This method of volumetric scanning projects a series of gradient images onto a subject. A camera captures images of the patterns of light and dark on the model, math happens, and 3d data is spit out of a computer.

[Jas] found a Microvision SHOWWX laser pico projector on Woot. The laser in the projector plays a large part in the quality of her 3d models – without a focus, [Jas] can get very accurate depth information up close. A Logitech webcam modified for a tighter focus handles the video capture responsibilities. The software side of things are a few of these structured light utilities that [Jas] melded into a single Processing sketch.

The results are pretty remarkable for a rig that uses woodworking clamps to hold everything together. [Jas]’ 3d model of her cat’s house looks very good. She’s got a few bugs to work out in her setup, but [Jas] plans on releasing her work out into the wild very soon. We’ll update this post whenever that happens. made her code available here. The code requires the ControlP5 and PeasyCam libraries.

Sustainability Hacks: Wind Turbine Generator

With a little bit of thought put into the build, a wind turbine generator can be one of the greenest ways to generate electricity. Wind power doesn’t require a semiconductor fab lab (unlike solar panels) and doesn’t have very many environmental consequences (unlike hydro power). The Tech Junkies put up a build log of a wind turbine that ended up being a very easy build.

In the interests of sustainability, The Tech Junkies found an old 1.5 HP DC treadmill motor. After measuring the voltage output when the motor was connected to a lathe, they discovered the power output was very linear. With a little bit of calculations, they realized they needed about 1000 RPM to get 20 Volts out of the motor. The team connected an inverter (it’s always cool seeing a power meter run backwards) and started fabricating the blades.

The team found a wealth of info on blade design on this site and following a few guidelines made six blades out of 8″ diameter PVC pipe. An aluminum hub was fabricated and the whole shebang was put on top of a found steel frame.

The Tech Junkies’ build produces 10 Watts of power but they’re looking to increase that to 500 W with the appropriate gearing. A great build that harkens back to this awesome webpage about turbine building and living off the grid.

Win A Laser Cutter By Playing With Light

Buildlounge and Full Spectrum Laser have decided to give away a laser cutter to whoever comes up with the best project involving light.

The contest is in part sponsored by  adafruit industries. The focus of the contest is light – just design something around light, submit it, and you’re in the drawing for your own laser cutter. A solar oven, photophone, solar fiber-optic lighting and hacking apart an old overhead projector are suggested on the contest page, but the winning project will probably be much cooler.

Entries are due by January 1st. First prize is Full Spectrum Laser’s 40 Watt laser cutter, second is an awesome green laser pointer from Wicked Lasers, and third prize is an EL wire starter kit from Adafruit. Entries are due by January 1st, so we expect to see a lot of awesome submissions on the Hack A Day tip line between now and New Years.

Playing Dubstep On Real Instruments

When we first saw the live cover of Skrillex Scary Monsters And Nice Sprites by the band Pinn Panelle, we had to know how a band is able to play live dubstep on real instruments. We emailed the band and they spilled the beans on how to process the hell out of an instrument in a live environment.

First up is the bassist, [Nathan Navarro]. He wears a Source Audio Hot Hand on his right thumb. This little box is a two-axis accelerometer that communicates with his pedal board using RF frequencies. With the Hot Hand, he has control over two parameters on Hot Hand Pedals. The envelope effect is awesome, but it’s worth noting that [Nathan] is sponsored by Source Audio. We’re thinking it would be relatively easy to cram a Wii MotionPlus and microcontroller into a wristband. Tied to a computer and MIDI interface, the homebrew solution would do the same thing.

[Derek Song] is the guitarist and he’s used multieffects for most of his musical life He has a small Bluetooth keyboard and touchpad mounted to the front of his guitar that controls just about everything on his pedal board. The Bluetooth controller sends commands to [Derek]’s computer that outputs MIDI CC messages to his pedal board.

In a studio, Pinn Panelle’s cover would be impressive. The fact that it’s being played live opens up a number of doors as to what a band can do in real-time. If you’ve got a pedal board or electronic music build, send it into the tip line. Also, check out the videos after the break for a better demo of [Derek]’s Bluetooth setup.

Continue reading “Playing Dubstep On Real Instruments”