Some Of The Many Ways To Build AM Transmitters And Receivers

AM radios are relatively simple devices, and building one is a good way to start exploring the world of radio communications. [GreatScott] does exactly this in the video after the break, building both a transmitter and receiver.

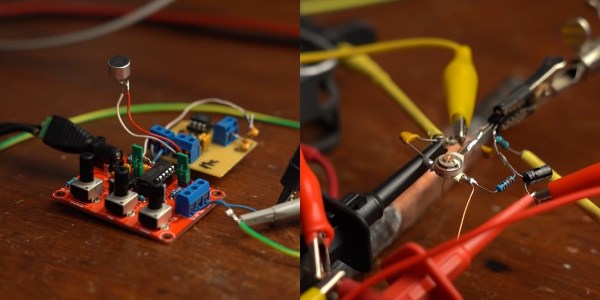
At the most basic level, AM radio works by generating a carrier wave with an oscillator, and then modulating the amplitude with an audio signal. Around these parts, the venerable 555 timer is always brought up whenever things get to oscillating; so you’ll no doubt be happy to see [GreatScott] decided to give it a shot for his first experiments, testing two popular 555 transmitter circuits. One uses the control voltage pin to input the audio signal, while the other uses the reset pin. The CV-pin version worked slightly better, but it was still just barely possible to distinguish a voice over a standard commercial AM/FM receiver.

The next attempt was with a XR2206 function generator kit, which worked quite well when combined with a simple microphone amplifier circuit. But this time the receiving side was swapped out, as [GreatScott] built a basic circuit around a TA7642 AM amplifier/demodulator IC, with only six passive components and a hand-wound coil.

There is no shortage of ways to build AM radios, and we’ve covered quite a few over the years. Off course a 555 timer can also be used in a receiver, and building transmitters using only discrete components is quite simple, as demonstrated by the 10-minute transmitter and single transistor transmitter.

Continue reading “Some Of The Many Ways To Build AM Transmitters And Receivers”

Fat Tire Bike Turned Hubless

Bicycle wheels have looked pretty much the same for over a century, and for very good reason: It works. [The Q] decided to ignore reason for a bit and focus on looks, so he built a fat tire bike without any hubs or spokes.

To make this work, he fabricated two sets of ring shaped “hubs” about the size of the rims, with a series of ball bearings around the circumference for the rims to roll around. The original forks were cut short and welded to a set of brackets that bolt to new hubs. This further complicates the back end as there’s nowhere to attach the sprocket cassette. The original rear hub, cassette and disc brake was moved to the inside of the frame. This drives the rear wheel using a second chain attached to a large ring sprocket mounted directly on the rim. The front brake was simply eliminated.

While this new design won’t be taking on existing bicycles, we doubt practicality was a priority in the build. It’s definitely a head turner, and we can’t help but see an opportunity to go even further and build a TRON bicycle.

Just recently, [The Q] turned another fat tire bike into an all-wheel-drive extreme off-roader. For another pedal-powered head turner, check out the strandbeest bicycle.

Mechanically Multiplexed Flip-Dot

Flip dots displays are timeless classics, but driving the large ones can quickly turn into a major challenge. The electromagnets require a lot of current to operate, and the driver circuits can get quite expensive. [James Bruton] wanted to build his own, but followed a bit of a different route, building a mechanically multiplexed flip dot (ball?) display.

Each of the dots on [James]’ 5×3 proof of concept is a bistable mechanical mechanism that can either show or hide a ping pong ball sized half sphere. Instead of using electromagnets, the dots are flipped by a row of micro servos mounted on a moving carriage behind the display. The mechanism is derived from one of [James]’ previous projects, a mechanical multiplexer. Each dot mechanism has a hook at the back of the mechanism for a servo to push or pull to flip the dot. A major disadvantage of this design is the fact that the servo horn must match the state of the dot before moving through the hook, otherwise it can crash and break something, which also reduces the speed at which the carriage can move.

This build was just to get a feel for the concept, and [James] already has several ideas for changes and improvements. The hook design can certainly change, and a belt drive would really speed things up. We think this mechanical display is a very interesting design challenge, and we are interested to hear how our readers would tackle it? Let us know in the comments below.

Recently we covered a 3D printed flip dot display for the first time. It’s still small and [Larry Builds] is working out the kinks, but we would love to see it eventually match the mesmerising effect of Breakfast’s large installations.

Bungee And Cam Assisted Actuator For OpenDog

One of the challenges of many walking robot designs is the fact that they draw current just to stay upright. This was exactly the case for one [James Bruton]’s quadruped robots, where the knee motors were getting too hot to touch. Adding springs to take some of the load is not as simple it might seem, so [James] created a bungee assisted cam mechanism to do the job.

For a normal spring-loaded lever, force is proportional to how much the spring is stretched, which will require the actuators to draw more and more current as it lifts the leg higher. For the spring force to remain constant throughout the range of motion, the length of the lever arm must become continuously shorter as the knee is bent.  [James] did this by stretching a bungee cord around a cam. The added bulk of the cam does however cause the knees to knock into each other in some scenarios, but [James] plans to adjust the robot’s gait to avoid this. He didn’t get around to actually measuring the current draw reduction, but the motor temperature has dropped significantly, only being slightly warm after a test run.

These tests were done with OpenDog V2, but [James] is already working on the design of V3, which will use 3D printed cycloidal gearboxes. At the moment, that build is still being delayed thanks to the global component shortage. Continue reading “Bungee And Cam Assisted Actuator For OpenDog”

A Massive Modular Smartwatch To Match Your Sci-Fi Fantasies

Modern smart watches have some incredible features, but they still don’t stack up to what science fiction promised us, both in size and capabilities. Fortunately, [Zack Freedman] has set out to change that with the Singularitron, a modular wearable computer that is less Apple Watch and more Pip-Boy.

The most striking features of this monstrosity is its size and the out-of-production four-line VFD display. The inputs consist of a row of large RGB-illuminated buttons and a rotary encoder mounted at an angle to curve around the wearers arm. On the inside are a pair of PCBs with an integrated Teensy 3.2, BLE module, motion processing module, haptic driver and power circuitry drawing from a removable 18650 battery. The armband is from a commercial wrist mounted barcode scanner which attaches to the Singularitron with a quick-detach mount.

A major feature of the Singularitron is its modularity. Arrayed around its edges are four slots with spring-loaded contacts for add-on modules. Modules have access to the SPI and I2C busses, two GPIO pins, 3.3 V and 5 V lines. Each module also contains an EEPROM chip to store the module’s ID and any configured settings, allowing modules to be hot swapped and automatically recognised. [Zack] has created a number of modules, like a laser pointer, environmental sensor, OLED display and a Teensy 4.0 to blink an LED. When a module is plugged or inserted, a series of randomly generated status messages flash across the display, thanks to an awesome little library which we are absolutely copying for our own projects. Ironically, keeping the time is one of the Singularitron weak points, since [Zack] wasn’t able to fit a backup battery inside, so the time needs to be reset when the battery dies. Maybe a module with an RTC and backup battery is the perfect solution. Continue reading “A Massive Modular Smartwatch To Match Your Sci-Fi Fantasies”

Ham Radio Traffic Logger Using A Bug In Baofeng Electronics

A Baofeng radio is often one of the first purchases a new ham radio operator makes these days due to the decent features and low price tag. They are far from perfect, but with a bit of creative inspiration, it’s possible to make the quirks work in your favor. By taking advantage of a loud pop on the earphone outputs whenever the LCD backlight turns on, [WhiskeyTangoHotel] built a radio traffic counter using an ESP8266.

Whenever there is a transmission on one of the frequencies the radio is tuned to, the backlight turns on. Connecting the audio output to an oscilloscope, [WhiskeyTangoHotel] measured a 5V spike whenever this happens. Using a pair of diodes in series to drop the voltage to a safe level, the ESP8266 detects the voltage spike and updates a Google spreadsheet with the timestamp via IFTTT.

This gave [WhiskeyTangoHotel] empirical data on how much traffic passes through the local VHF repeater, but we wouldn’t blame them if the hack itself was the real motivator.

Of course, this would also be a perfect application for the RTL-SDR, which should allow you to do the above and much more, all in software. Add a bit of AI and you can even extract the call signs. The RTL-SDR is also a good tool for learning about RF modulation.

UV5-R image via PE1RQM

Automated Sentry Turret For Your Secret Lab

There are few things as frustrating when you’re trying to get some serious hacking done than intruders repeatedly showing up without permission. [All Parts Combined] has the solution for you, with a Kinect-based robotic sentry turret to keep them at bay.

The system consists of a Microsoft Kinect V2 connected to a PC, which runs an app to do all the processing, and outputs the targeting information to an Arduino over serial. The Arduino controls a simple 2-axis servo mount with an electric airsoft gun zip-tied to it. The trigger switch is replaced with a relay, also connected to the Arduino.

The Kinect V2 comes with SDKs that really simplify tracking human movement, and outputs the data in an easy-to-use format. [All Parts Combined] used the SDK in Unity, which allows him to choose which body parts to track. He added scripts that detect a few basic gestures, issues voice commands, and generates the serial commands for the Arduino. The servo angles are calculated with simple geometry, using XY coordinates of the target received from the SDK, and the known distance between the Kinect and turret. When an intruder enters the Kinect’s field of view it immediately starts aiming at the intruder’s heart, issues a “Hands Up!” command, and tells the intruder to leave. If the intruder doesn’t comply, it starts an audible countdown before firing. [All Parts Combined] also added a secret disarming gesture (double hand pistols), which turns the turret into an apologetic comrade. All it needs is a Portal-inspired enclosure.

It’s a fun project that illustrates how the Kinect can make complex computer vision tasks relatively simple. Unfortunately the V2 is no longer in production, having been replaced by the more expensive, developer focused Azure Kinect. We’ve covered several Kinect-based projects, including a 3D room scanner and a robotic basketball hoop.

Continue reading “Automated Sentry Turret For Your Secret Lab”